Windows VM Setup
This document is based on cookbook that provides a set of recipes that enable you to quickly deploy ADDI with guidance and recommendations.
ADDI requires as dependencies third party applications. Several recommendations and suggestions in terms of version to be used will be presented in this document (see prerequisites).
Working with recommended versions and making sure all prerequisites are met will most likely guarantee a successful deployment of ADDI.
Java Runtime Environment
Before you install Java:
Make sure that there are no other Java versions installed on the VM or any other versions of Java have been uninstalled. Failing to do so might result an unexpected IBM ADDI behavior.
To check the installed Java version, complete the following steps:
- Right-click the Start menu.
- Choose the Terminal option.
- Run
java -versionin the command line.
java --version
- Check the Java version that is displayed in the terminal window.
After you successfully install Java:
Complete the following steps to make sure that your Java is properly configured:
- Click the Start menu on Windows system.
- Type “advanced" in the search bar and then select View advanced system settings from the search results.
- Click Environment Variables on the Systems Properties window.
- Check and make sure that you have the correct
JAVA_HOMEsystem variable (it should be OK by default) in the System variables list.
- Important: Set the path to the Java installation folder in the System variable list to include the bin folder as in this example,
C:\Program Files\Java\jdk-11.0.13\bin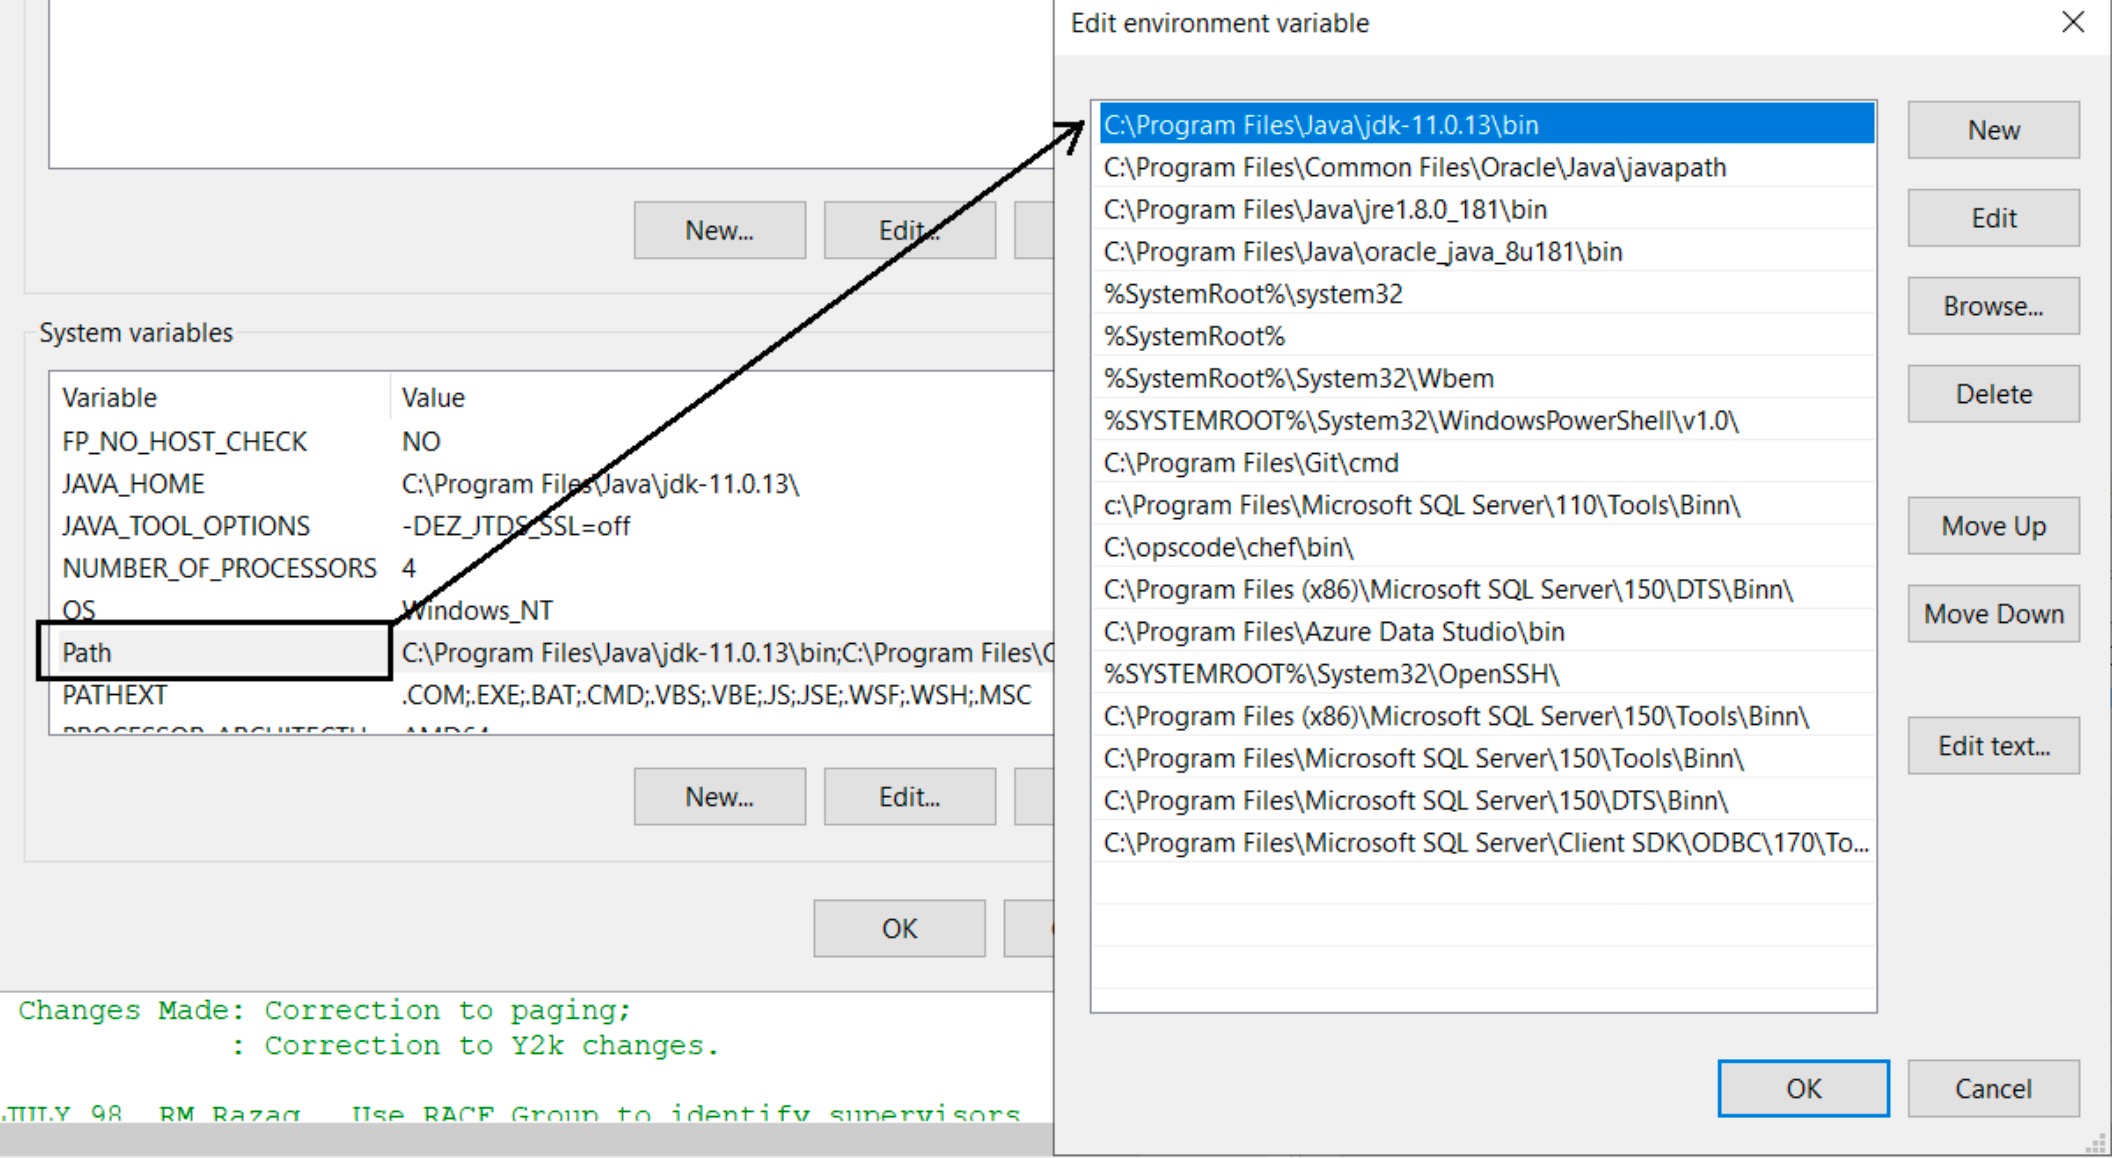
- Add the following variables in the System variables list as shown in the following screen capture:
- Variable name:
JAVA_TOOL_OPTIONS - Variable value:
-DEZ_JTDS_SSL=off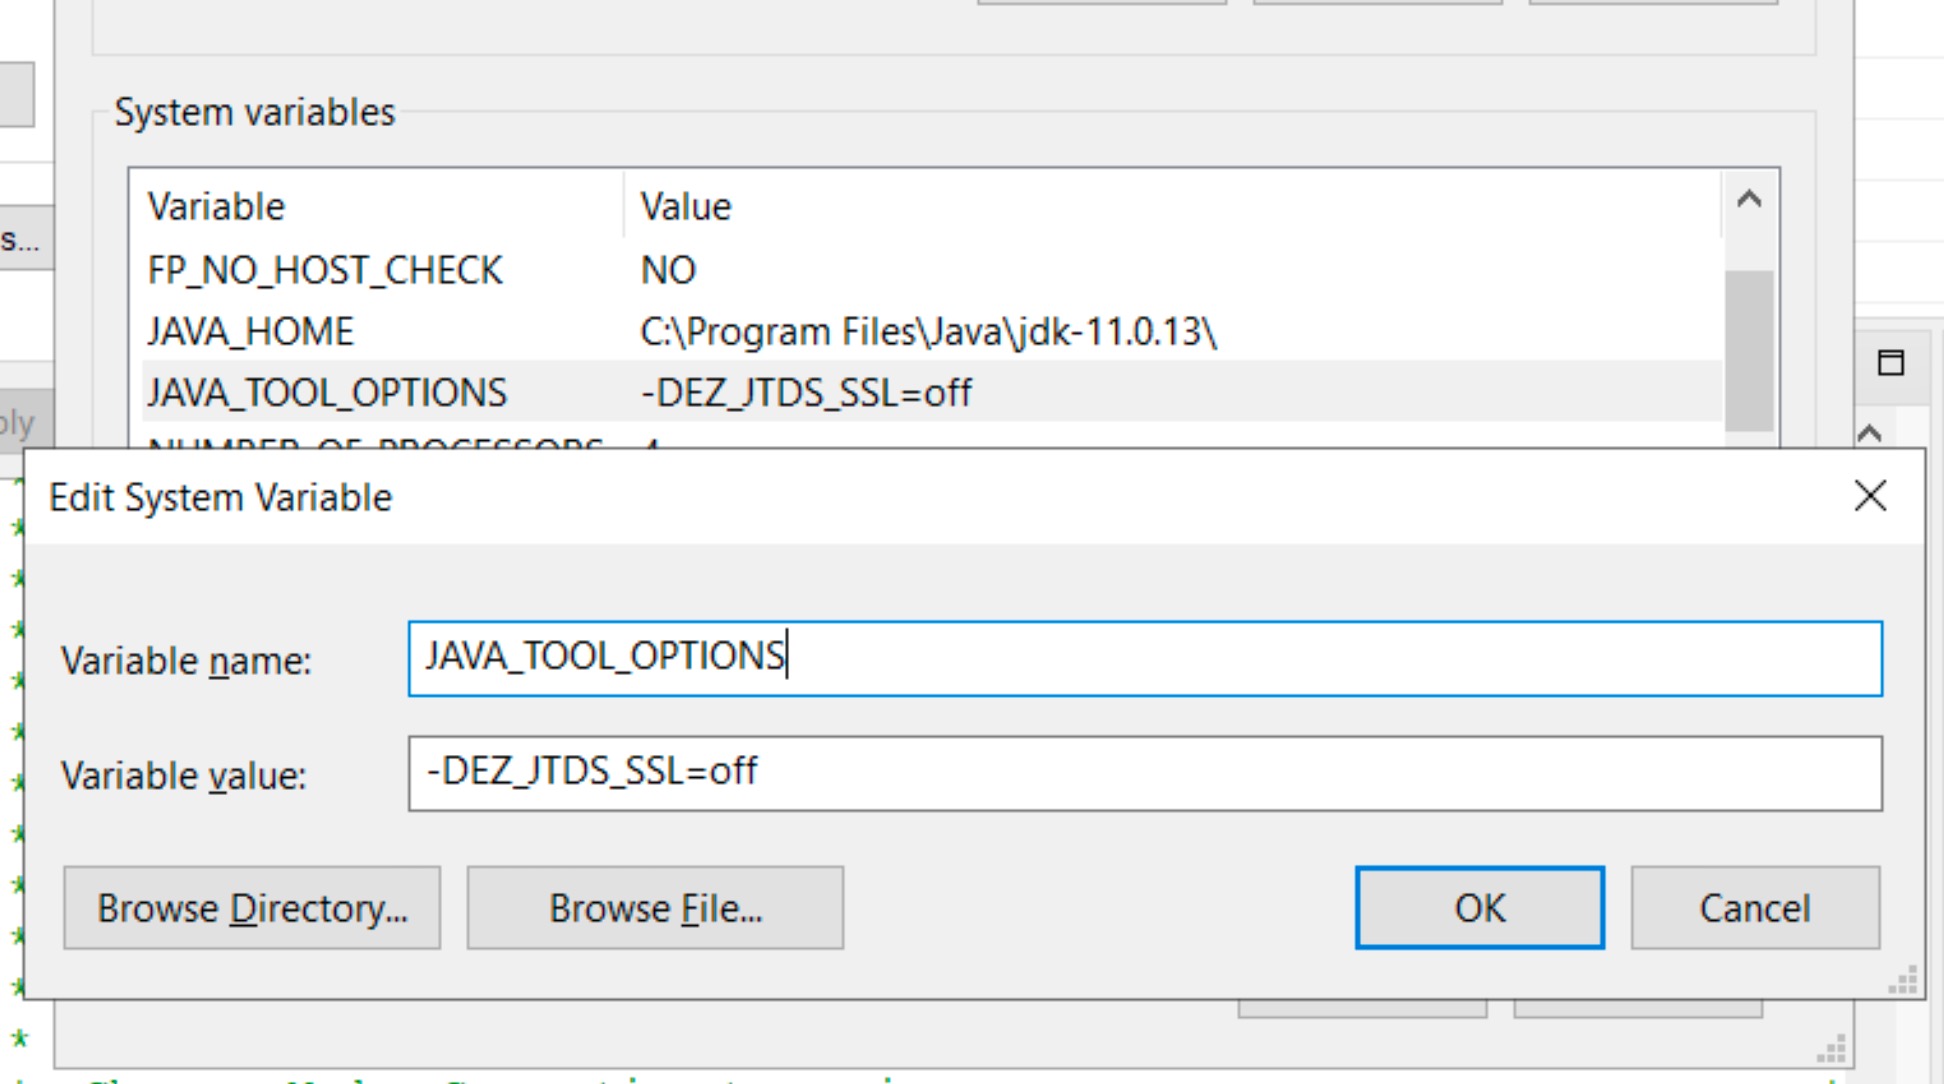
- Variable name:
Microsoft SQL Server Configurations
Recommendations from Original Cookbook
Recommended SQL server version is SQL Server 2019
- Make sure that Microsoft SQL Server instance is configured with a case-insensitive (CI) collation.
- Important: IBM ADDI does not support the Microsoft SQL Server instance's collation Latin1_General_CP1254_CI_AS.
- Make sure that Microsoft SQL Server Agent service is started.
Recommendations gathered from install experience
- SQL Server Express 2019 or 2022 will work for practice and quick projects
You may need to expose port 1433 for SQL Server
Installation steps
- Run the installer you've downloaded.
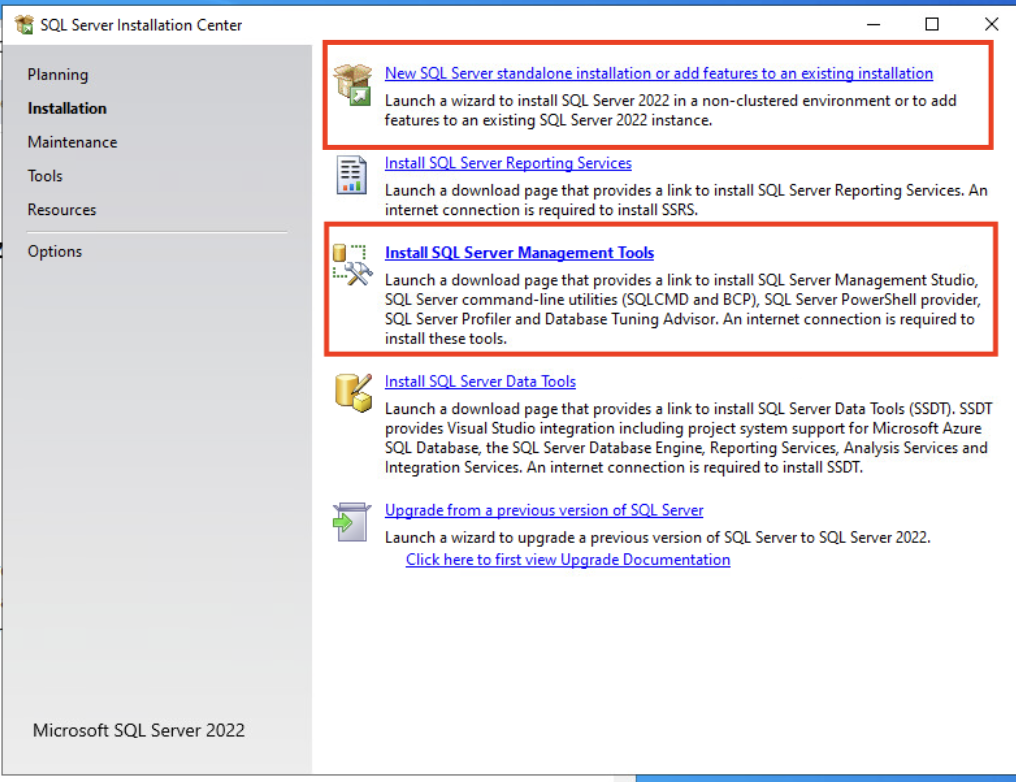
- Select the first option on the wizard to install SQL Server.
- Then select the third option on the wizard to install SQL Server Management Studio. or go directly to the webpage.
Setting up an SQL user account:
The SQL user account must have the privilege to create database, create/delete/update table, create/delete/update index, and execute sql clause.
Complete the following steps to set up an SQL user account:
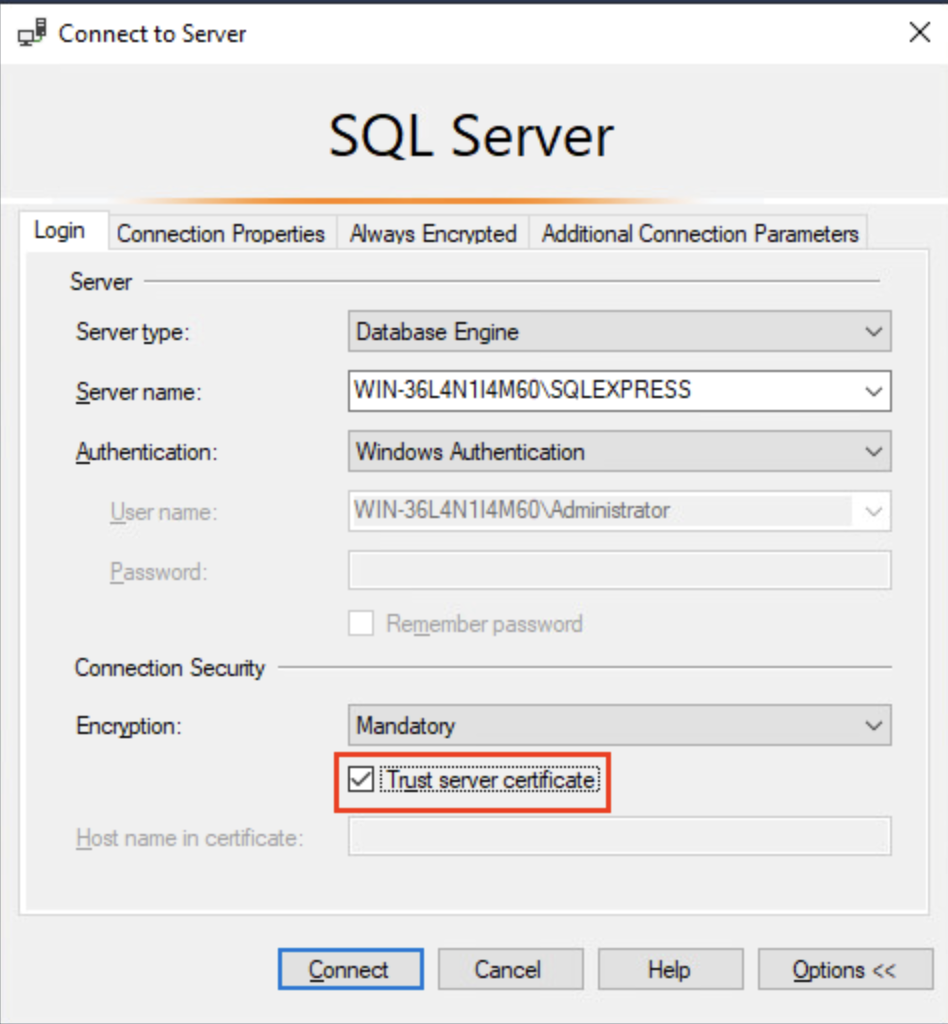
- Start SQL Server Management Studio.
- On the connection screen, make sure to select the "Trust the certificate" checkbox.
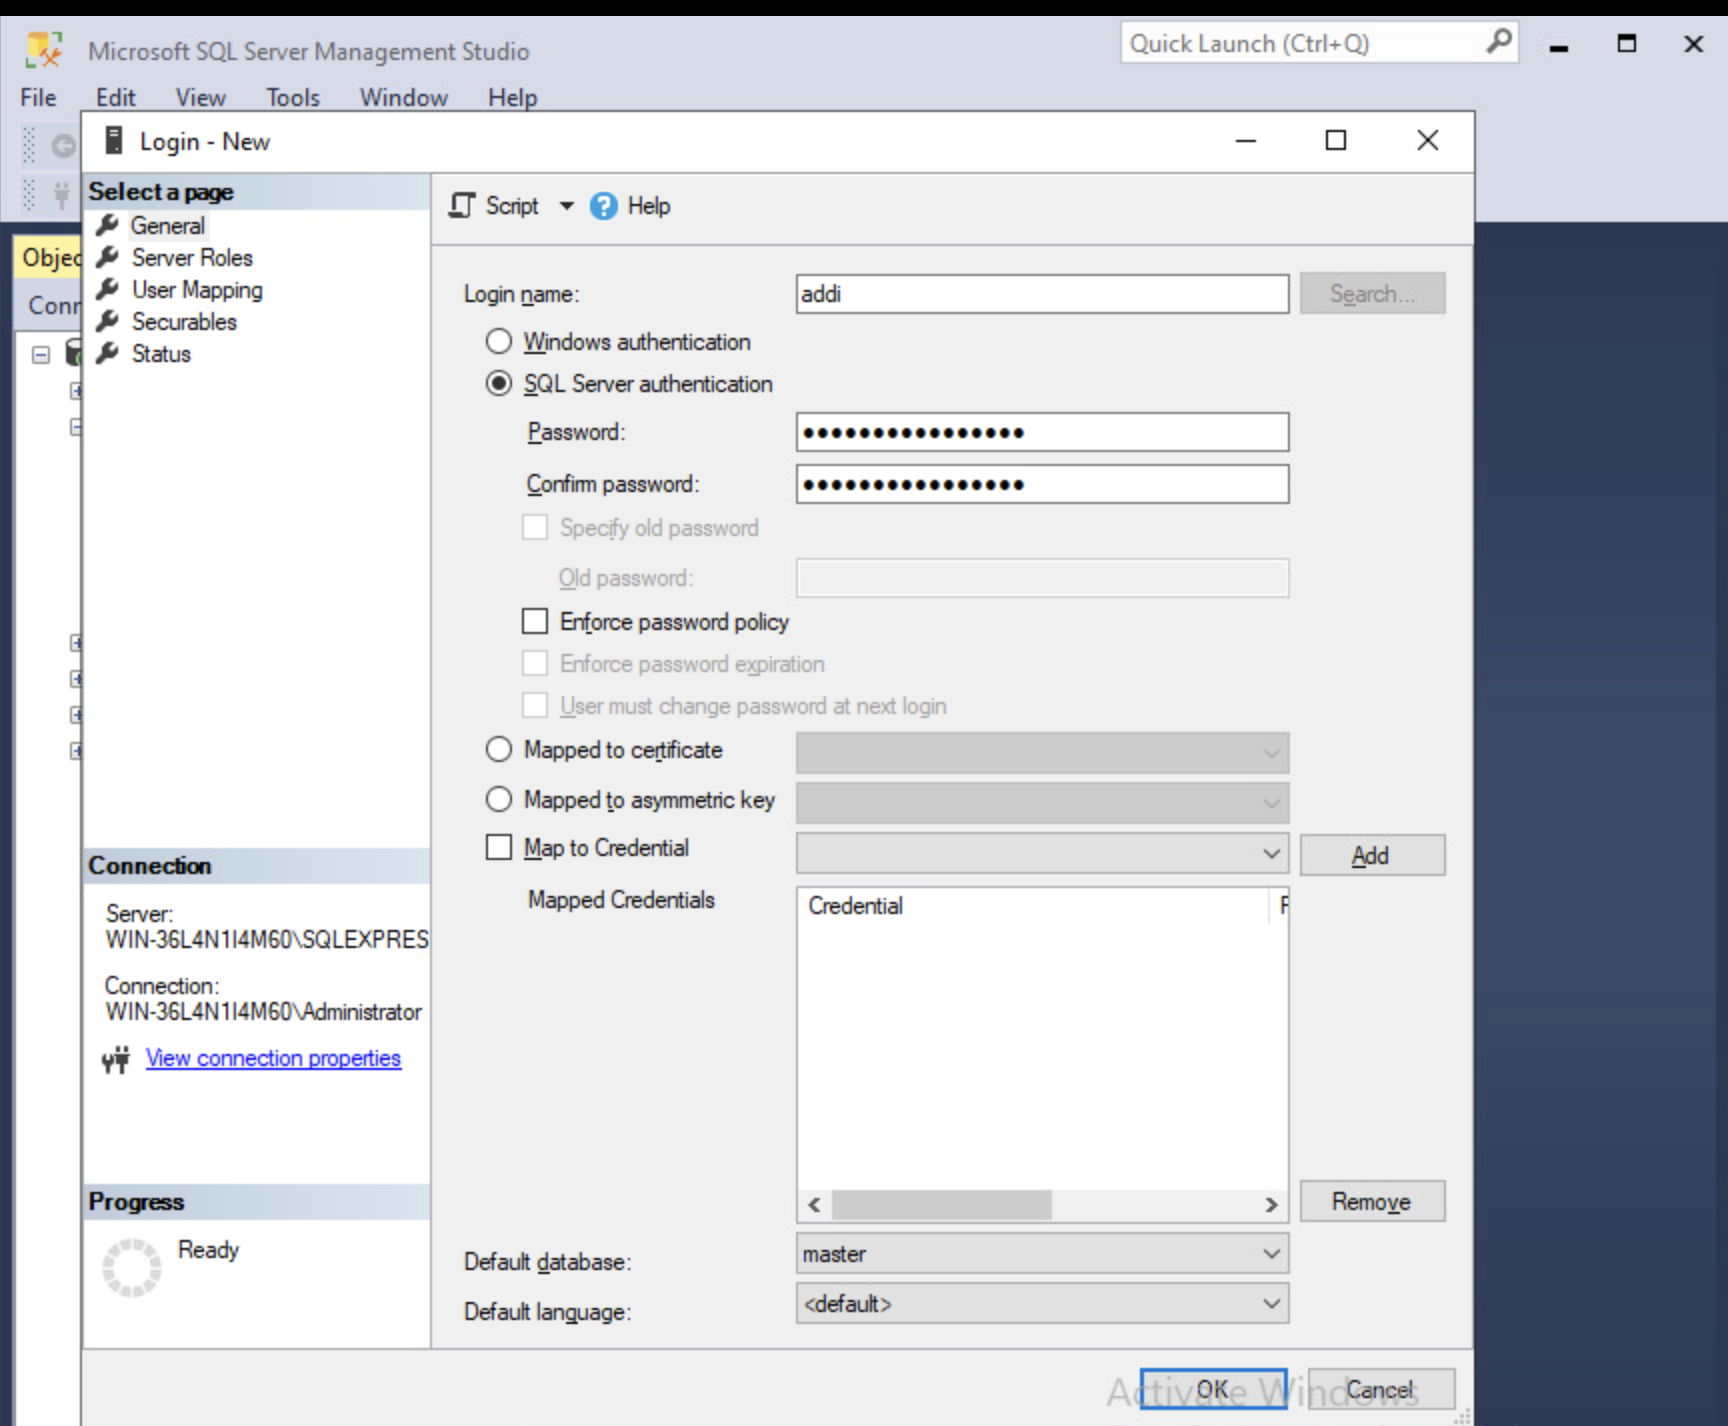
- Expand Security > Logins and then right-click Logins and choose New Login. Add a login name, select SQL Server Authentication, add a password, and make sure that the default database is set to master. This user is referred to as IBM AD SQL Identity.
SQL Server Express may require a strong password. Create one that is at least 10 characters in length with numbers and alphanumeric symbols. Example: Ibm1234!Ibm1234!
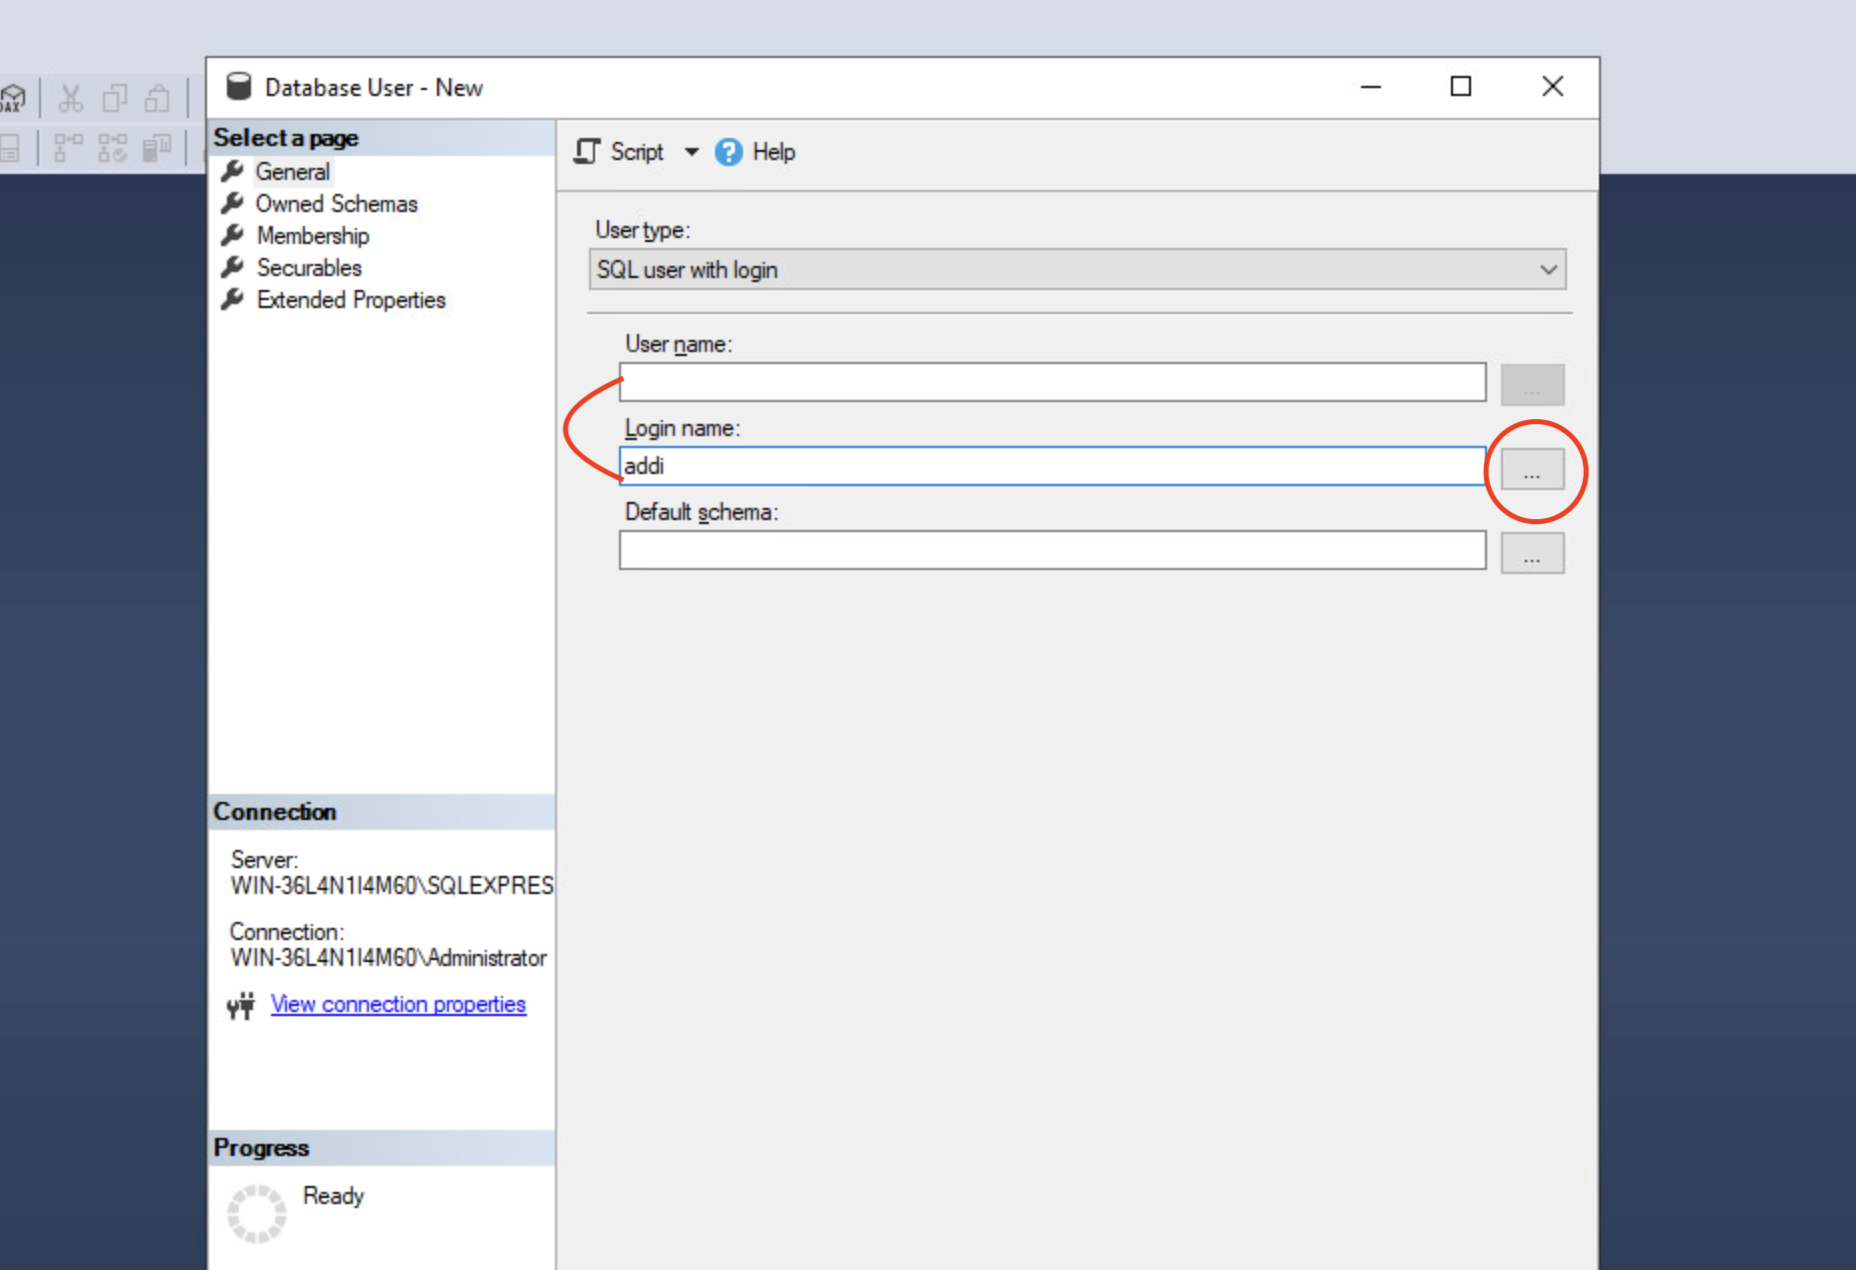
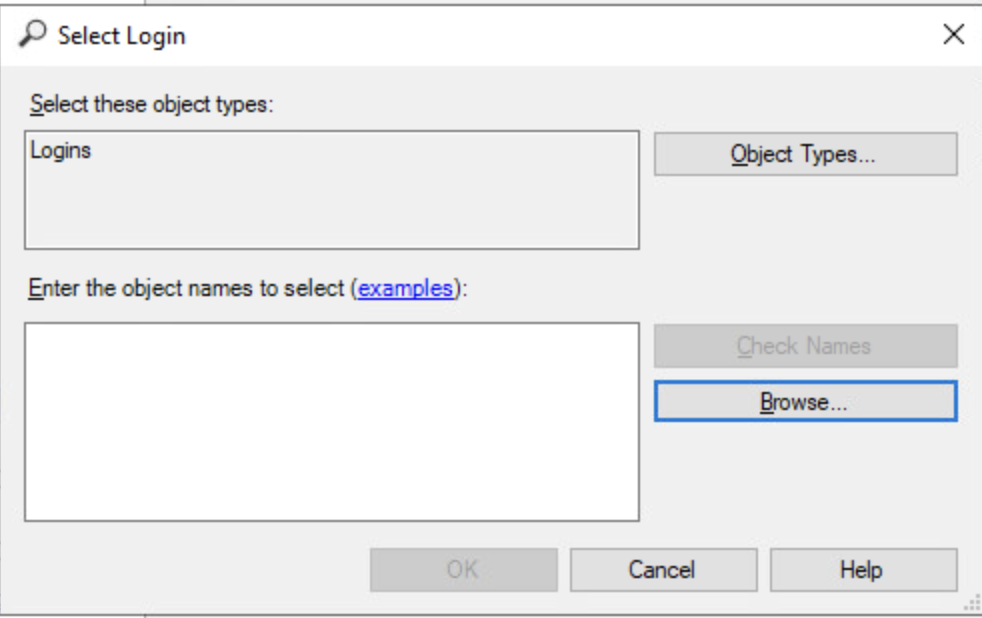
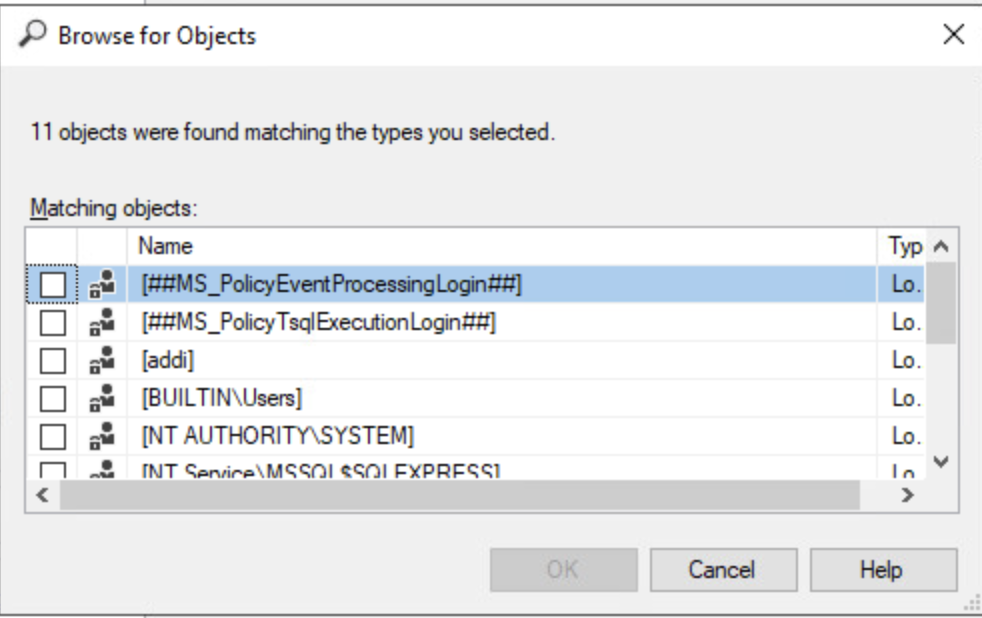
 4. Expand Databases > System Databases > master > Security > Users and then right-click Users and choose New User. Choose the IBM AD SQL Identity user by selecting the three dots next to the login name field. Click Browse. And select the user you created in the last step. Then add the same text value to the user name field.
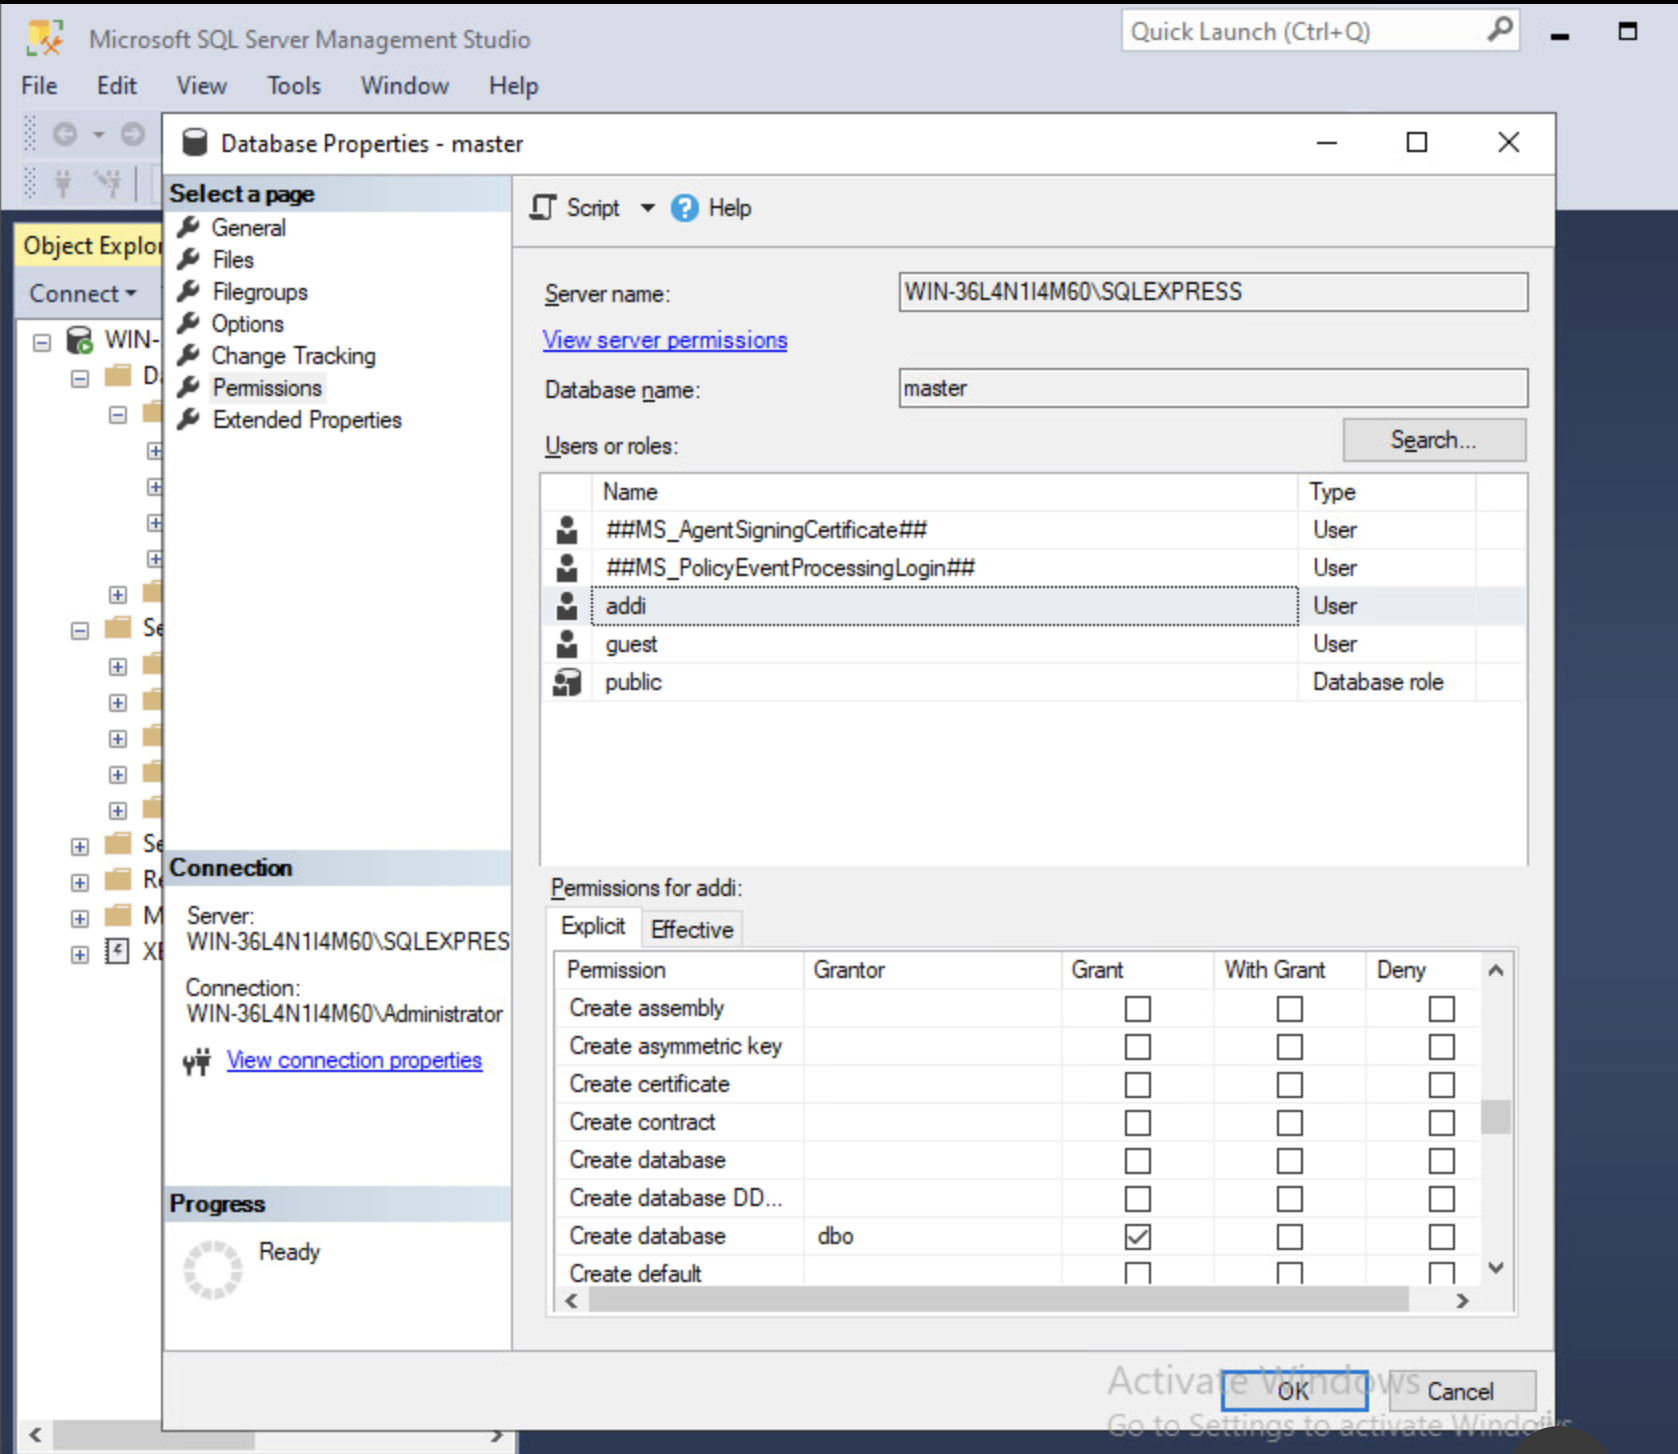
 5. Expand Databases > System Databases > master and then right-click master and choose Properties. Go to the Permissions tab for the IBM AD SQL Identity and make sure that permissions are granted for: Create database, Create function, Create procedure, Create table, and Create view.
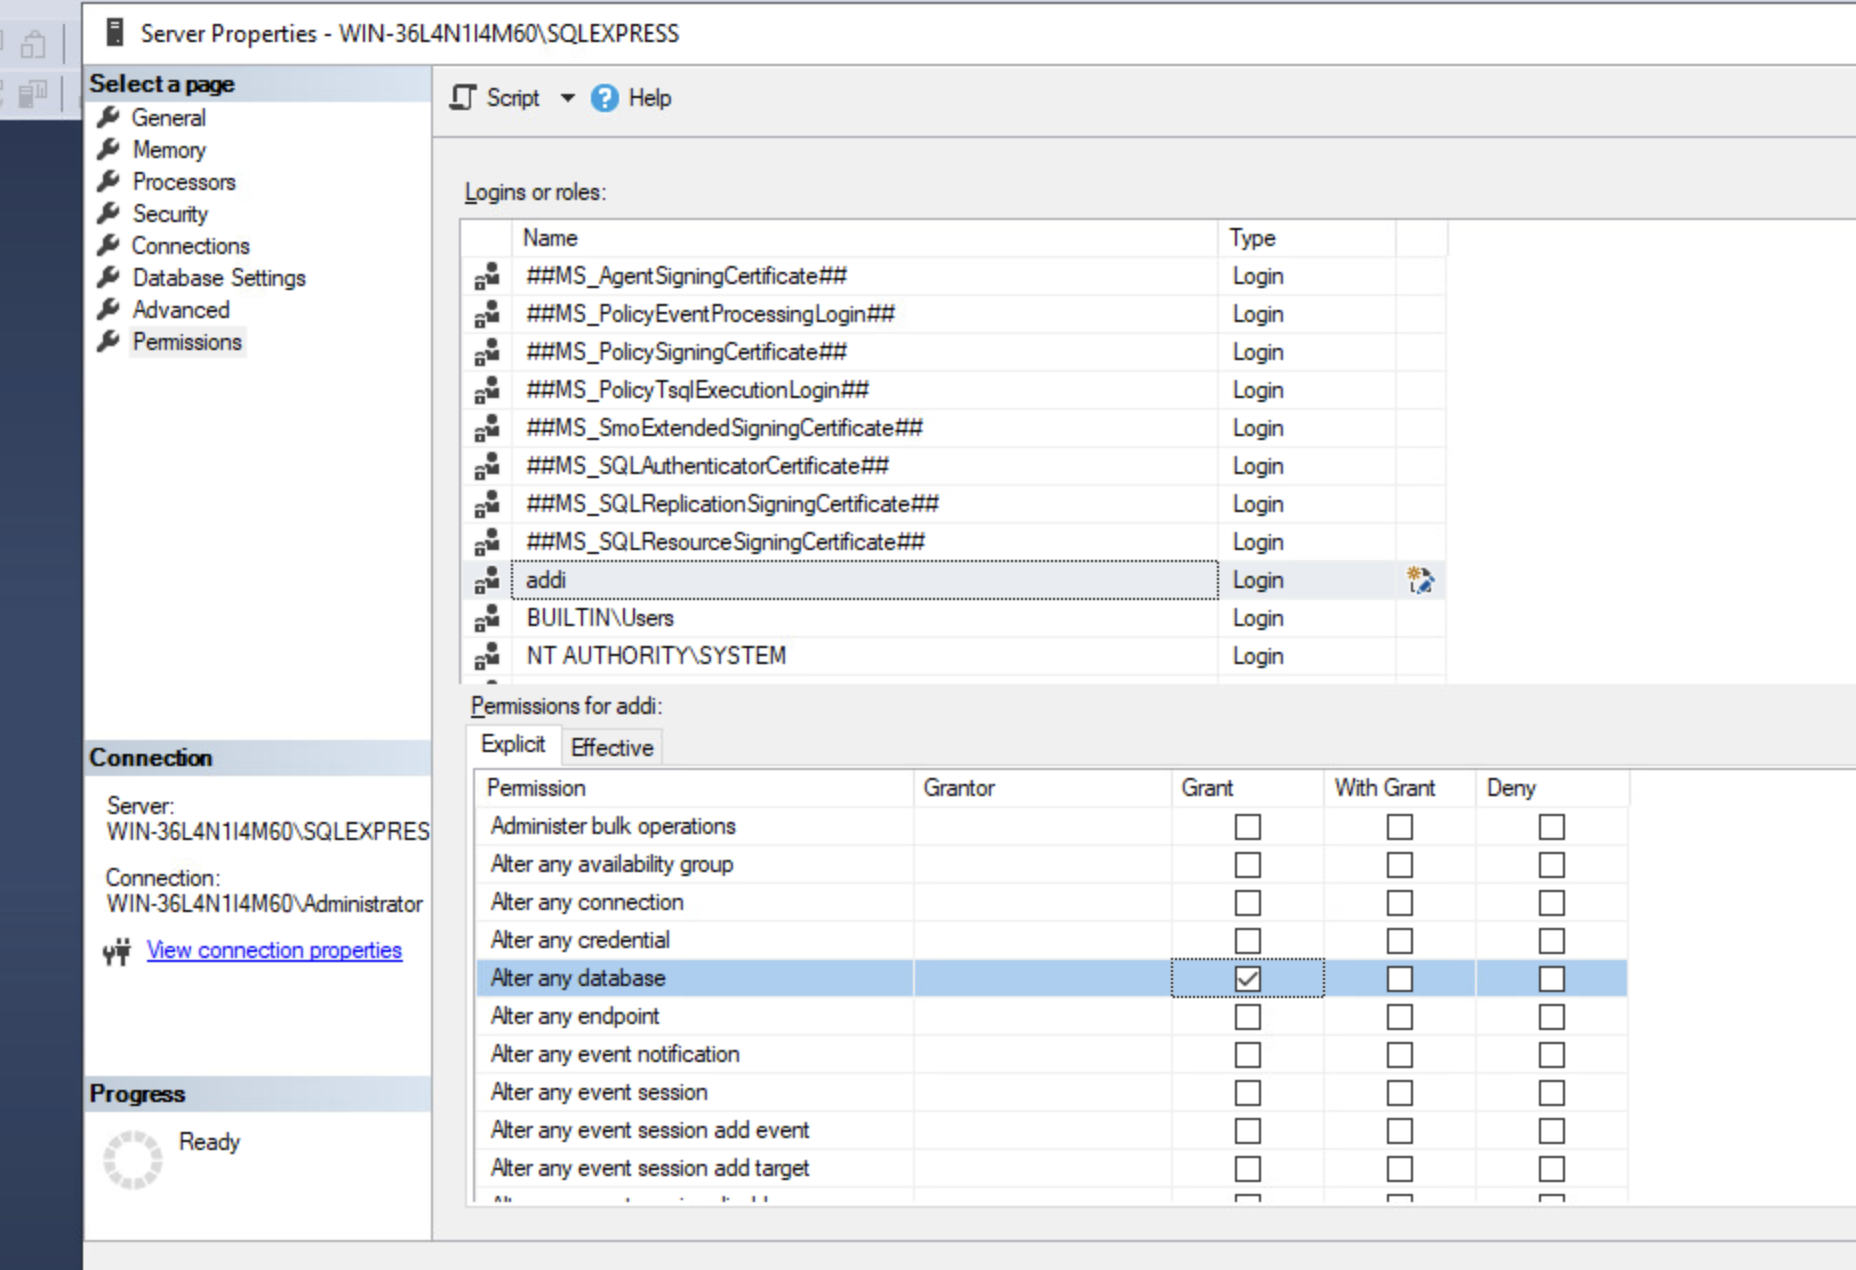
You must complete the following steps to grant the permission only if the Rename project feature is used in IBM AD Build; otherwise it is not needed.
- Right-click the SQL server instance and then select Properties.
- In the Server Properties window, select Permissions: From the roles list, select the IBM AD SQL Identity and then select to grant for Alter any database permission.
Configuring SQL Server to enable it to accept connection over TCP/iP:
Complete the following steps to configure SQL Server:
- Start SQL Server Configuration Manager.
- Select SQL Server Network Configuration > Protocols for
<Instance ID>and make sure that Shared Memory and TCP/iP are set to Enabled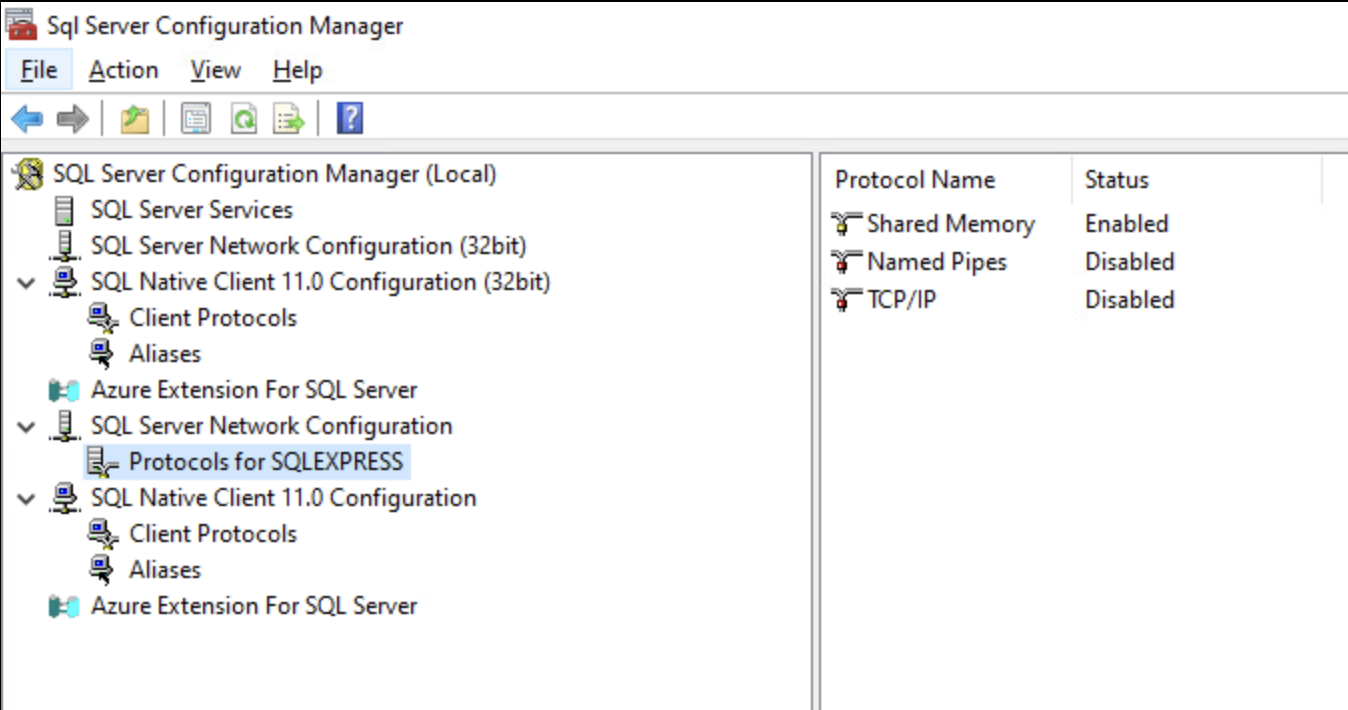
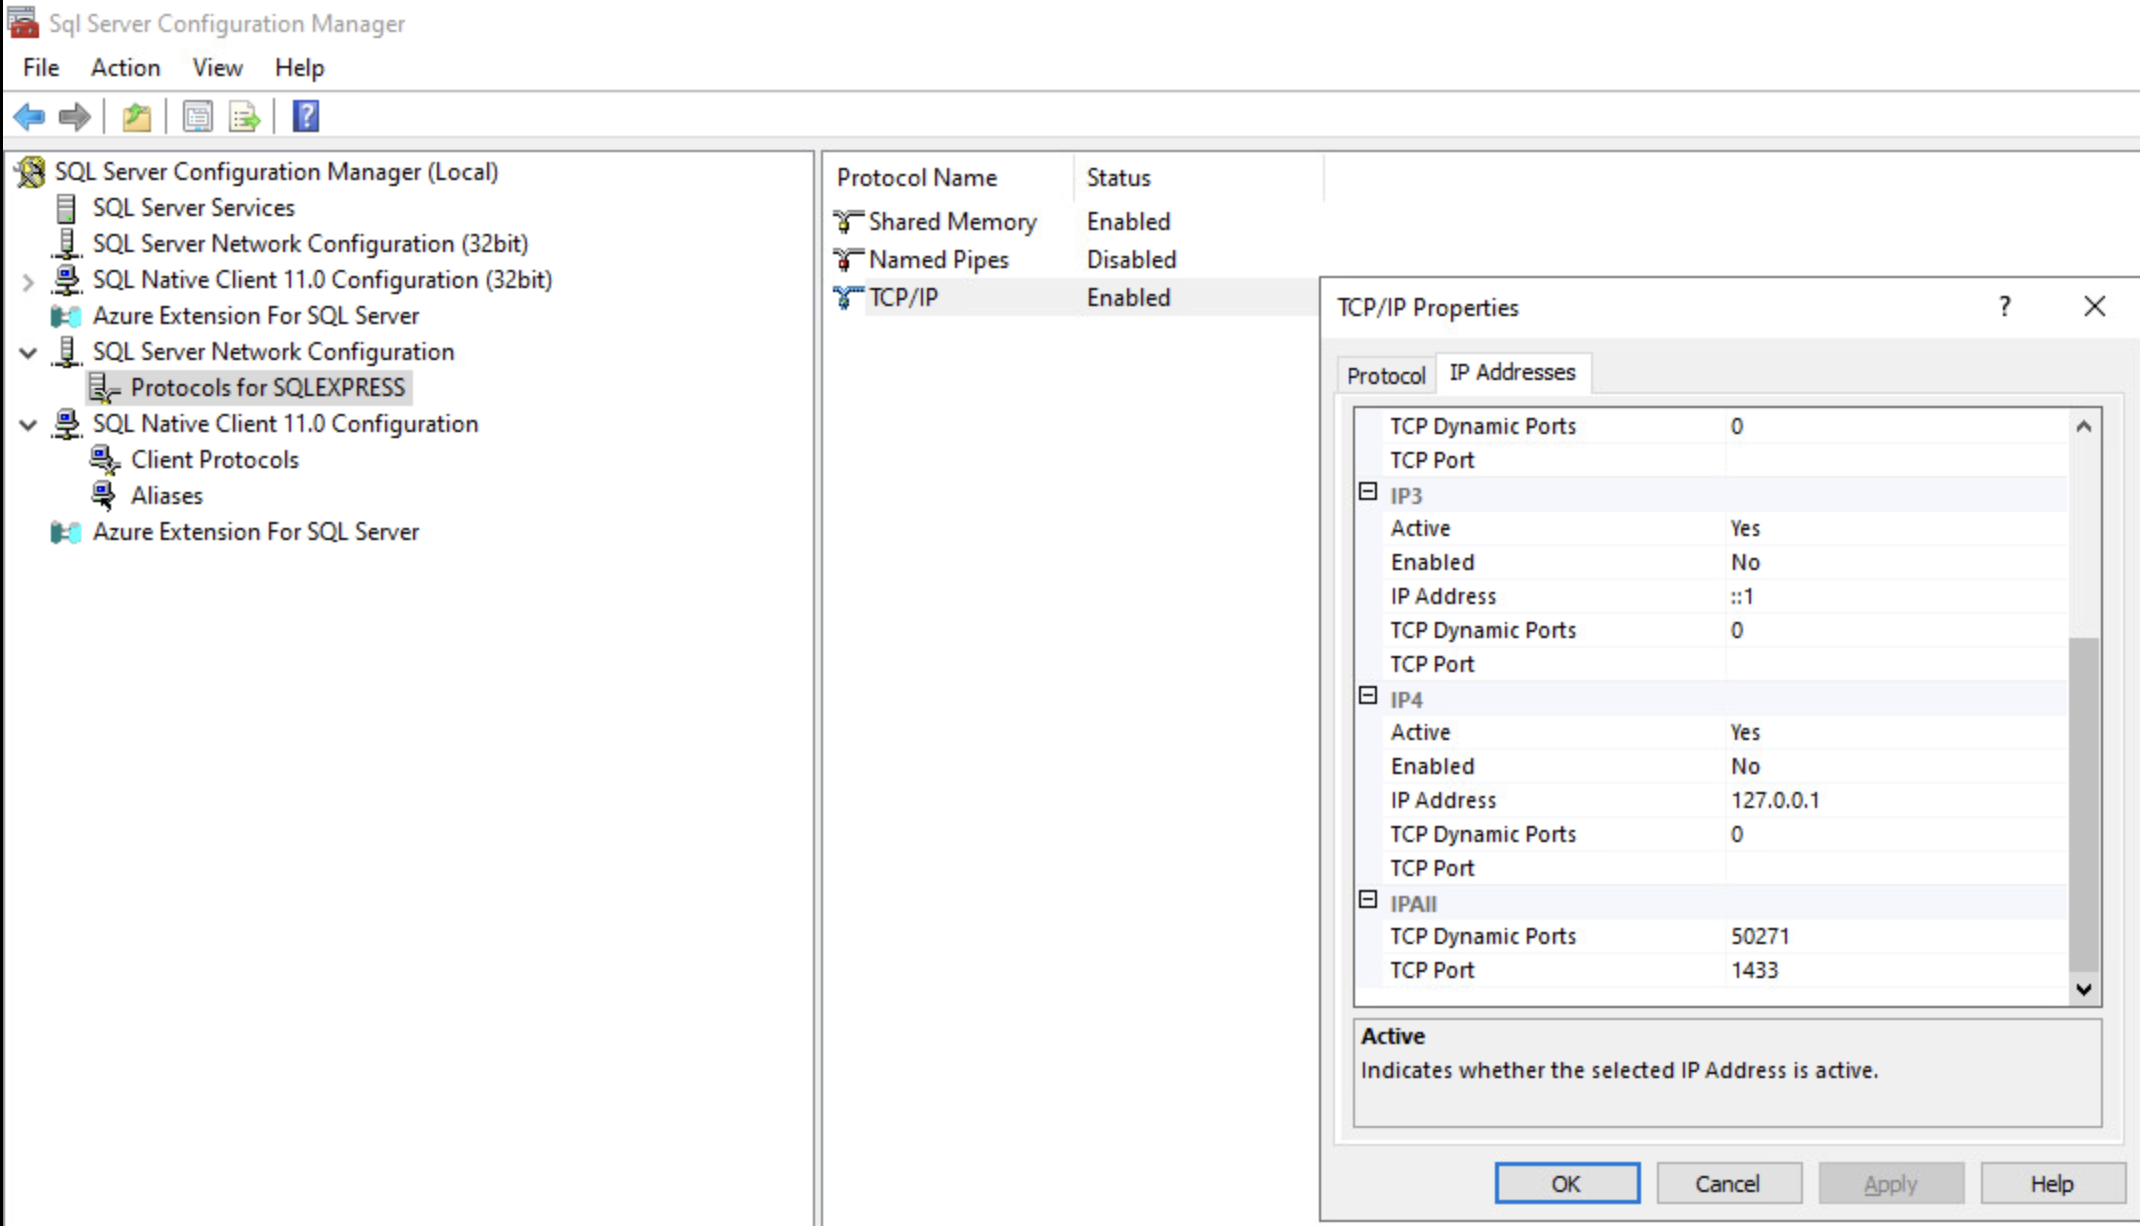
- After Enabling, right click and step into the properties for this protocol. Navigate to the IP Address tab and scroll down to the IPAll Section. Update the TCP port to 1433.
- Restart SQL Server Service. Right click the SQL Server record and click restart.
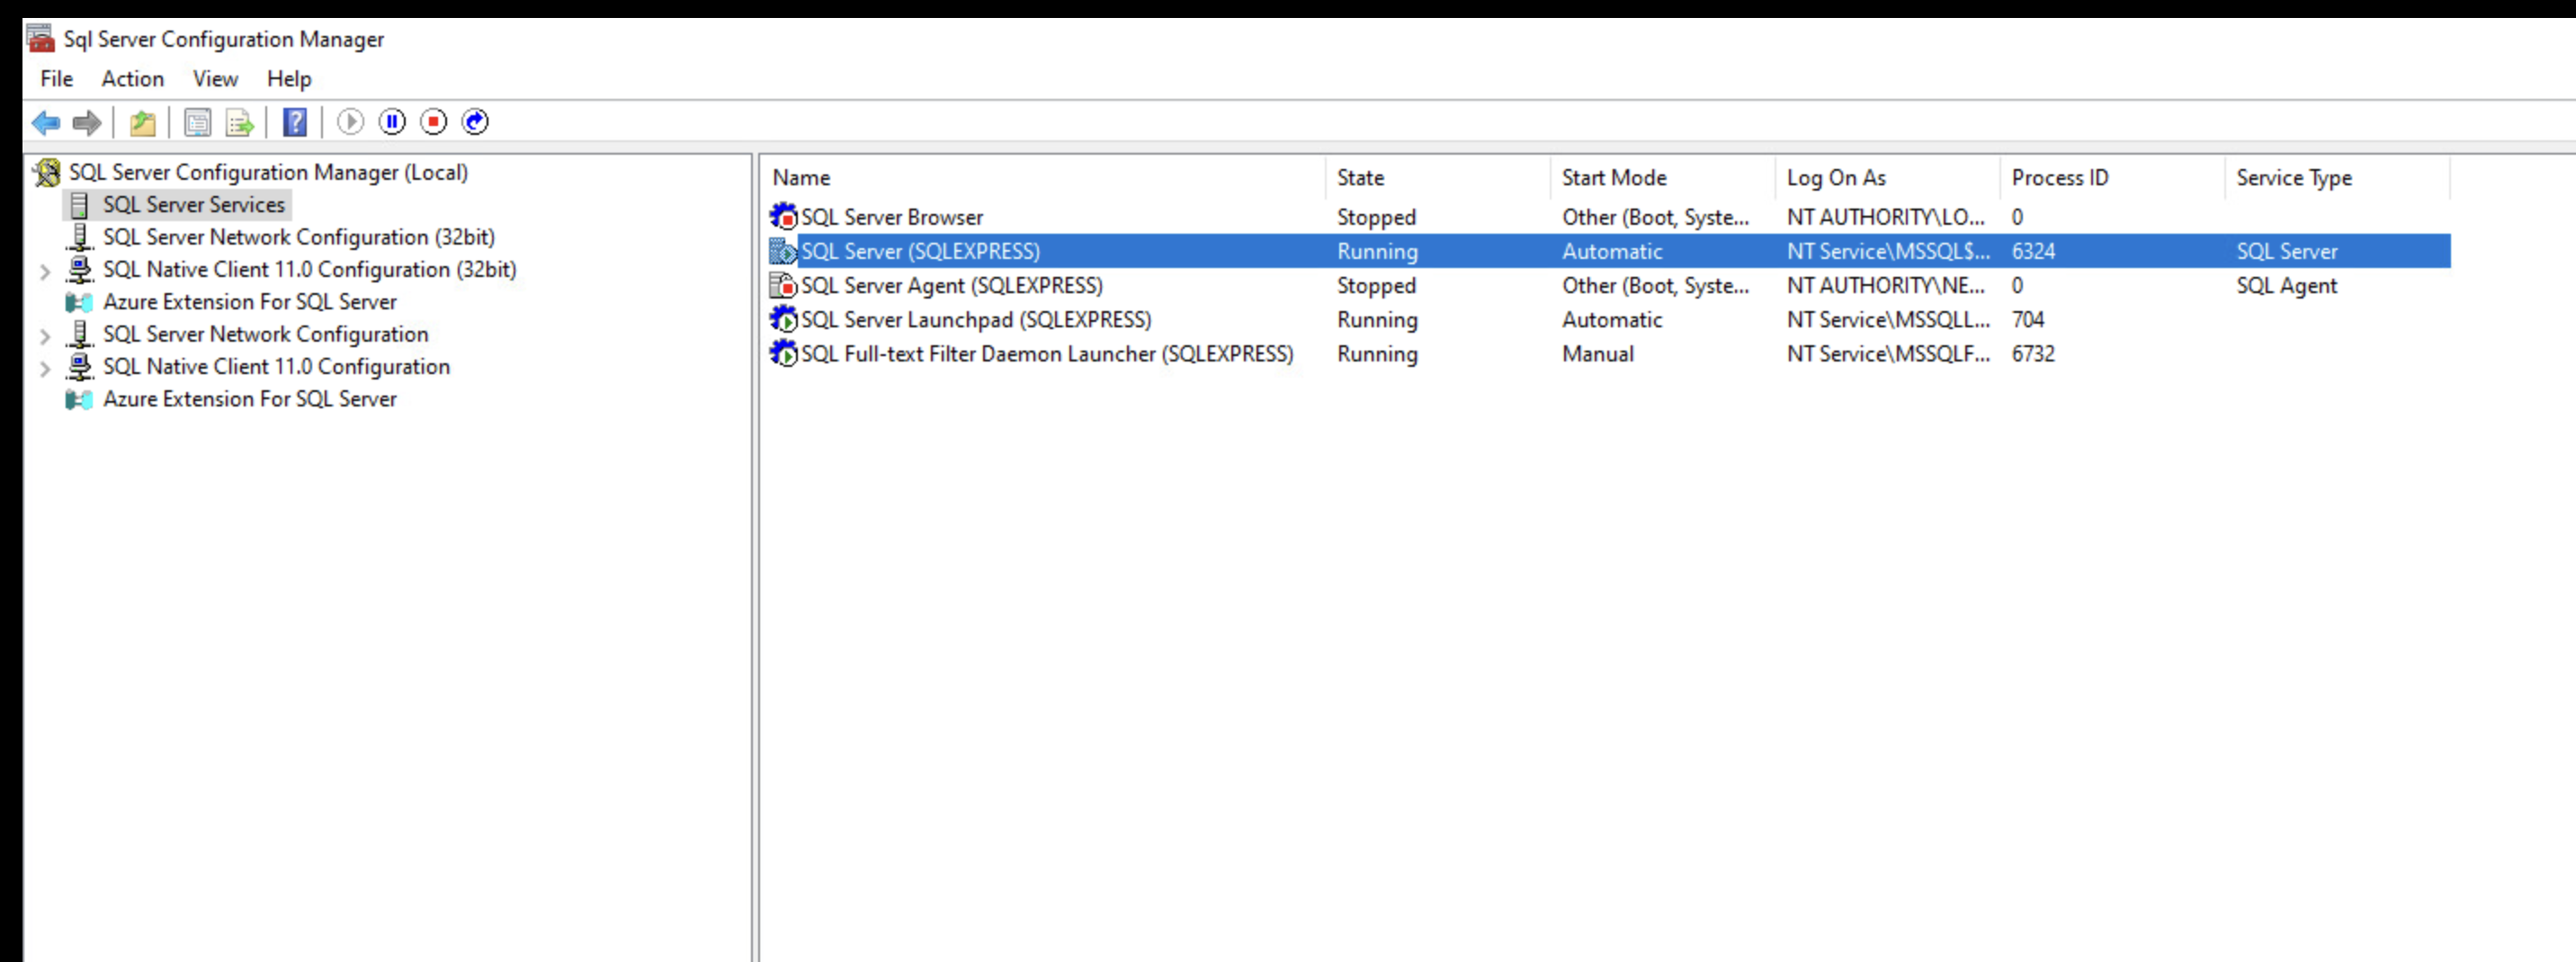
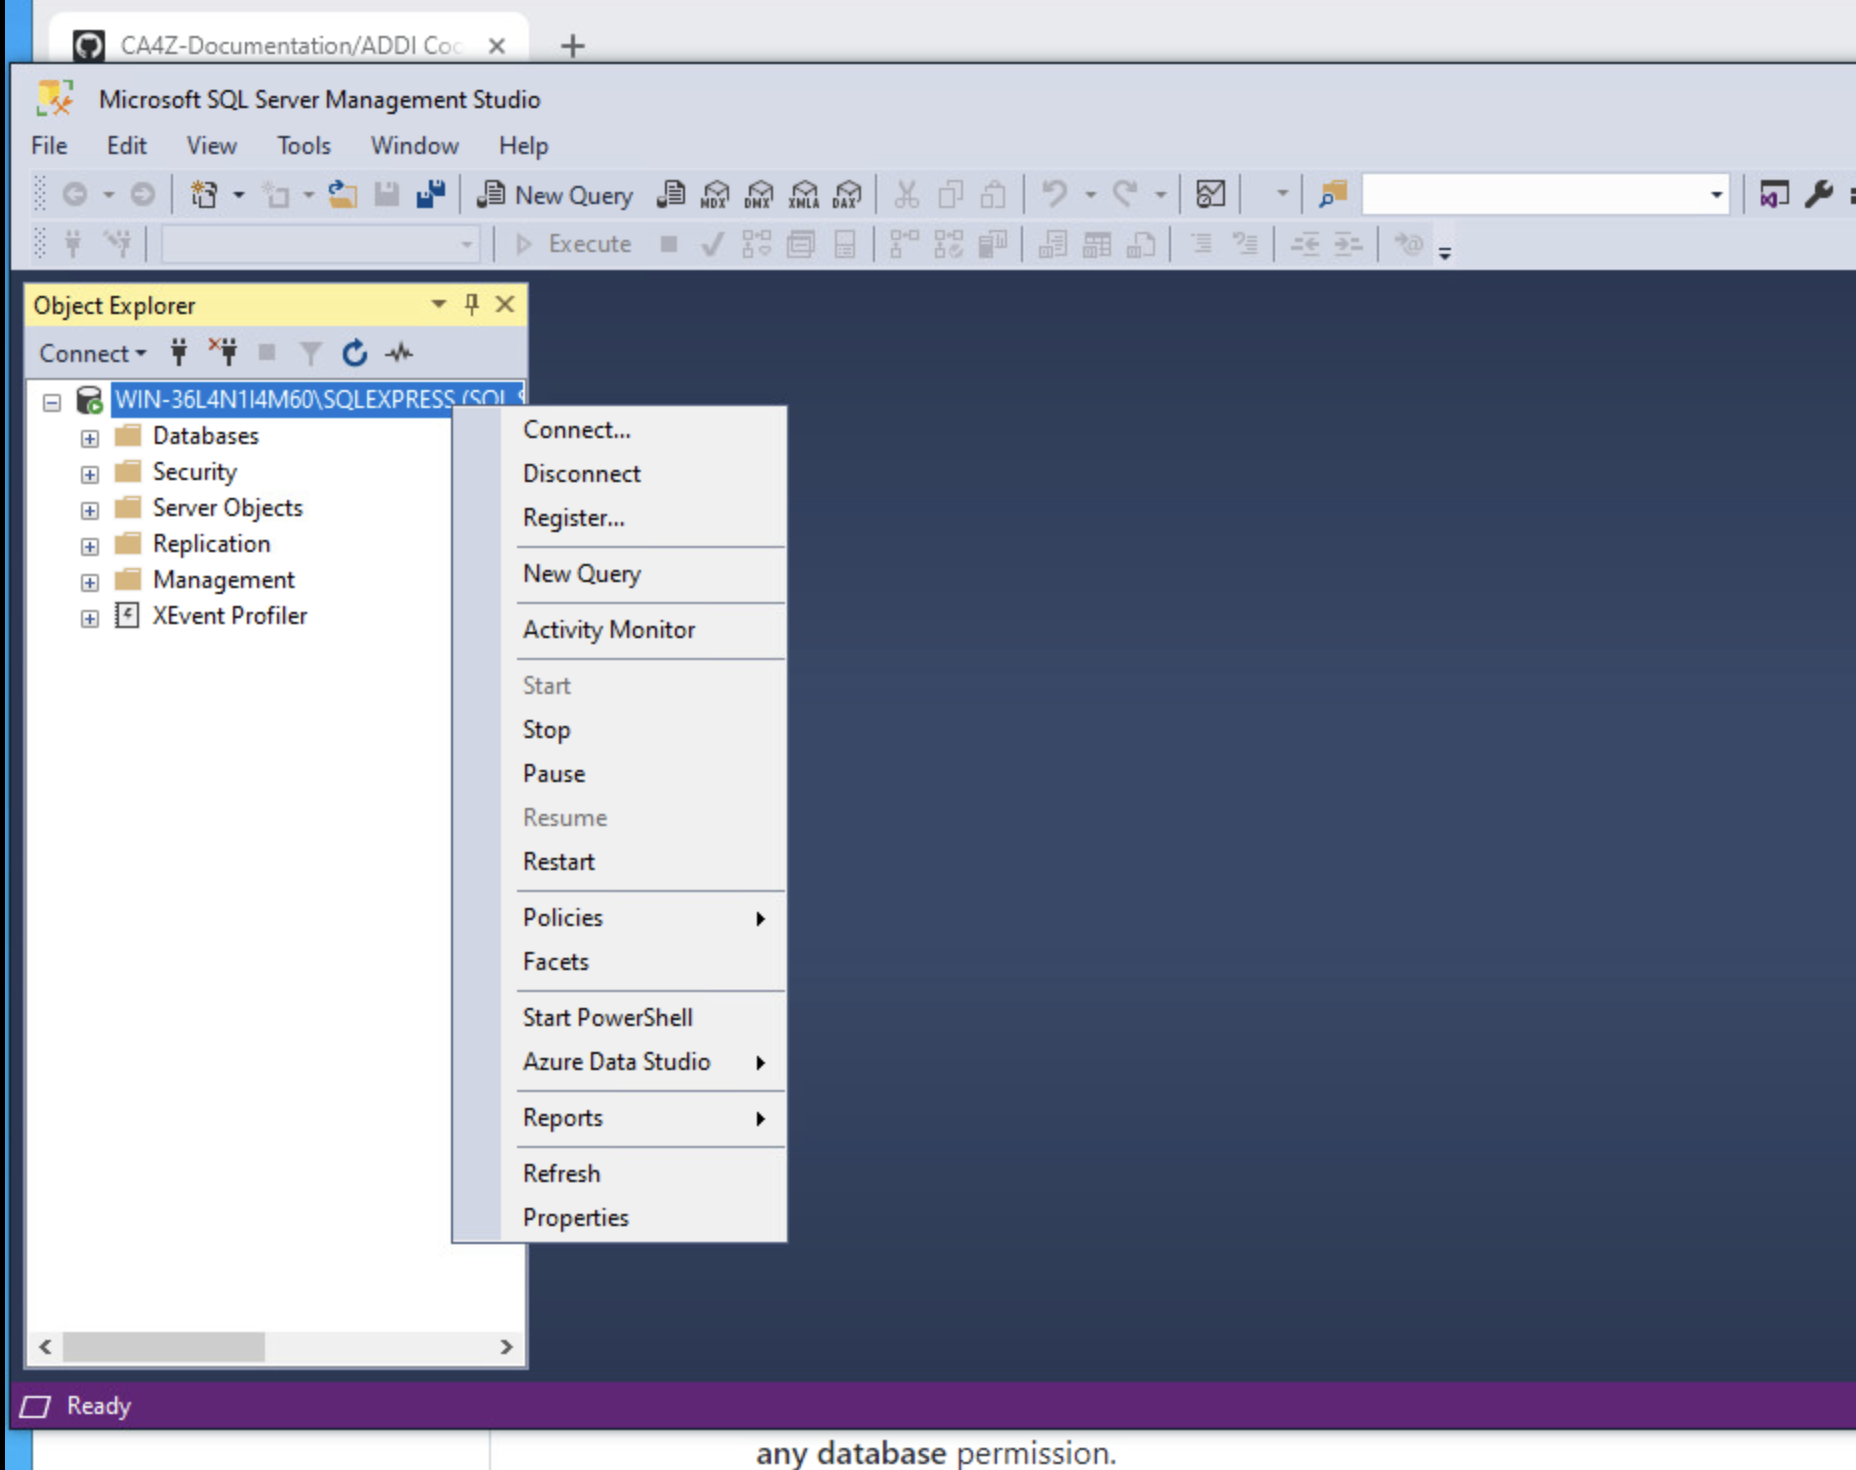
- Additionally you can restart the server within SQL Server Management Studio as well.
- Close or minimize SQL Server Configuration Manager.
SQL Server Configuration Manager writes startup parameters to the registry. They take effect upon the next startup of the SQL Server.
Also, even if SQL server is installed and configured on the same VM as IBM ADDI, depending on the antivirus and firewall settings, restriction issues might surface. If you find yourself in that case, check the firewall exceptions page.
Installing IBM AD Connect for Mainframe
For situations where you also plan to use AD Connect for Mainframe, check the specific instructions of IBM ADDI Documentation online.
Installing components with the IBM ADDI Installer
Before you begin:
Make sure that there is no previously installed AD ADDI on the machine. If there is one, you must uninstall it first and clean up any remaining files before proceeding to the next steps.
Complete the following steps to install with the IBM ADDI installer:
- Double-click the installer file.
- On the Welcome page, click Next.
- On the Licensing Agreements page, click “I accept the terms of this license agreement”, and then click Next.
- On the Installation Path page, specify the installation path, and then click Next. The default installation path is
C:\Program Files\IBM Application Discovery and Delivery Intelligence
Make sure that you have full read/write permission on the location where AD is installed.
- If the installation path that you specify does not exist, the target directory is created. Confirm the path and click OK in the Message dialog box.
- On the Select Installation Components page, select the components that you want to install, and then click Next.
If you are going to deploy Refactoring Assistant, then you must install the DEX Authentication Service!!!
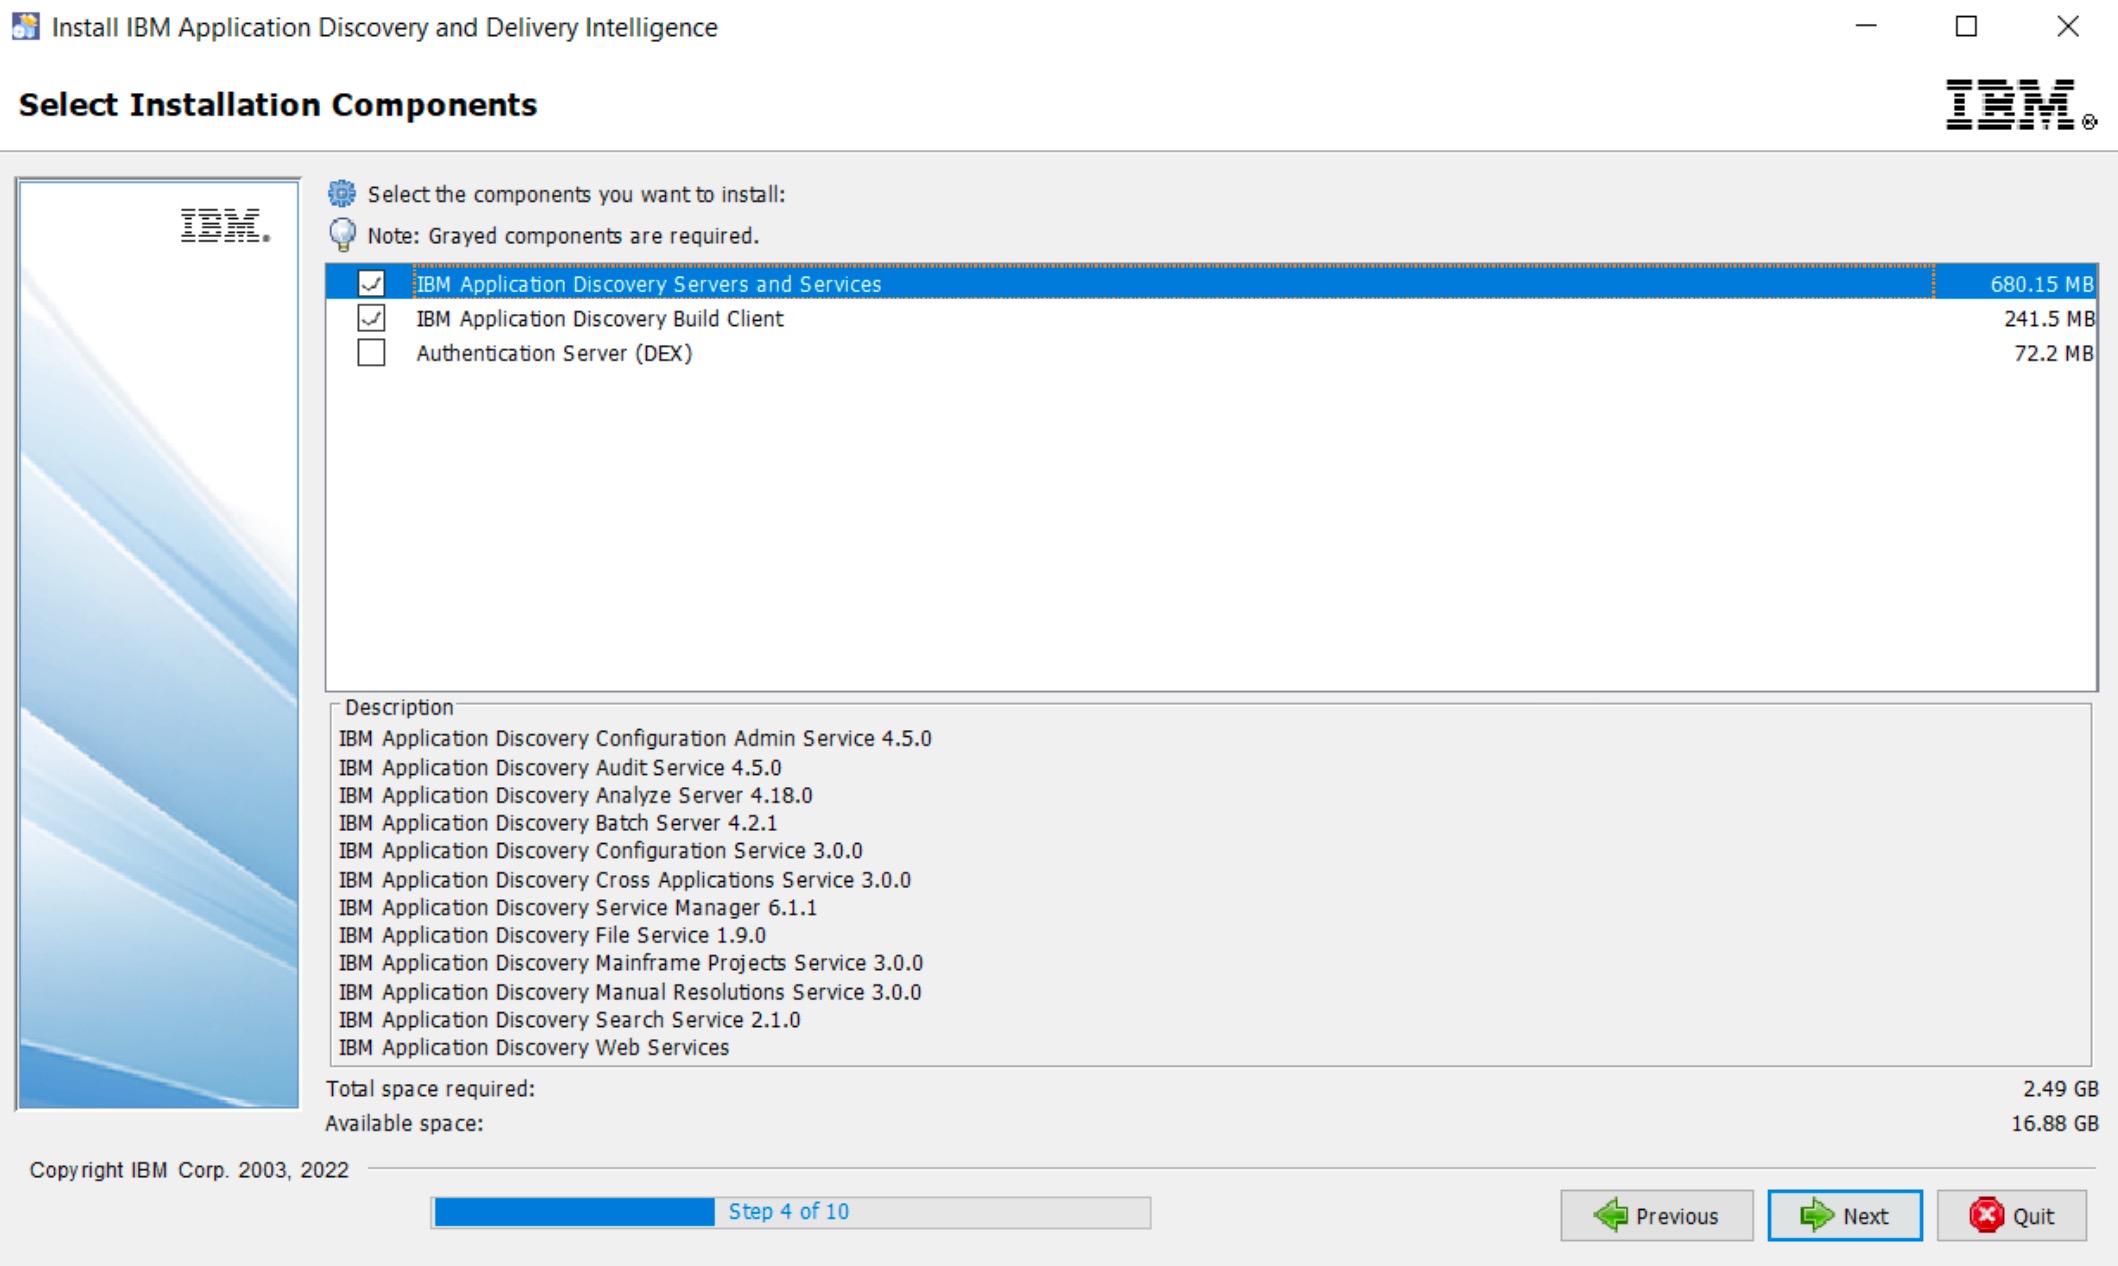 7. On the IBM Application Discovery Configuration Wizard page, make sure the IBM Application Discovery Configuration Wizard checkbox is selected. The IBM AD Configuration Wizard will open in the system's default browser after the installation is completed. Click Next.
- Note: Depending on the machine performance, you might see the “Context root not found” page in your browser. Wait for a minute and then refresh the page until you see IBM AD Configuration Wizard showing in your browser.
- Specify the configuration service IP address and service port for IBM AD Build Client ( this will be the IP address for the host that ADDI lives on ), and then click Next.
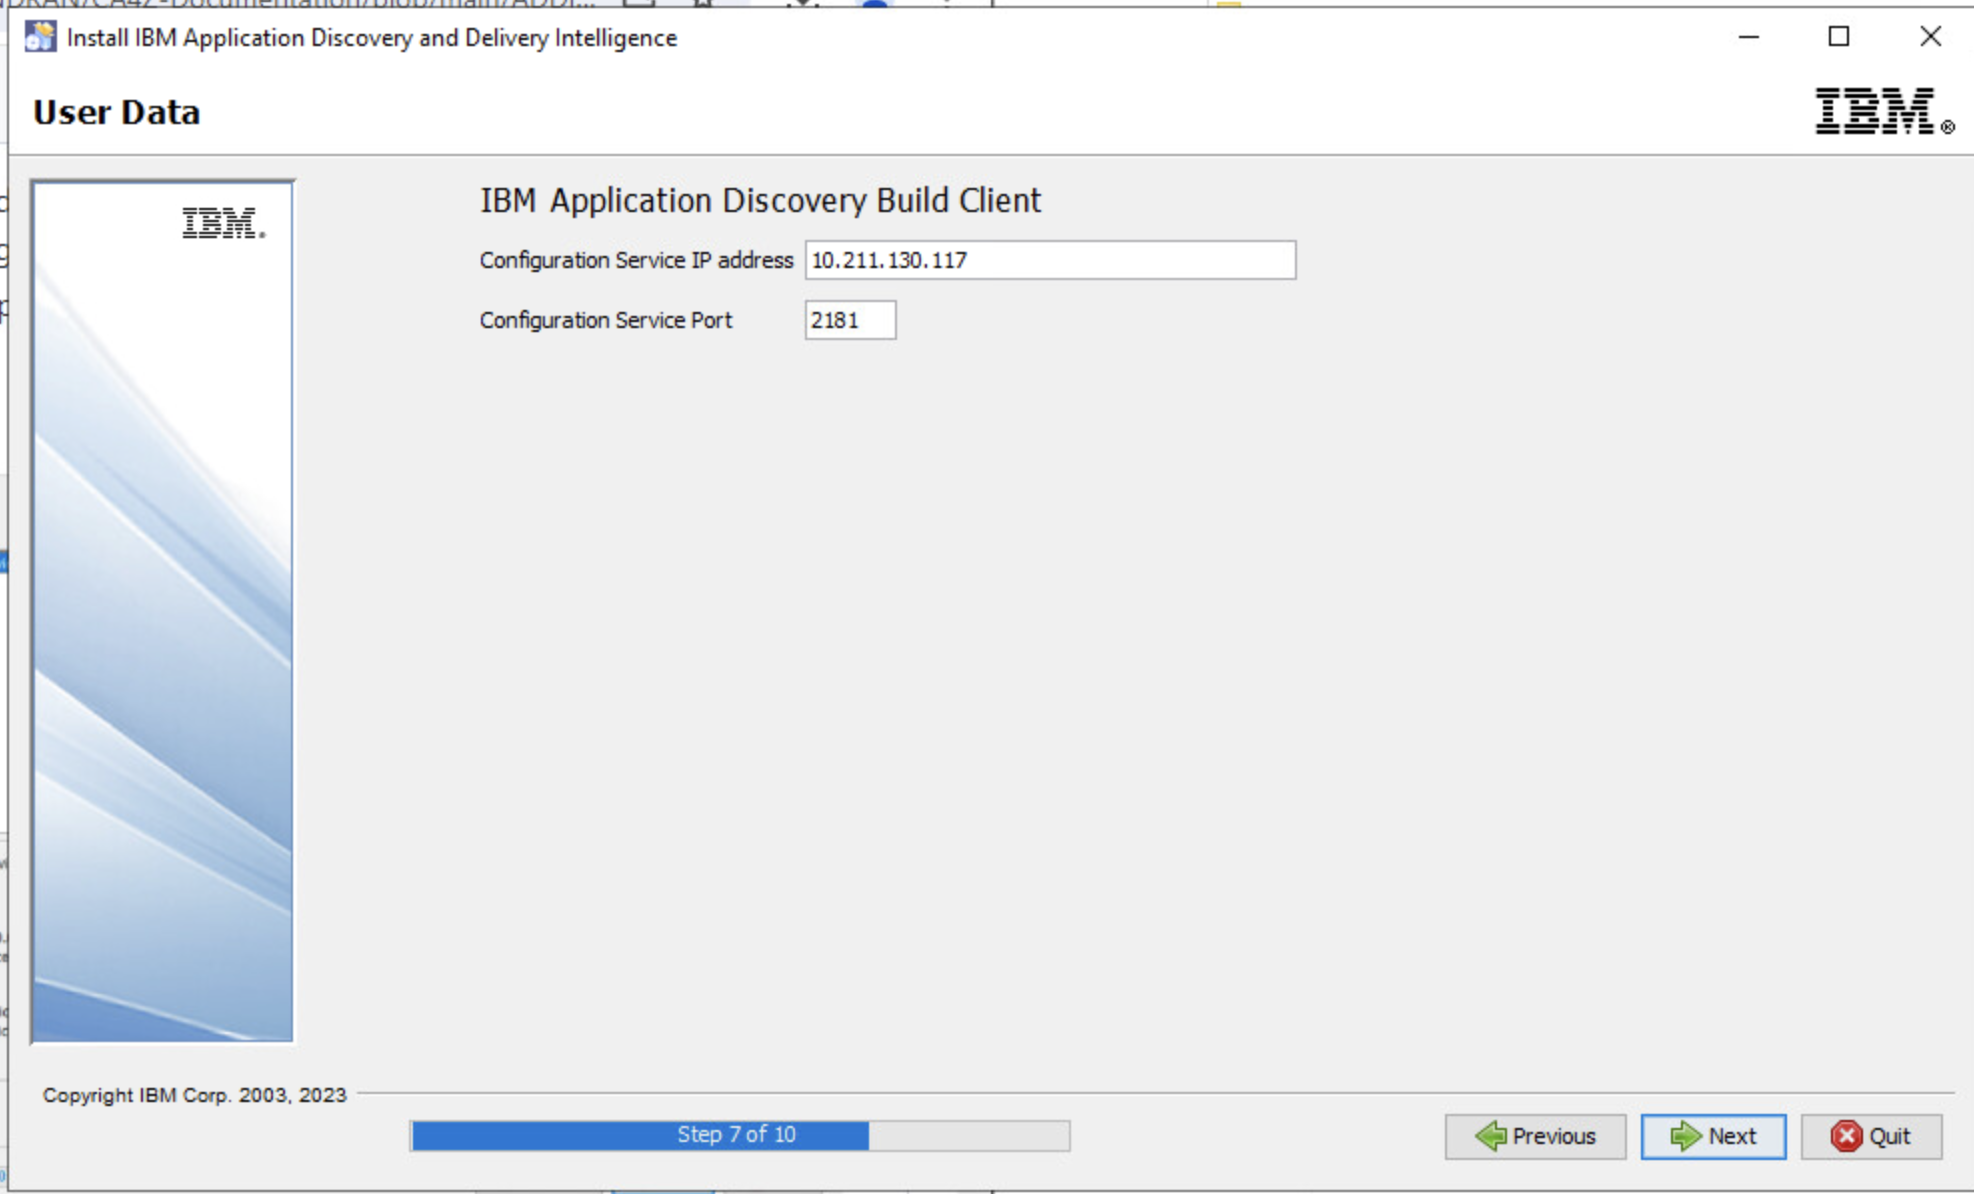
- On the Setup Shortcuts page, select the shortcuts that you want to create, and then click Next.
The installation will take several minutes to complete. Once the installation is complete successfully, a web page will pop-up with which you can proceed to the configuration stage. It is extremely important not to shut down or restart the VM before this stage.
Be aware that you may need to expose port 2281 for ADDI (before you add certs and set up SSL/TLS the port is 2181, but you may not need to expose it)
Configuring by using IBM AD Configuration Wizard
The IBM Application Discovery Configuration Wizard page will open in the system's default browser after the installation is completed.
Notes:
- Due to that self-signed certificates are used by default, you are alerted with a warning message in your browser that is similar to the following example. You need to accept the security risk before you continue. To remove the warning, you can upload your own certificates and turn on Security > HTTPS through your browser settings.

- If you need to use IBM Application Discovery Configuration Wizard to perform the initial setup at a later time, access https://localhost:9443/ad/admin/setup. It is recommended to use IBM Application Discovery Configuration Wizard only once, right after the installation process of IBM ADDI product is completed.
- IBM AD Configuration Wizard is now multi-language ready. Once you access its web interface, you can select the language menu from the upper right corner and choose one of the available languages. The entire configuration process will be displayed in the selected language.
Complete the following configuration steps:
- On the Welcome page, click Get Started!
- On the General Settings page, the fields should be already auto-filled with values so that you can click Next after you read and acknowledged the data. You can change, for example, the environment name, which is not mandatory though.
When a new environment is created, a default workspace is also created and automatically attached to the new environment. The default workspace is where all IBM AD Build projects are available.
- On the Paths page, the information of paths is also auto-filled. Those paths on disk are automatically created and used when you work with AD Projects and dependencies:
| Path | Description | |
|---|---|---|
| 1 | Default projects path | Path where all mainframe projects will be stored. |
| 2 | Path for the retrieved members | Path where source code files that are automatically downloaded from Mainframe systems (by using IBM AD Connect for Mainframe) will be stored. |
| 3 | z/OS Configurations path Path | where all z/OS configurations will be stored. |
| 4 | Manual Resolutions path | Path where all journal files will be stored. |
| 5 | Search indexes path | Path where all indexes will be stored |
- On the Relational Database Server page, enter the following information:
| Description | Value |
|---|---|
| Server name | Enter an appropriate name (alias) for the relational database server. |
| Select database server type | Select the appropriate relational database type. |
| Host | Enter the IP or the hostname where the relational database server is installed. |
| Port | Enter the relational database server port. The default port for SQL Server is 1433. |
| Instance (optional) | Only fill this in if a non-null instance name is defined for your SQL Server instance. |
| Username and Password | Enter the username and password for the IBM AD SQL Identity as previously defined in Microsoft SQL Server Configurations. |
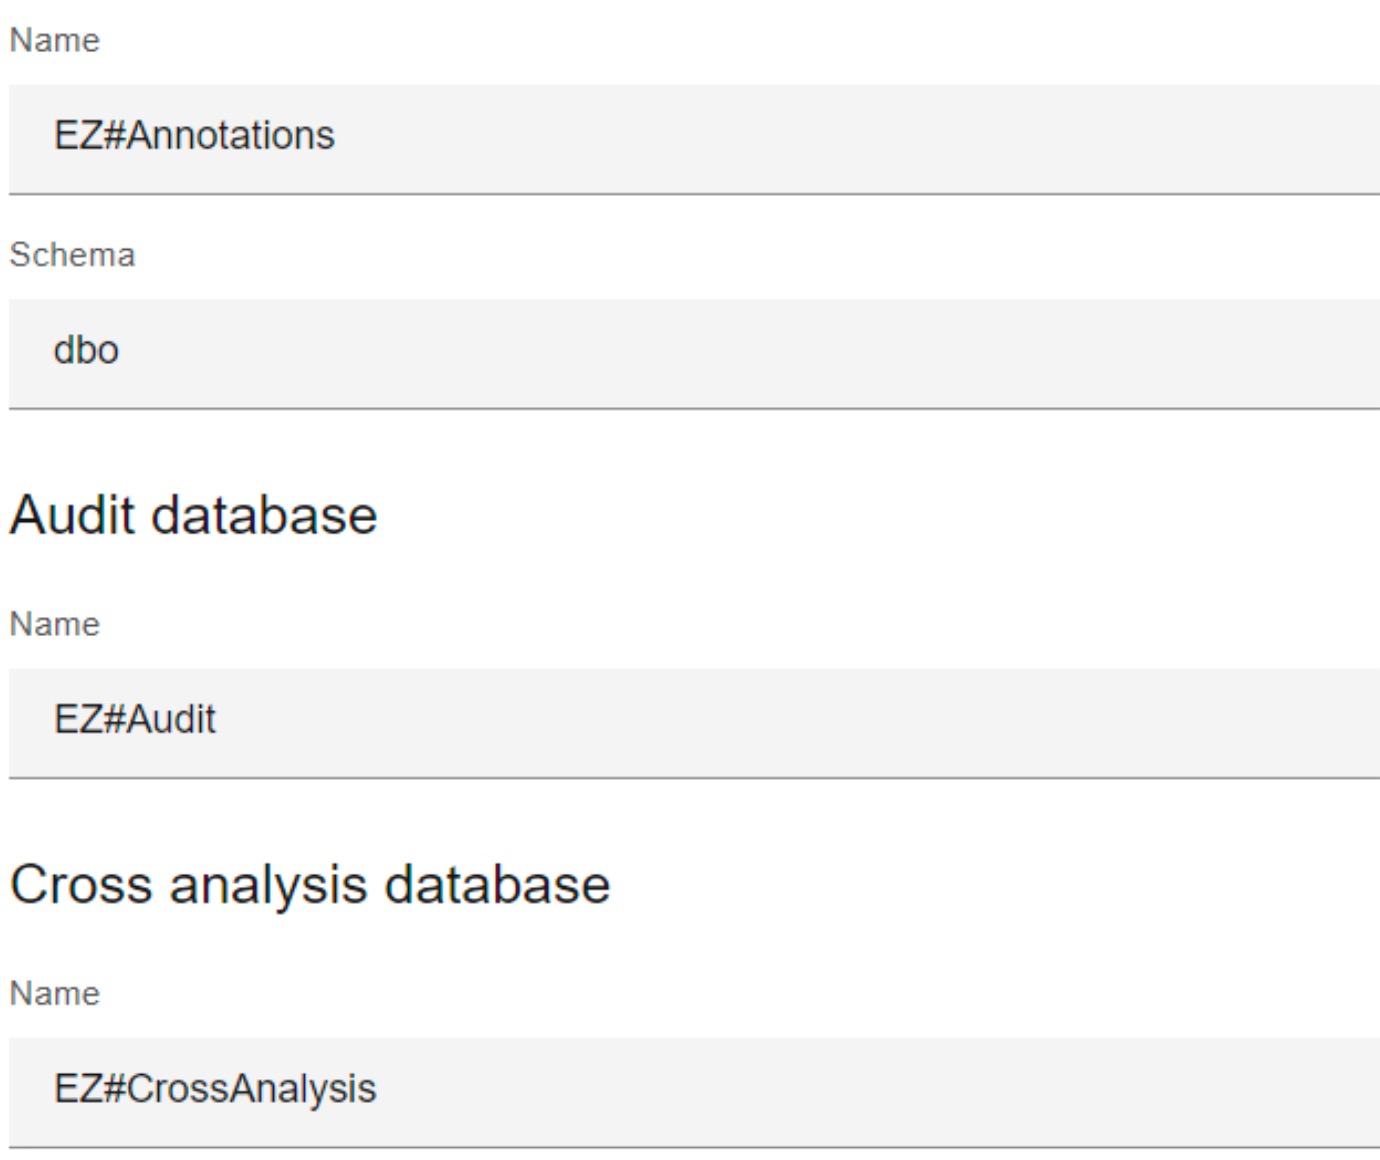
- On the Database names page, database names are already automatically added for several common databases that AD uses, including Annotations Database name and schema name, Audit Database name, and Cross Analysis Database name as shown in the following screen capture.
- On the Graph Database Server page, set a new password for GraphDB Server's root user and confirm it.
- On the Batch Server page, the following information is available:
| Description | Value |
|---|---|
| Projects | The asterisk * means that all projects are considered for this service. |
| Components | Represents a list of component names that are initially selected for this service. Note: Additional components can be considered for this service. For more information, see the Additional Components table in AD Knowledge Center. |
Only change or add values in the Components field after discussing them with your IBM ADDI representative.
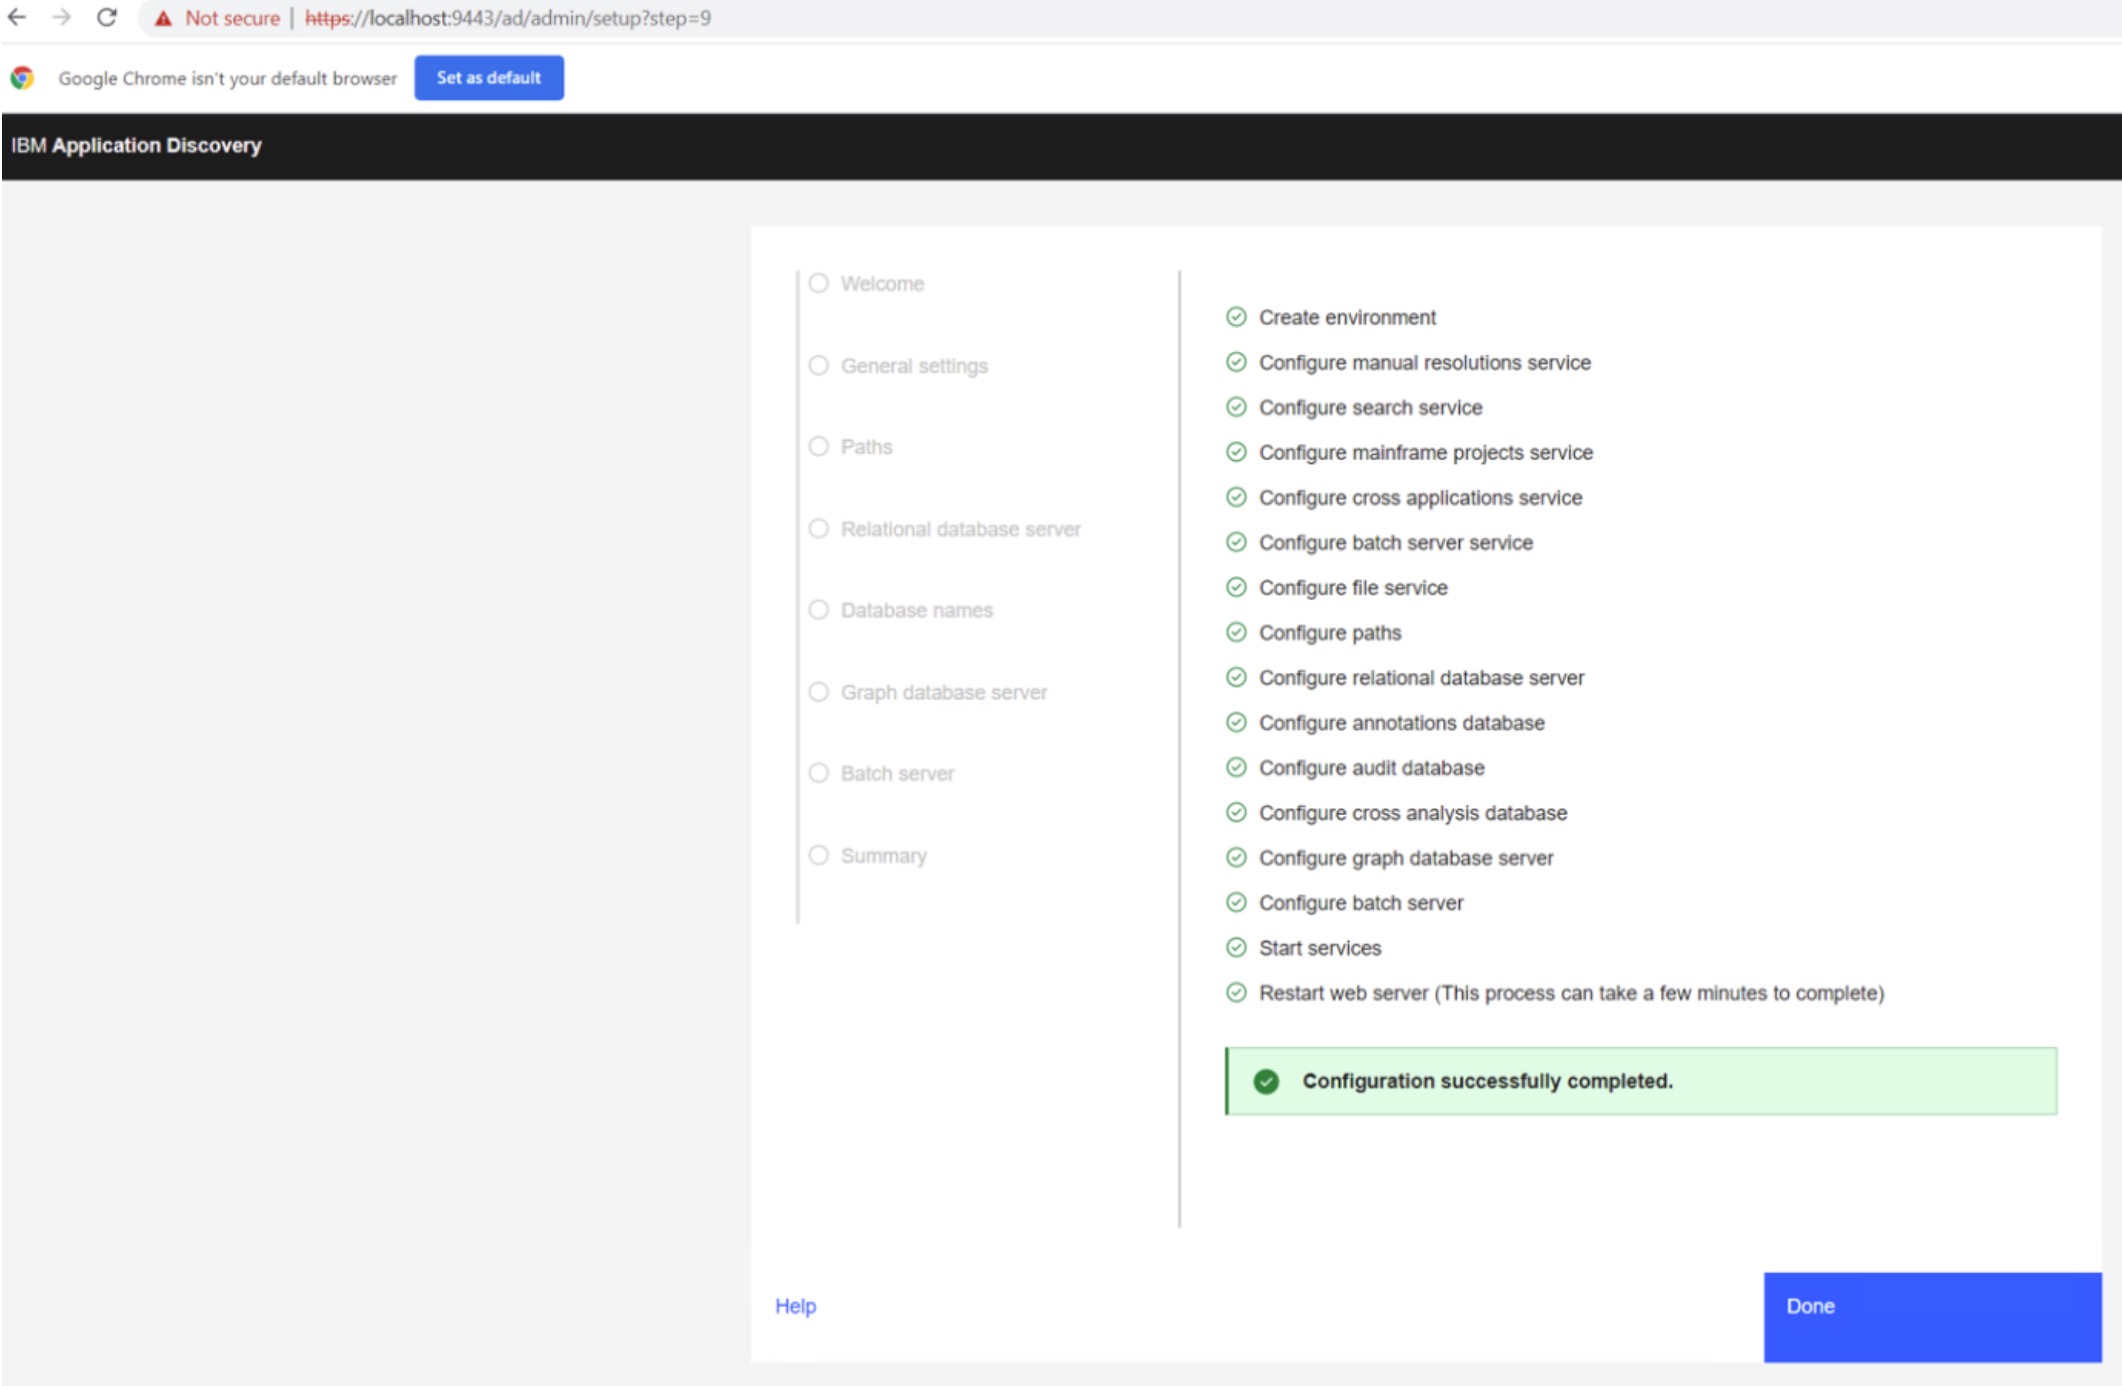
- On the Summary page, click Commit. Configuration steps are automatically completed onward, and this stage can also take up to several minutes.
- When the configuration is successfully completed, click Done.
Installing and Configuring IBM AD Analyze Client
Before you begin
Before you install and configure IBM AD Analyze Client, you need to install IBM Developer for z/OS (IDz) by following these steps:
- Download IDz from this website, and ID v15.0.6 is recommended. Then, select IBM Developer for z/OS (IDz or IDz EE) from the list.
- You can also download IDz pack directly from this page . If the link is not available, follow the steps below to download and install IDz.
- Select Aqua 3.3.
- Select Installation Manager.
- In the next screen, select Starting from fresh. Then make sure the correct operating system is selected. Now click the download button.
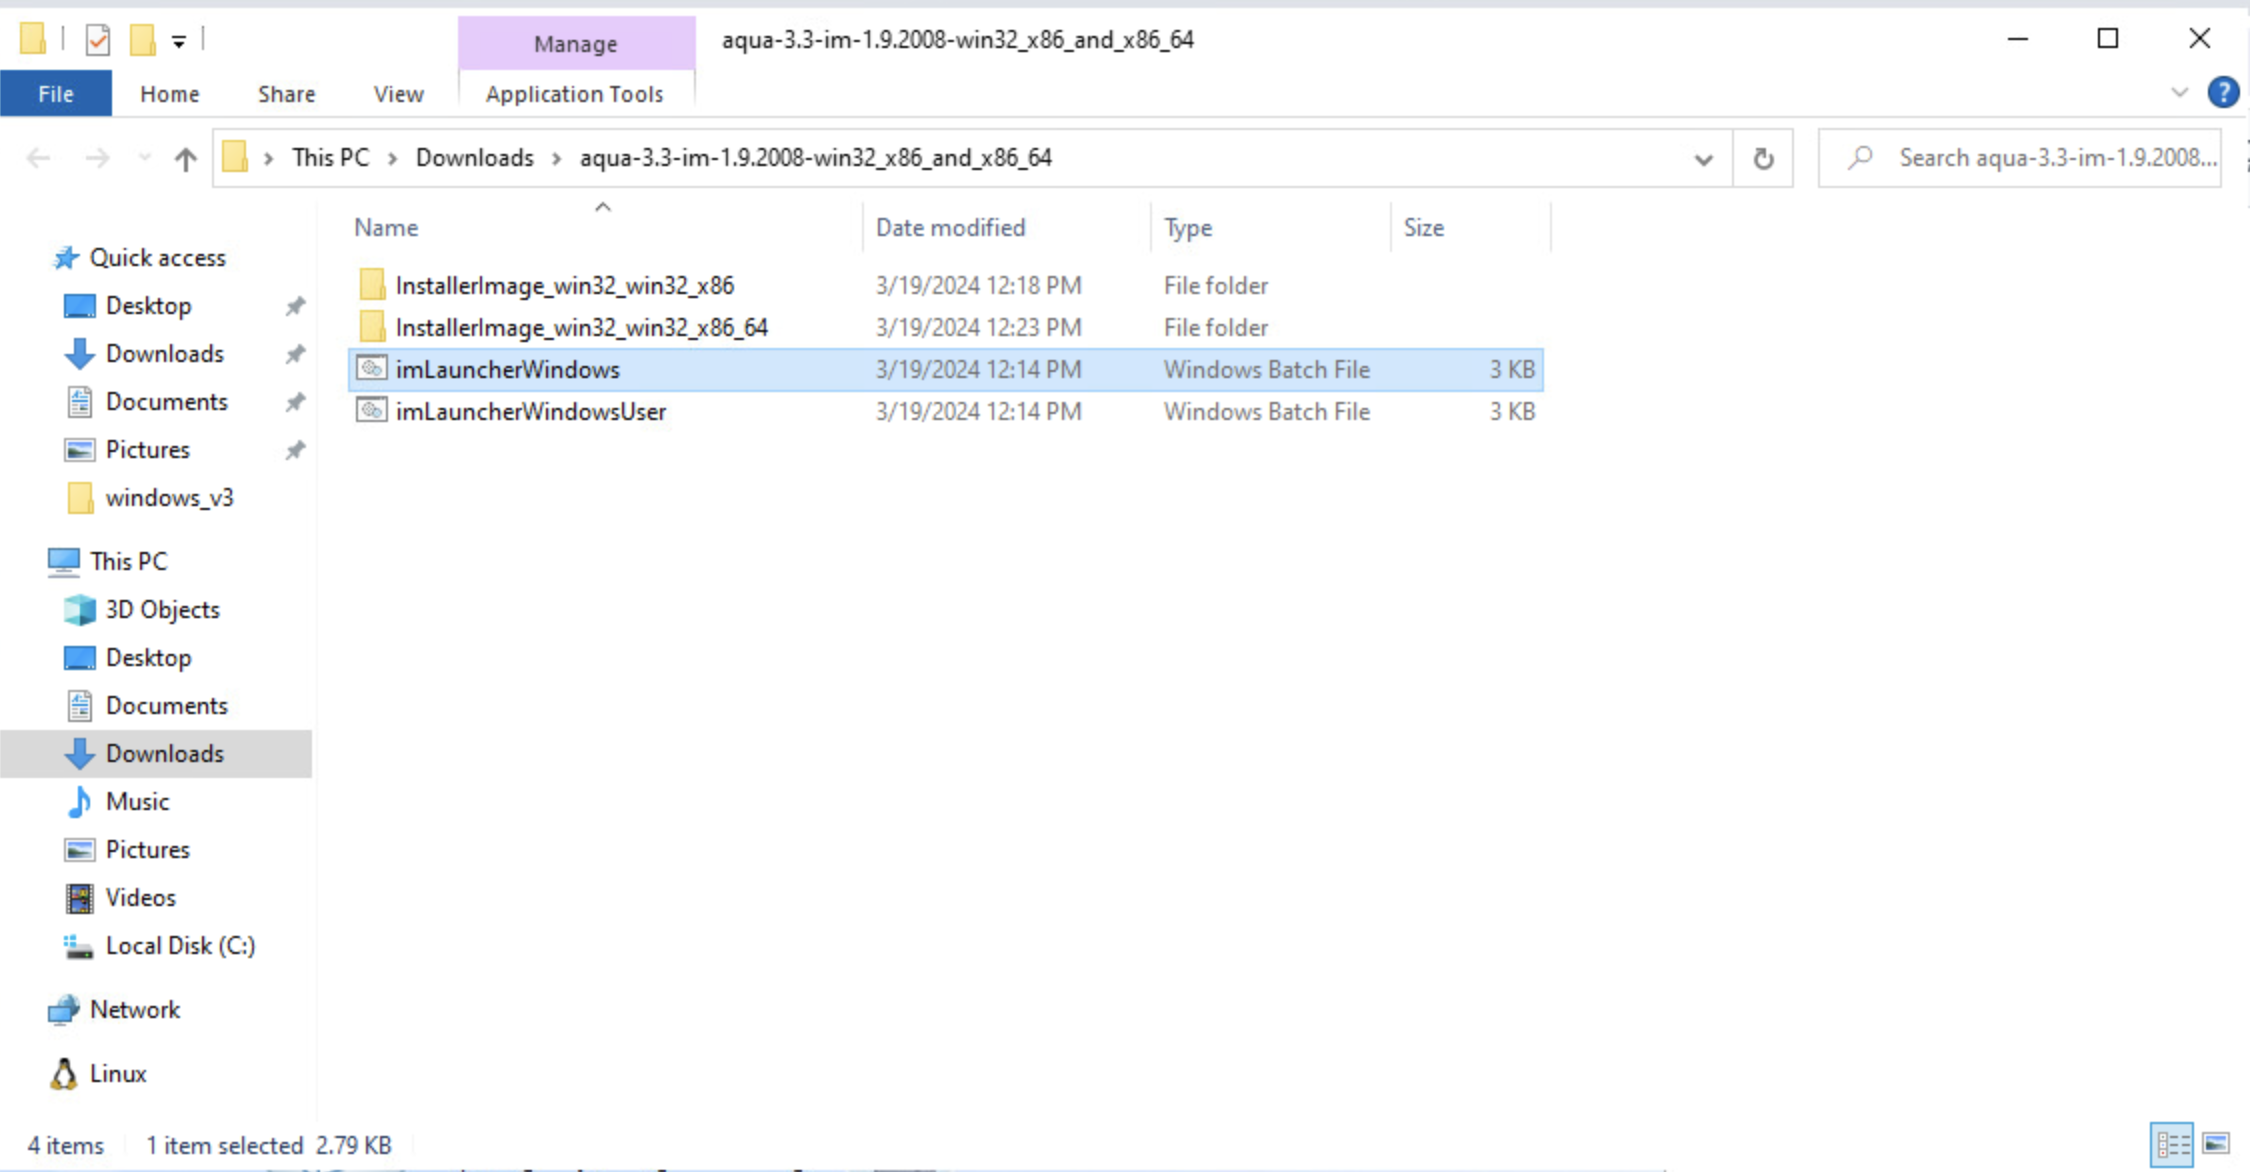
- After you download, unzip the downloaded file. Then open the folder and open the installer.
- imLauncherWindows - for Admins
- imLauncherWindowsUSer - for Non-Admins
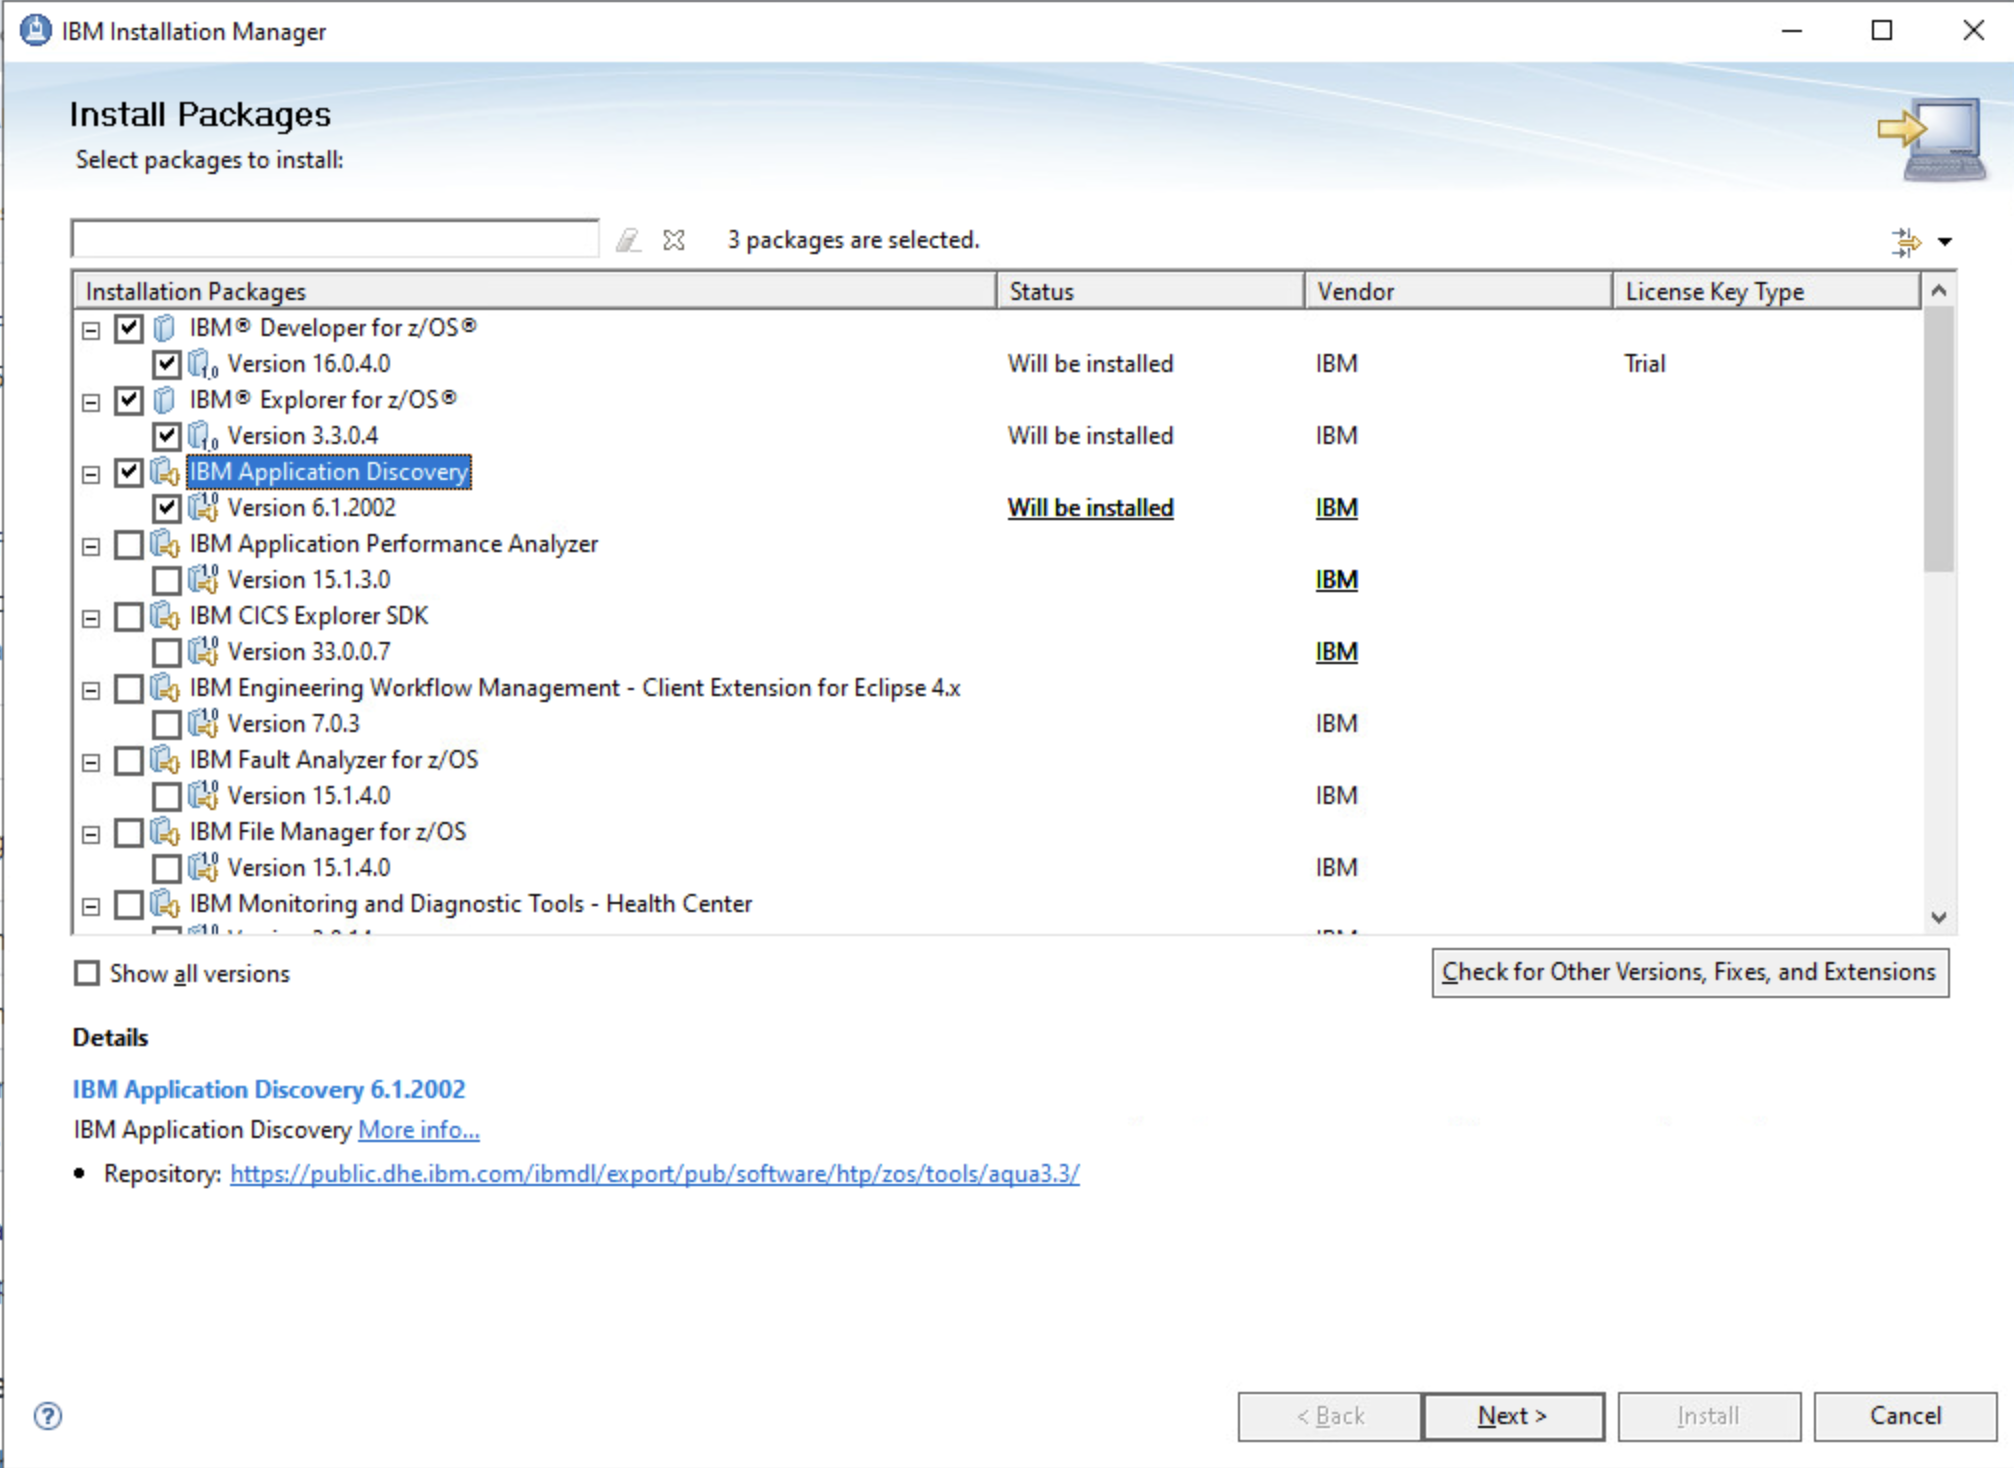
- Select the following packages for install
- IBM Developer for z/OS
- IBM Explorer for z/OS
- IBM Application Discovery
- Proceed through the rest of the installation. There are no changes to be made.
- Once the download has been completed, extract and navigate to the folder
C:/.../Program FilesiBM/Developer_for_zOS. Now, select the eclipse application icon.