Enabling S3 Bucket access
Task Overview
Per the IBM Documentation, the following steps would need to be performed in order to allow for S3 bucket access:
Installing AWS SDK for Java on B2BI Certified Container/Docker deployment:
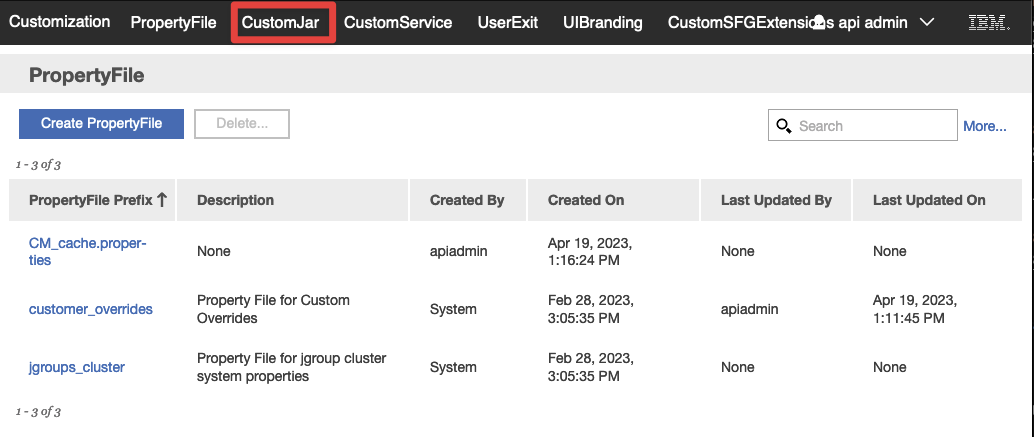
- On B2BI Dashboard, select Customization > Customization. Click the Click Here To Access link. In the Customization login screen, enter the User Name and Password and click Login. (apiadmin/apipassword)
- Click Custom Jar. The Custom Jar list page is displayed. Click Create CustomJar.
- Set the 'Vendor Name' as "awssdk". 'Vendor Version' as the version from "aws-java-sdk-[version]" you downloaded earlier.
- Set the 'File Type' as "LIBRARY". Set 'Target Path' as "Every".
- Upload the files mentioned below (Create multiple custom jars using same parameters as mentioned in ibm-client-engineering/spog-fsm-st5#4 and ibm-client-engineering/spog-fsm-st5#5 above along with each file mentioned below):
- aws-java-sdk-[version].jar (Found in aws-java-sdk-[version]/lib)
- httpclient-[version].jar
- httpcore-[version].jar
- jackson-annotations-[version].jar
- jackson-core-[version].jar
- jackson-databind-[version].jar
- joda-time-[version].jar
- netty-*.jar (Found in aws-java-sdk-[version]/third-party/lib)
Restart the ASI/AC/API pods.
Task Breakdown
Creating an apiadmin user
Login to our dashboard URL:
https://k8s-ingressn-ingressn-f9d3dcbc72-69d548b3e1e33f06.elb.us-east-1.amazonaws.com/dashboard/
- Select Accounts->User Accounts
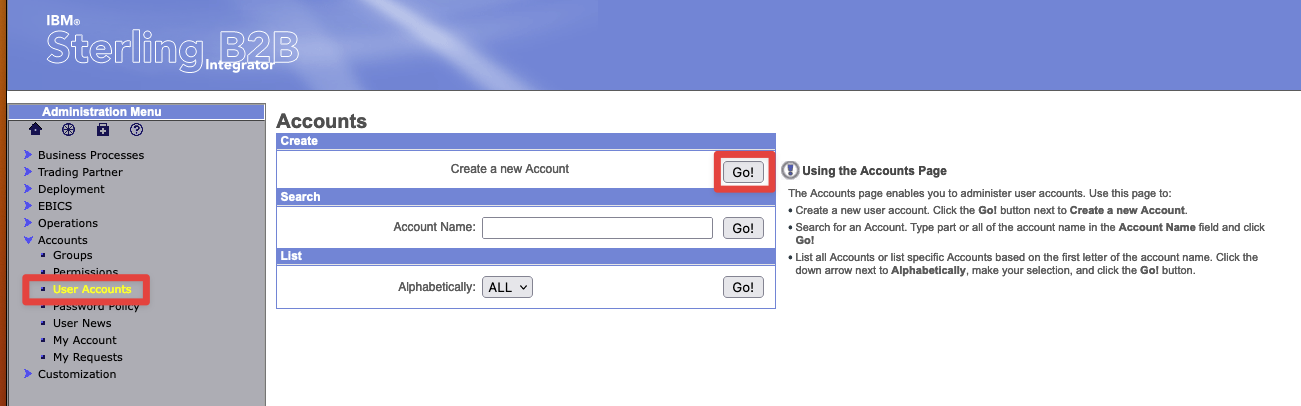
- Set the username to
apiadminwith a password ofapipassword
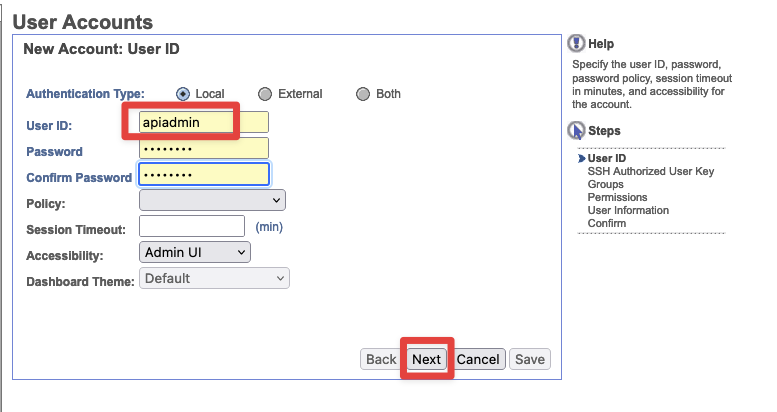
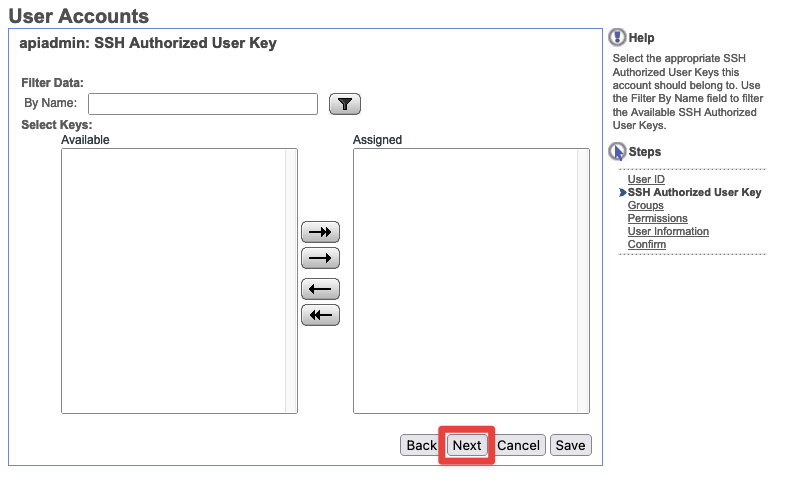
- Skip SSH Authorized Keys as we do not require this for this account
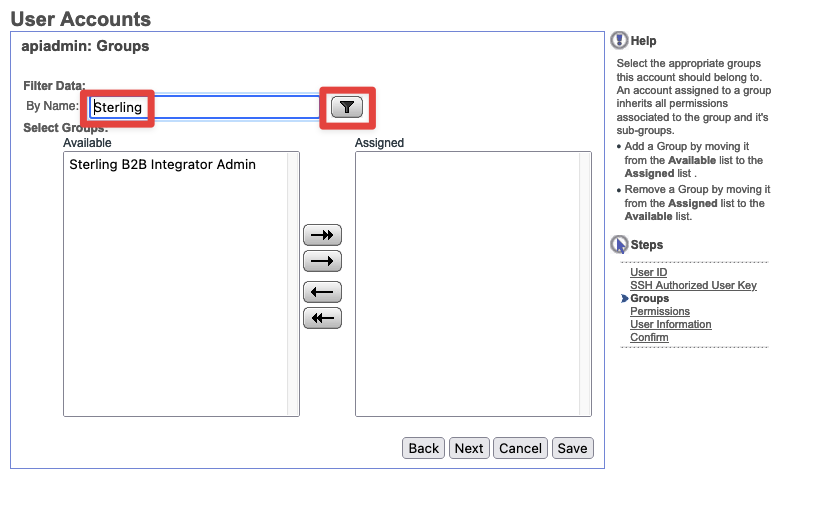
- Under
Filter Datasearch forSterling, then SelectSterling B2B Integrator Adminand assign it. Then pressNext
 |  |
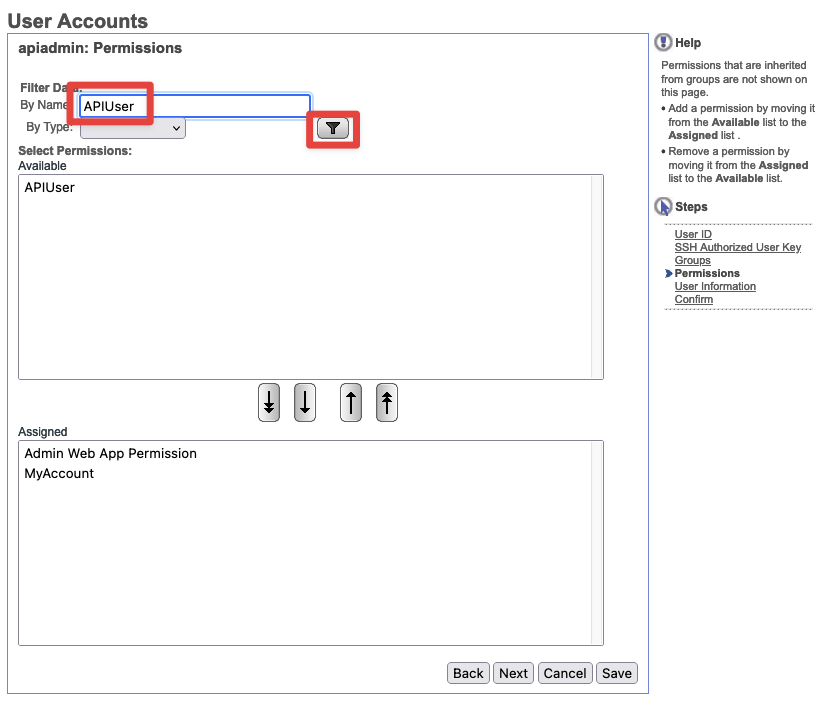
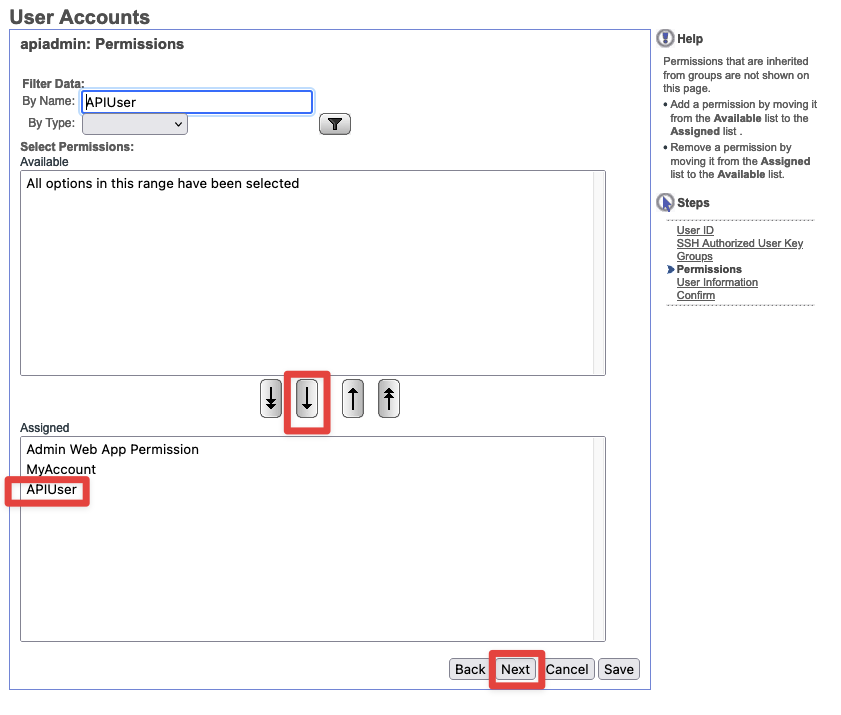
- Permissions - Under
Filter Datasearch forAPIUser. SelectAPIUserand add it to the permissions below with the arrow. Then hitNext.
 |  |
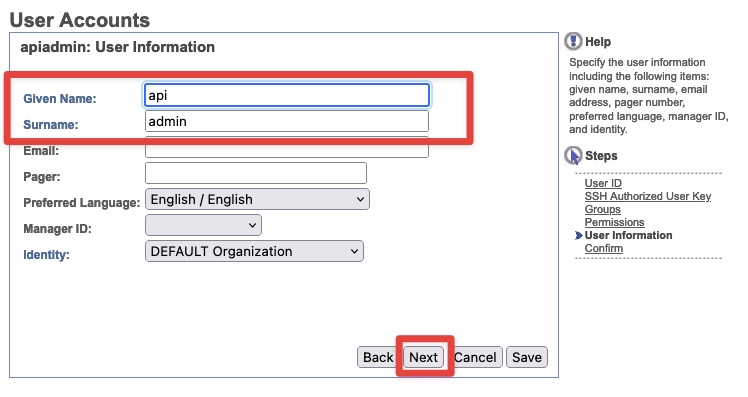
- User Information - Set the
Given NameandSurnametoapiandapiadminrespectfully. Then clickNext.
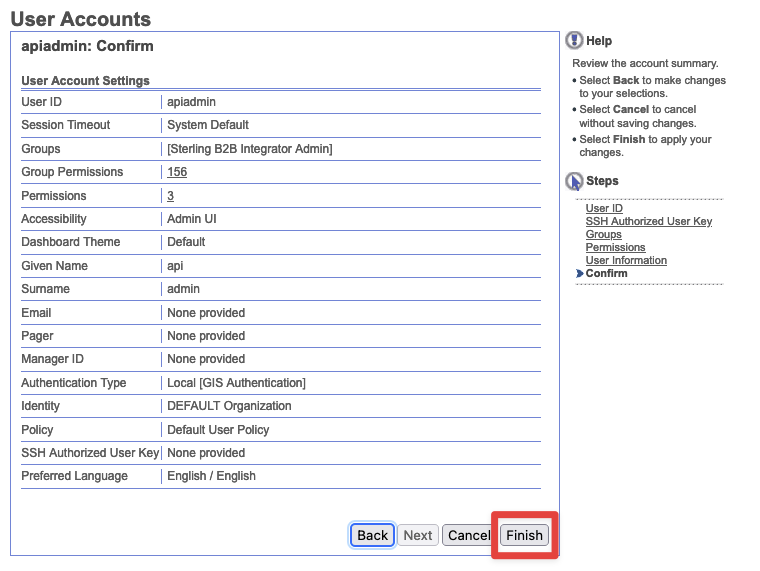
- Confirm - Verify all info is correct and then click
Finish
Uploading Required Jar files for S3 access
Downloading latest AWS SDK zip file
Latest SDK can be retrieved here:
https://sdk-for-java.amazonwebservices.com/latest/aws-java-sdk.zip
Download the zip and extract it. The files needed will live at the following paths:
aws-java-sdk-1.12.464/lib/aws-java-sdk-1.12.464.jar
aws-java-sdk-1.12.464/third-party/lib/httpclient-4.5.13.jar
aws-java-sdk-1.12.464/third-party/lib/httpcore-4.4.13.jar
aws-java-sdk-1.12.464/third-party/lib/jackson-annotations-2.12.7.jar
aws-java-sdk-1.12.464/third-party/lib/jackson-core-2.12.7.jar
aws-java-sdk-1.12.464/third-party/lib/jackson-databind-2.12.7.1.jar
aws-java-sdk-1.12.464/third-party/lib/joda-time-2.8.1.jar
aws-java-sdk-1.12.464/third-party/lib/netty-buffer-4.1.86.Final.jar
aws-java-sdk-1.12.464/third-party/lib/netty-codec-4.1.86.Final.jar
aws-java-sdk-1.12.464/third-party/lib/netty-codec-http-4.1.86.Final.jar
aws-java-sdk-1.12.464/third-party/lib/netty-common-4.1.86.Final.jar
aws-java-sdk-1.12.464/third-party/lib/netty-handler-4.1.86.Final.jar
aws-java-sdk-1.12.464/third-party/lib/netty-resolver-4.1.86.Final.jar
aws-java-sdk-1.12.464/third-party/lib/netty-transport-4.1.86.Final.jar
aws-java-sdk-1.12.464/third-party/lib/netty-transport-native-unix-common-4.1.86.Final.jar
Versions may be differnt as the aws-java-sdk.zip is always being updated.
PropertyUI url
Retrieve the propertyUI url. It can be retrieved with the following command:
echo "https://"$(kubectl get ingress sterling-b2bi-b2bi-ingress -o jsonpath='{..hostname}')"/propertyUI/app/"

https://myingress.elb.us-east-1.amazonaws.com/propertyUI/app/
Login using the apiadmin user we created with the password apipassword
Upload each jar file
Select CustomJar from the top menubar
Click Create CustomJar from the top of the page

In this example we are uploading the latest aws-java-sdk jar file. Click the browse button and select the aws-java-sdk jar file from the path extracted above.
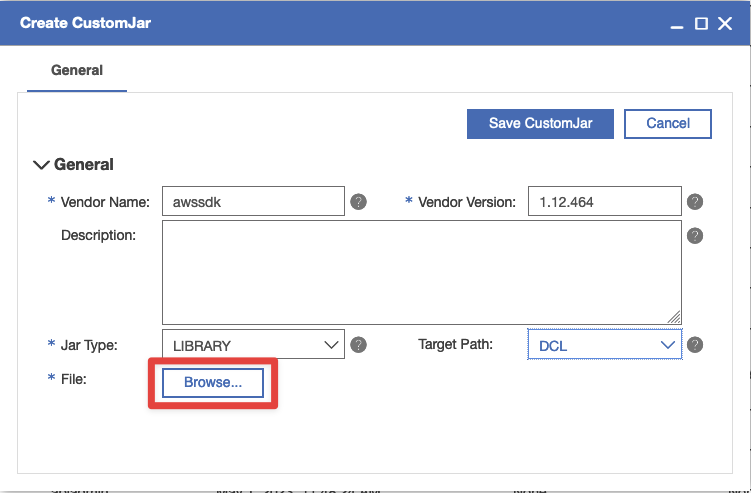
When complete, click the Save CustomJar button.
Wash, rinse, repeat with the other jar files in the above list.
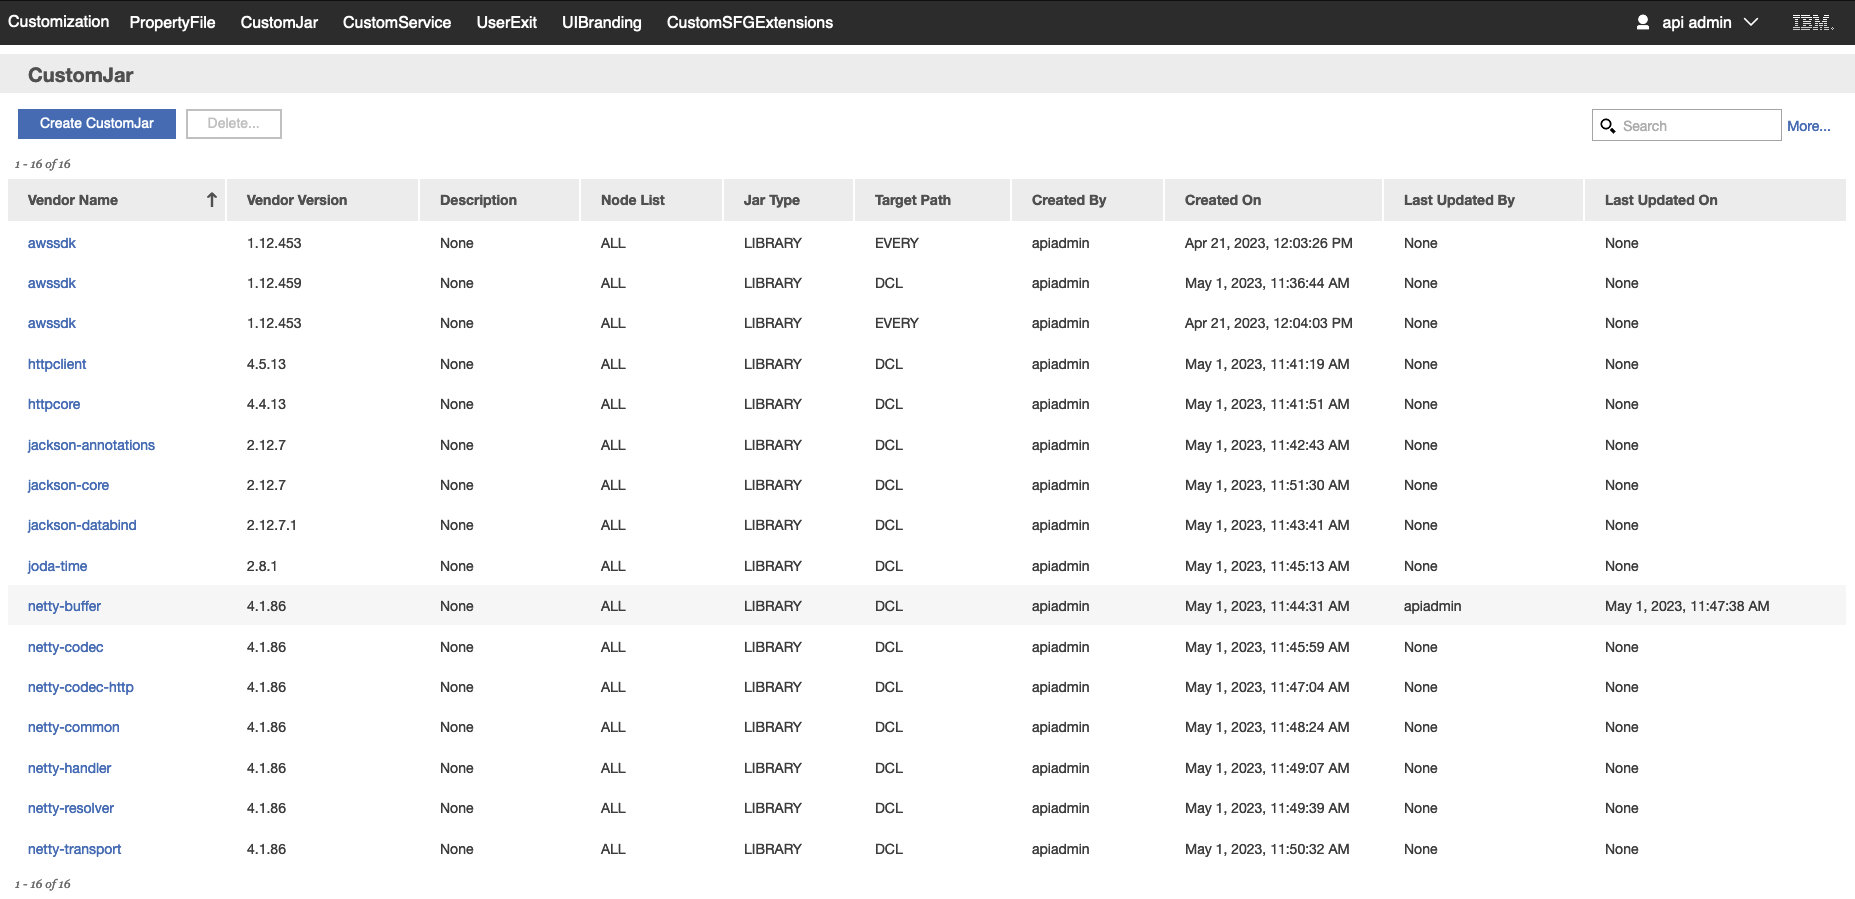
When complete, the page should look similar but not exactly like this:
Restart all the pods.
kubectl scale sts sterling-b2bi-b2bi-ac-server --replicas=0
kubectl scale sts sterling-b2bi-b2bi-asi-server --replicas=0
kubectl scale sts sterling-b2bi-b2bi-api-server --replicas=0
kubectl scale sts sterling-b2bi-b2bi-ac-server --replicas=1
kubectl scale sts sterling-b2bi-b2bi-asi-server --replicas=1
kubectl scale sts sterling-b2bi-b2bi-api-server --replicas=1
You may need to update the startup probe failure threshold for the ASI application in your b2bi overrides file to 12 before restarting the pods after creating the above custom jars.
  startupProbe:
    initialDelaySeconds: 120
    timeoutSeconds: 30
    periodSeconds: 60
    failureThreshold: 12
Whenever the pods are restarted, they will go through a copy process to install these custom jars and that adds to the load time. Without this change, the startup probe may wind up killing the ASI pod before this process is complete.
B2Bi Adapter creation and configuration
Configuring communication adapters:
The following adapters can be used with Sterling File Gateway:
| Protocol | Adapter |
|---|---|
| FTP, FTPS | FTP Server adapter |
| FTP, FTPS | FTP Client adapter and services |
| SSH/SFTP, SSH/SCP | SFTP Server adapter |
| SSH/SFTP | SFTP Client adapter and services |
| Sterling Connect:Direct | Connect:Direct Server adapter |
| PGP | Command Line Adapter 2 |
| HTTP, HTTPS, WebDAV (Requires extensibility. See Add Custom Protocols.) | HTTP Server adapter |
| HTTP, HTTPS, WebDAV (Requires extensibility. See Add Custom Protocols.) | HTTP Client adapter and services |
| WebSphere® MQ File Transfer Edition | WebSphere MQ File Transfer Edition Agent adapter, WebSphere MQ Suite Async adapter, WebSphere MQ File Transfer Edition Create Transfer service, FTP Server Adapter |
Primary URL can be found with the following command:
kubectl get ingress sterling-b2bi-b2bi-ingress -o jsonpath="{..hostname}"

k8s-ingressn-ingressn-f9d3dcbc72-69d548b3e1e33f06.elb.us-east-1.amazonaws.com
Login to the dashboard as fg_sysadmin:
https://k8s-ingressn-ingressn-f9d3dcbc72-69d548b3e1e33f06.elb.us-east-1.amazonaws.com/dashboard
From the main menu:
- Select Deployment > Services > Configuration.
- Select and configure the adapters you require.
As an example, let's configure SFTP. Per the above table, SFTP is SFTP Client adapter
Log out of dashboard and log back into the filegateway as fg_architect:
https://k8s-ingressn-ingressn-f9d3dcbc72-69d548b3e1e33f06.elb.us-east-1.amazonaws.com/filegateway
From the main menu, select Participants > Communities to create a community with the following values:
| Field | Value |
|---|---|
| Community Name | FirstComm |
| Partner Initiates Protocol Connection | X |
| Partner Listens for Protocol Connections | X |
| SSH/SFTP | X |
| Should Receive Notification | Yes |
Select Participants > Groups to create a group named Group1.
Log out of filegateway and log back in as fg_provisioner
Create two partners with the following values:
Select Participants > Partners
| Field | Value For First Partner | Value For Second Partner |
|---|---|---|
| Community | FirstComm | FirstComm |
| Partner Name | Partner1 | Partner2 |
| Phone | 333 | 444 |
| y@x.com | x@y.com | |
| User Name | partner1 | partner2 |
| Password | p@ssw0rd | p@ssw@rd |
| Given Name | partner | partner |
| Surname | 1 | 2 |
| Partner Role | Is a consumer of data - Initiates a connection | Is a producer of data |
| Use SSH | Yes | Yes |
| Use Authorized User Key | No | No |
| PGP Settings | - No - No | - No - No |
Associate the partners with Group1. Select Participants > Groups > Add Partner. Select the partners and the group, and click Execute
Log out and log back into the filegateway as fg_architect
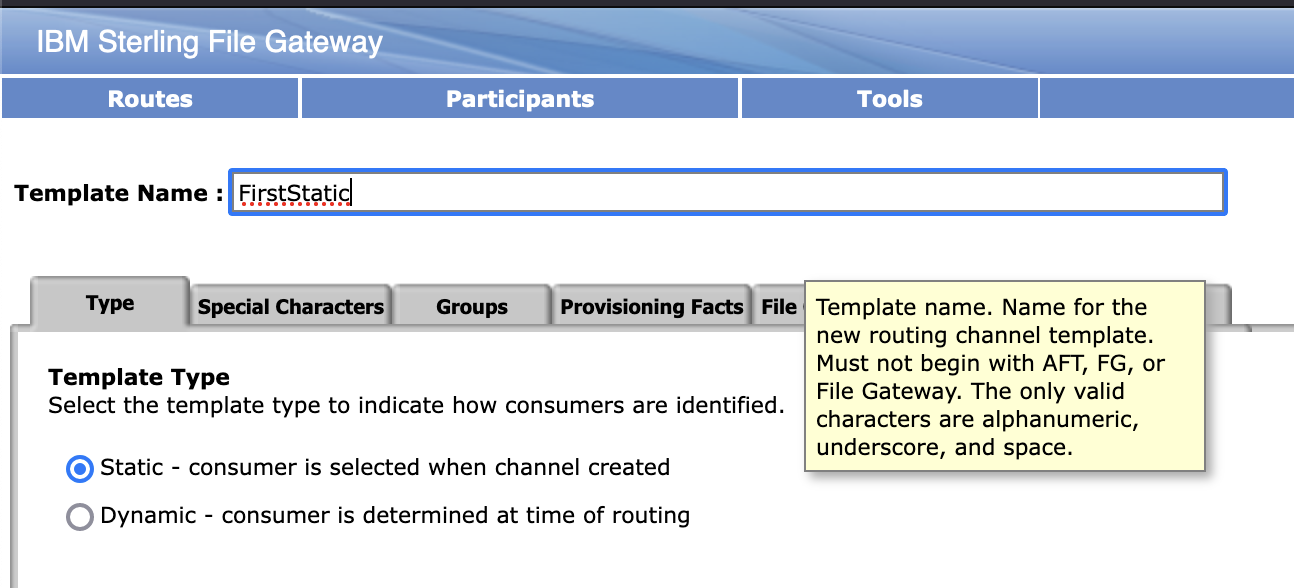
Select Routes > Templates > Create to create a routing channel template with the following values:
 | 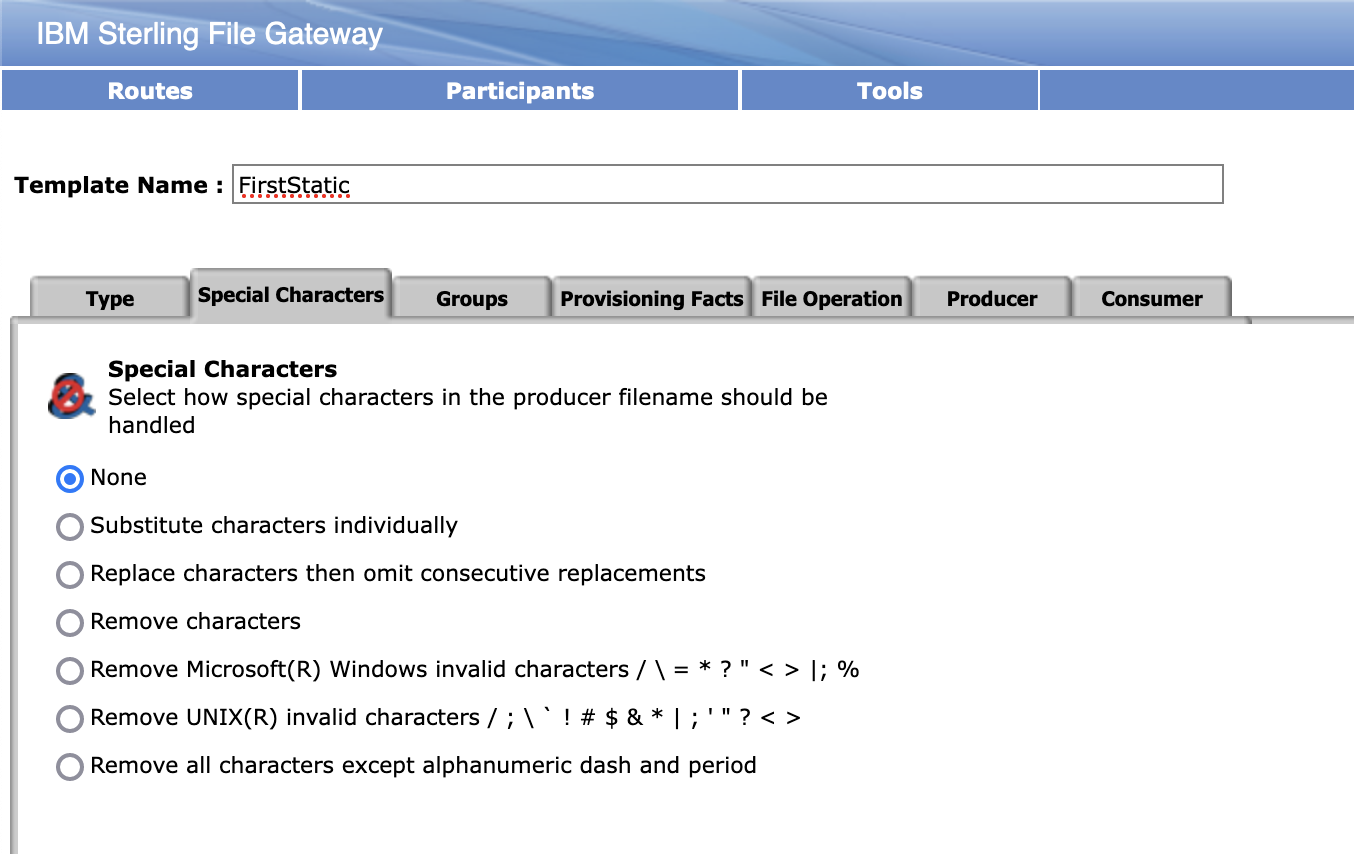 |
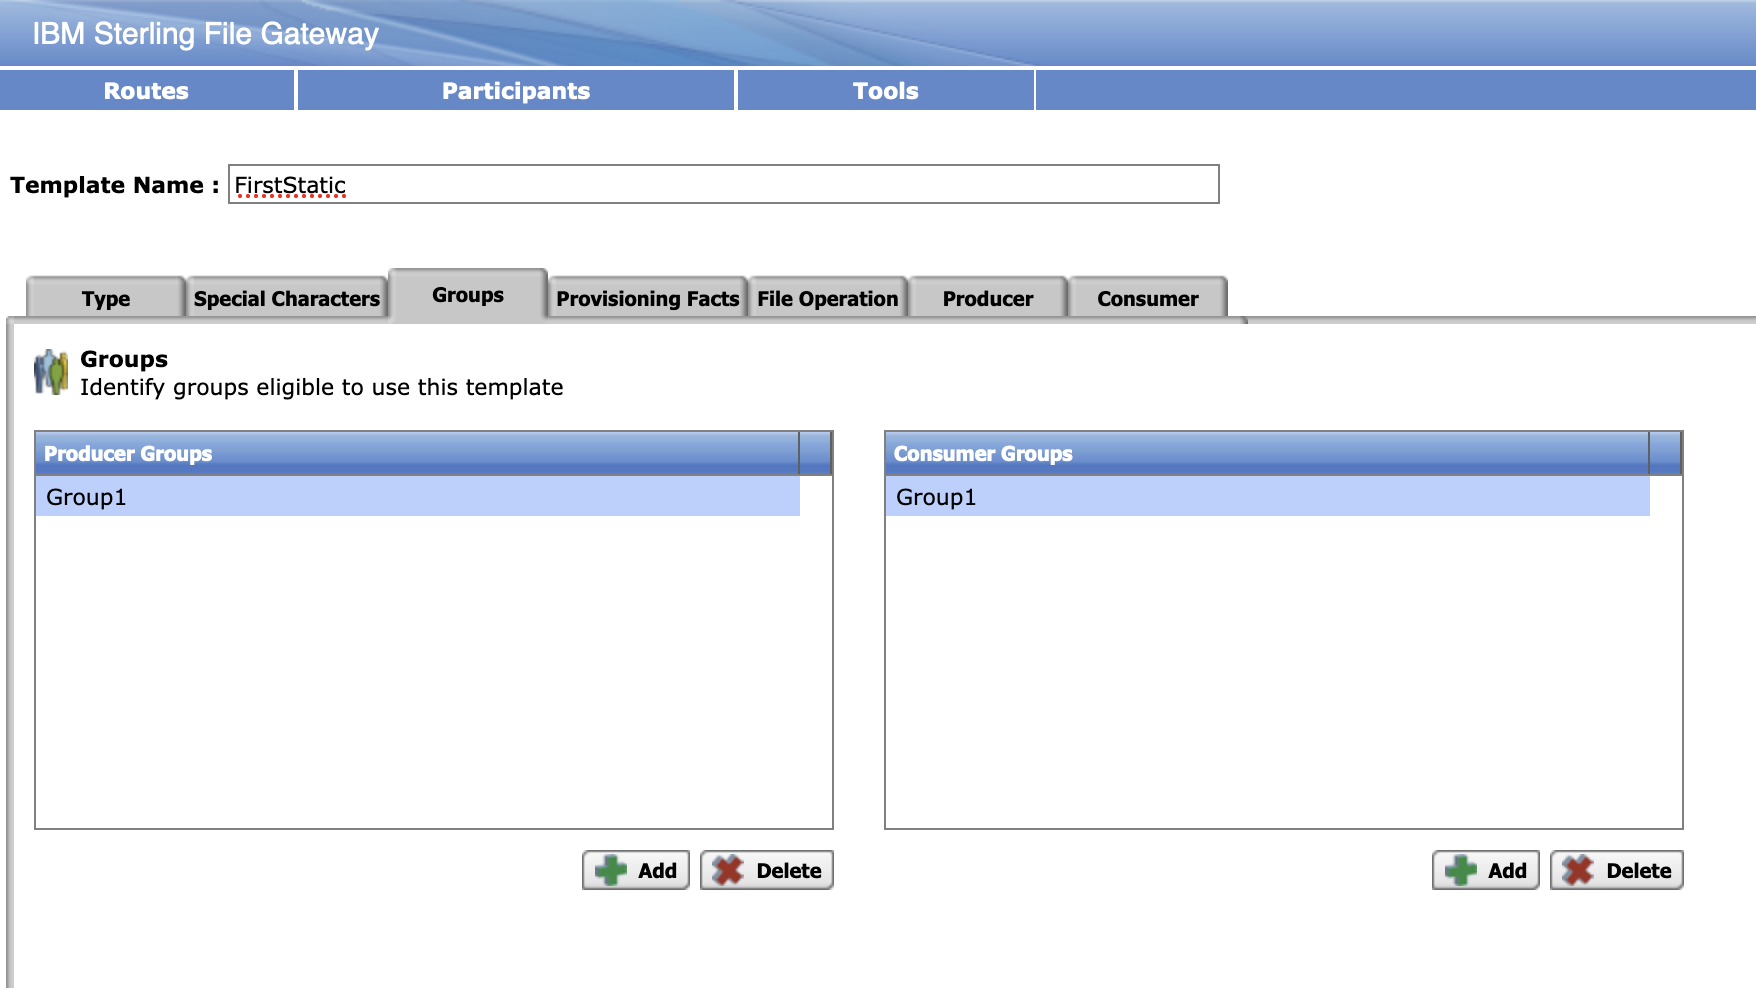 | 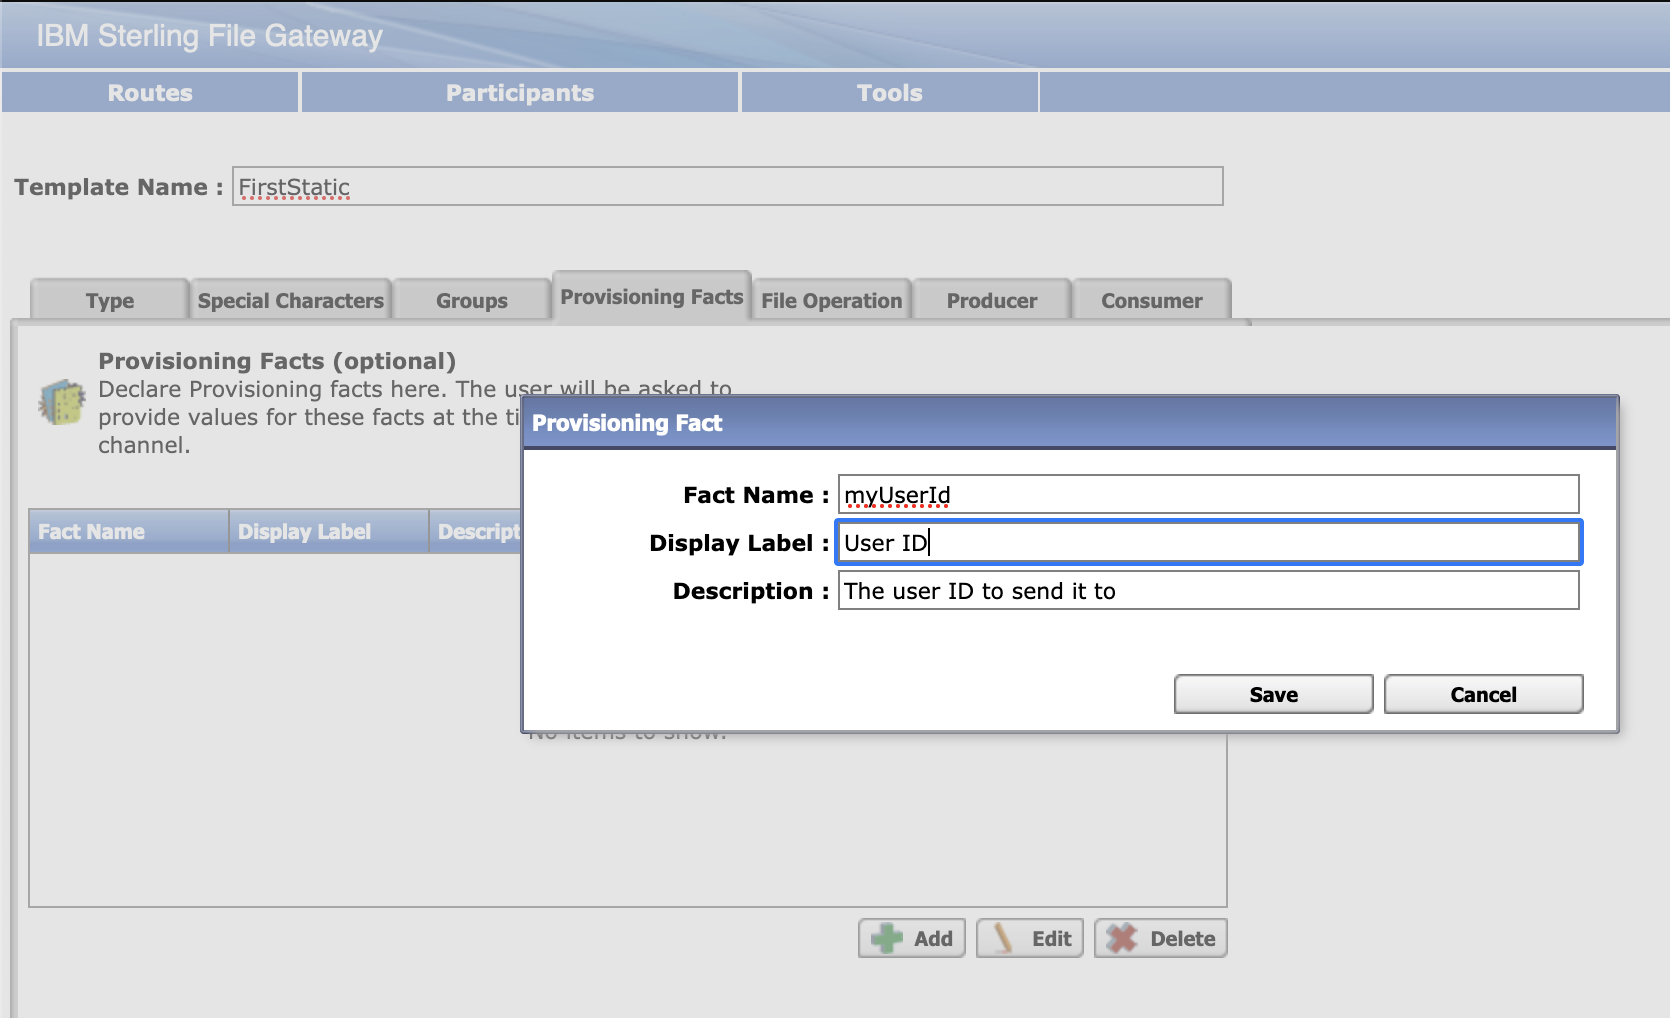 |
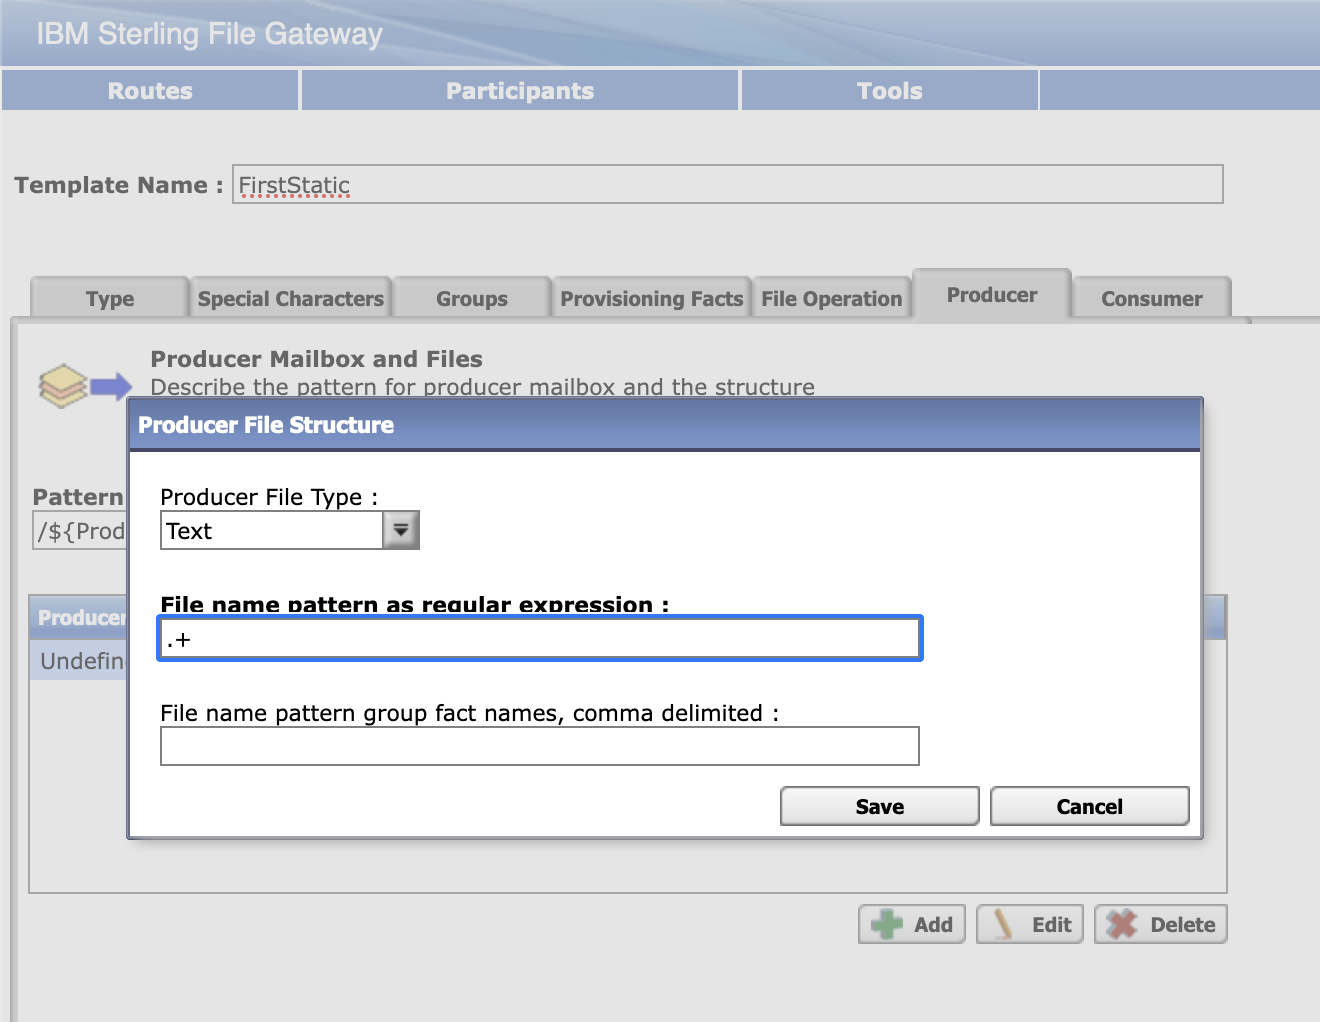 |  |
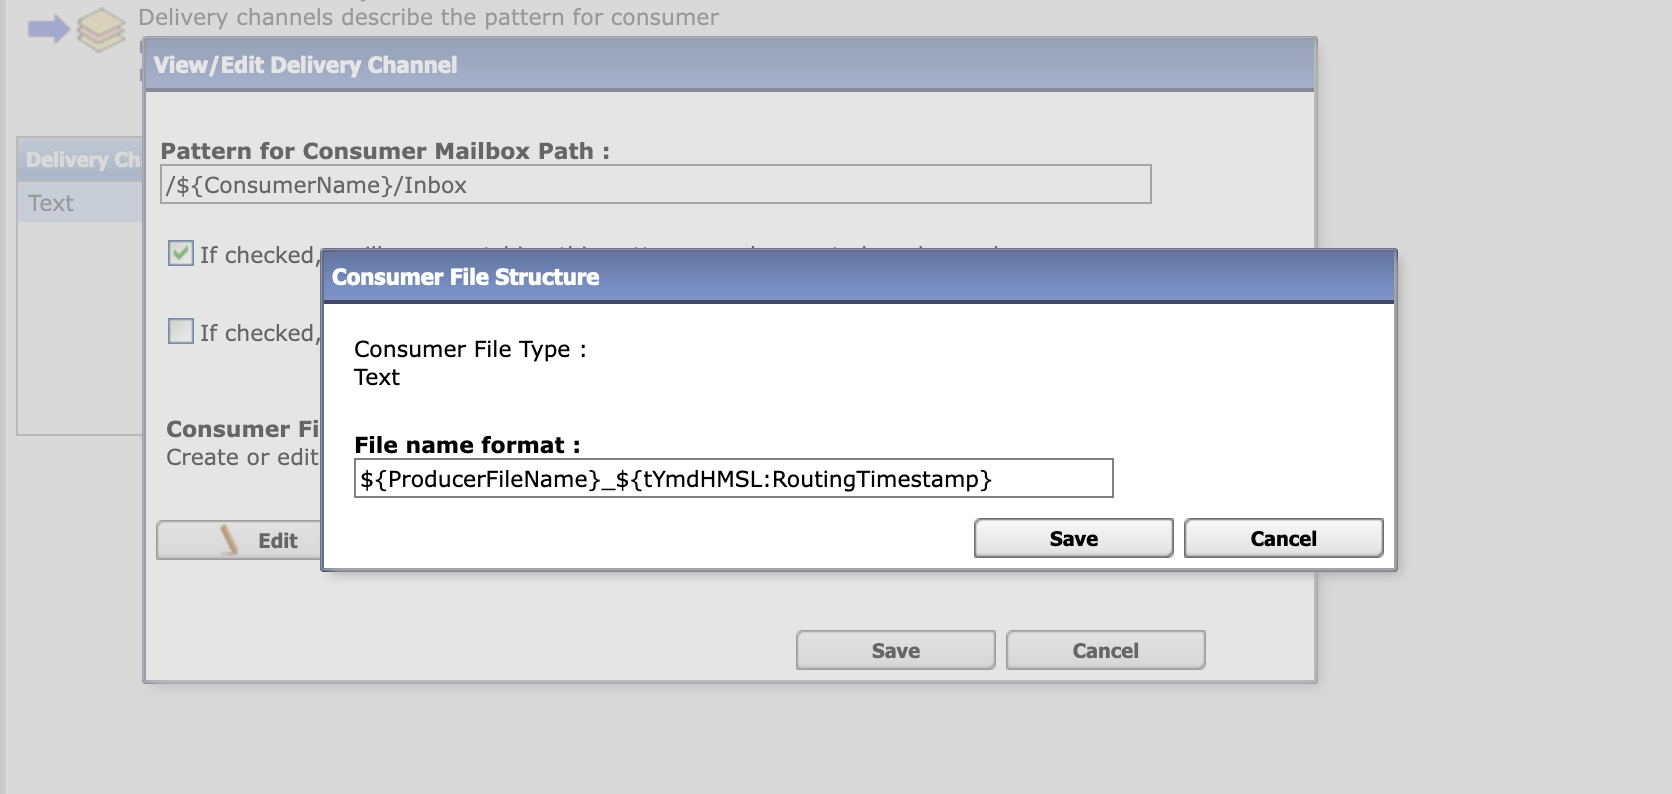 | 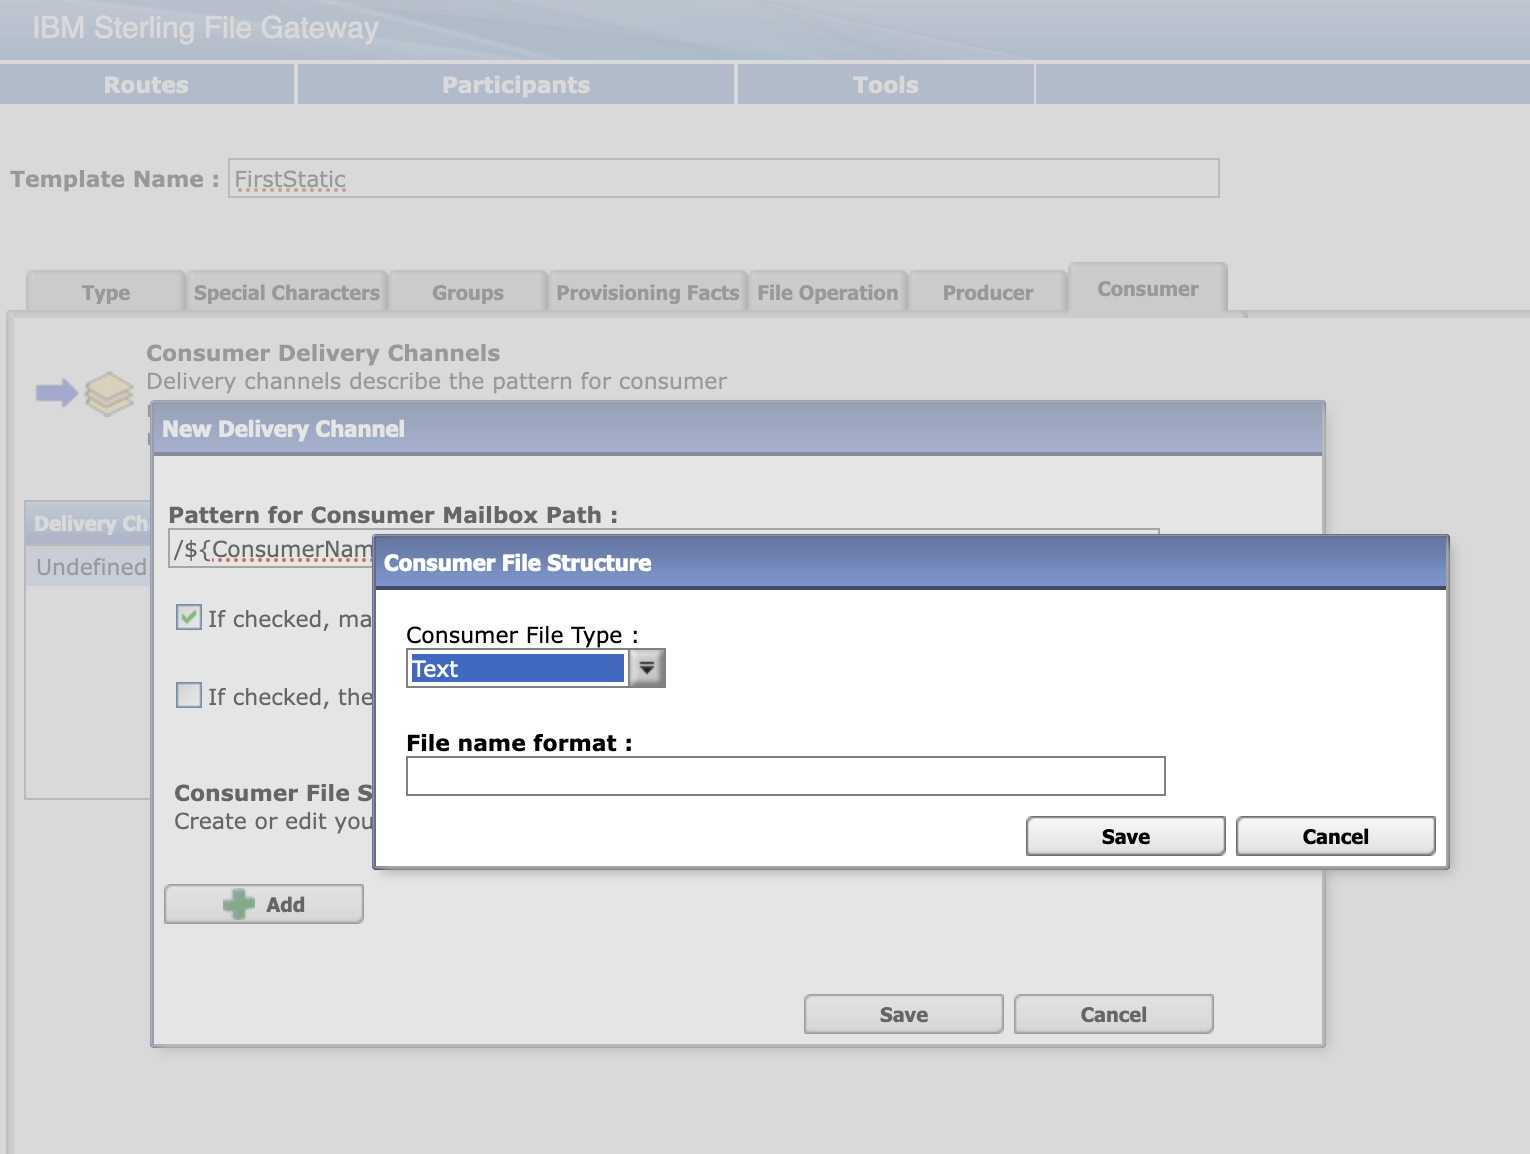 |
Save the template
Log out and log back into filegateway as fg_provisioner
Create a routing channel with the following values:
| Field | Value |
|---|---|
| Routing Channel Template | FirstStatic |
| Producer | Partner2 |
| Consumer | Partner1 |
| User ID | User1 |
Log out of the UI and log in to the myFileGateway ui as partner2. You will probably need to change the password on first login.
https://k8s-ingressn-ingressn-f9d3dcbc72-69d548b3e1e33f06.elb.us-east-1.amazonaws.com/myfilegateway
Upload a text file to the / mailbox and then log out.
Log in to myfilegateway as partner1. You will probably need to change the password on first login.
Click the Download File tab and see if the file is there. Since Partner1 is the consumer and Partner2 is the sender, the file should show up there.
Click on the file and download. Verify the file is downloaded and matches the naming convention we set.
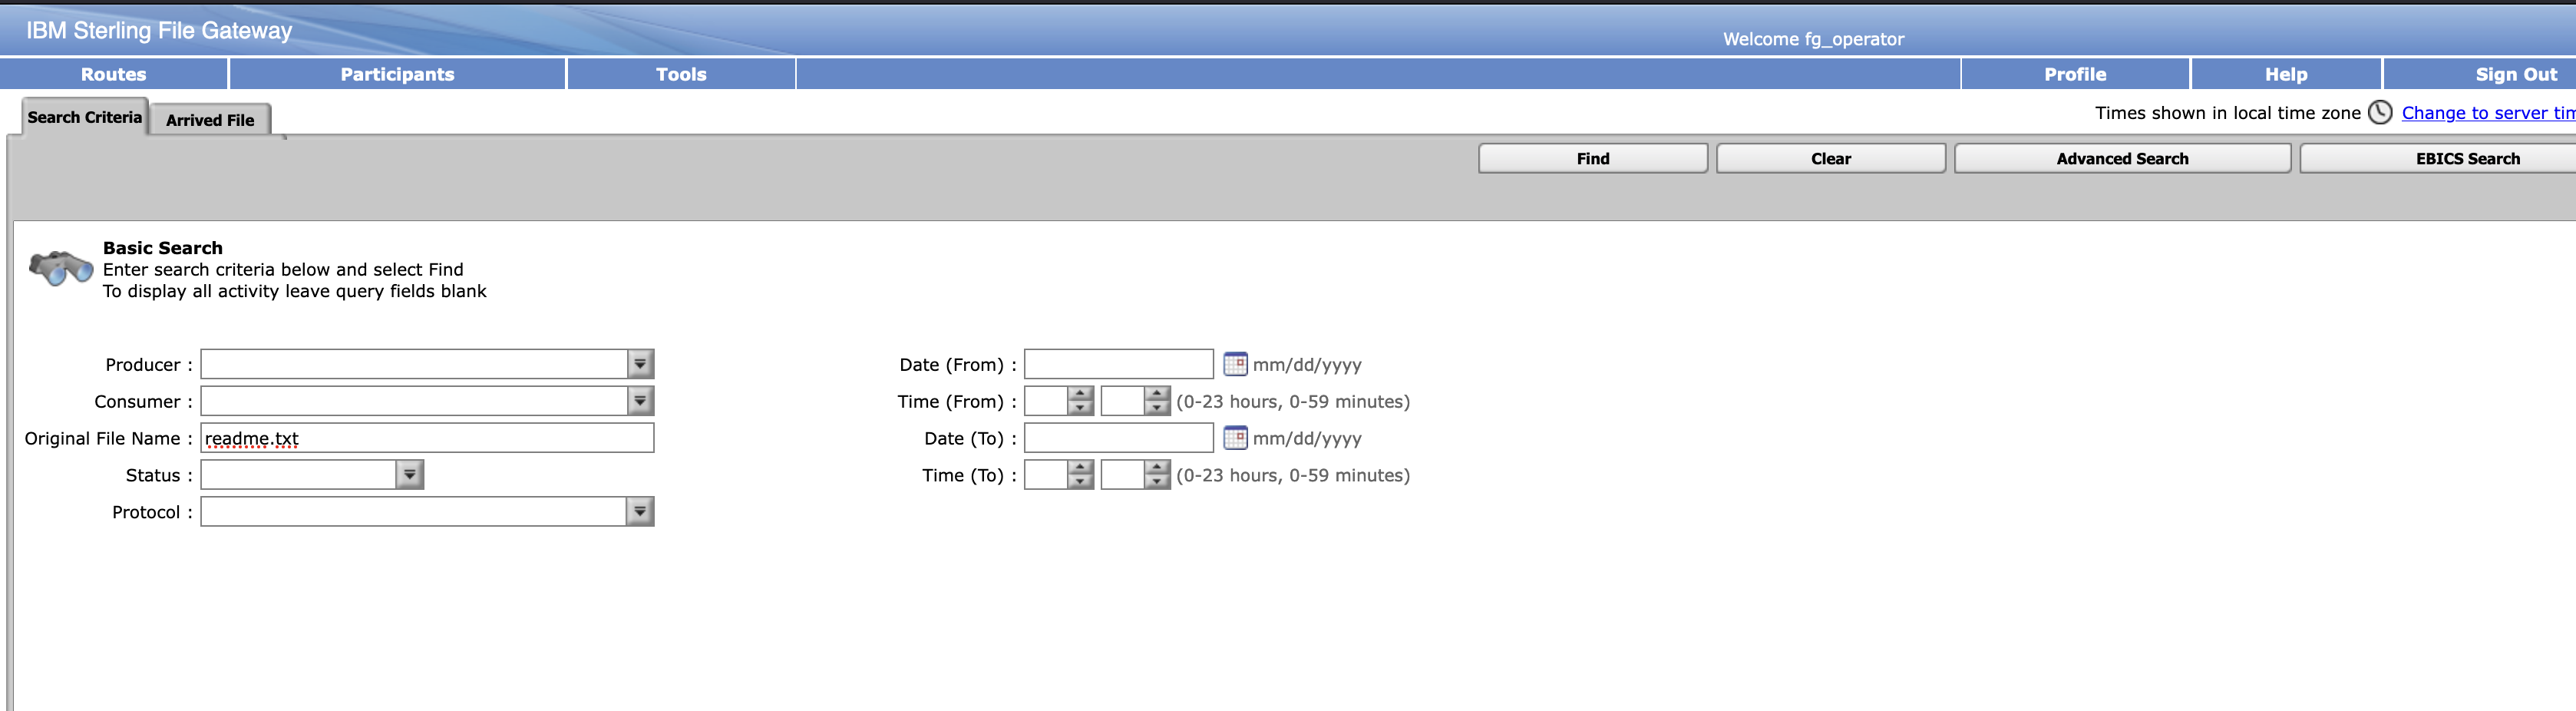
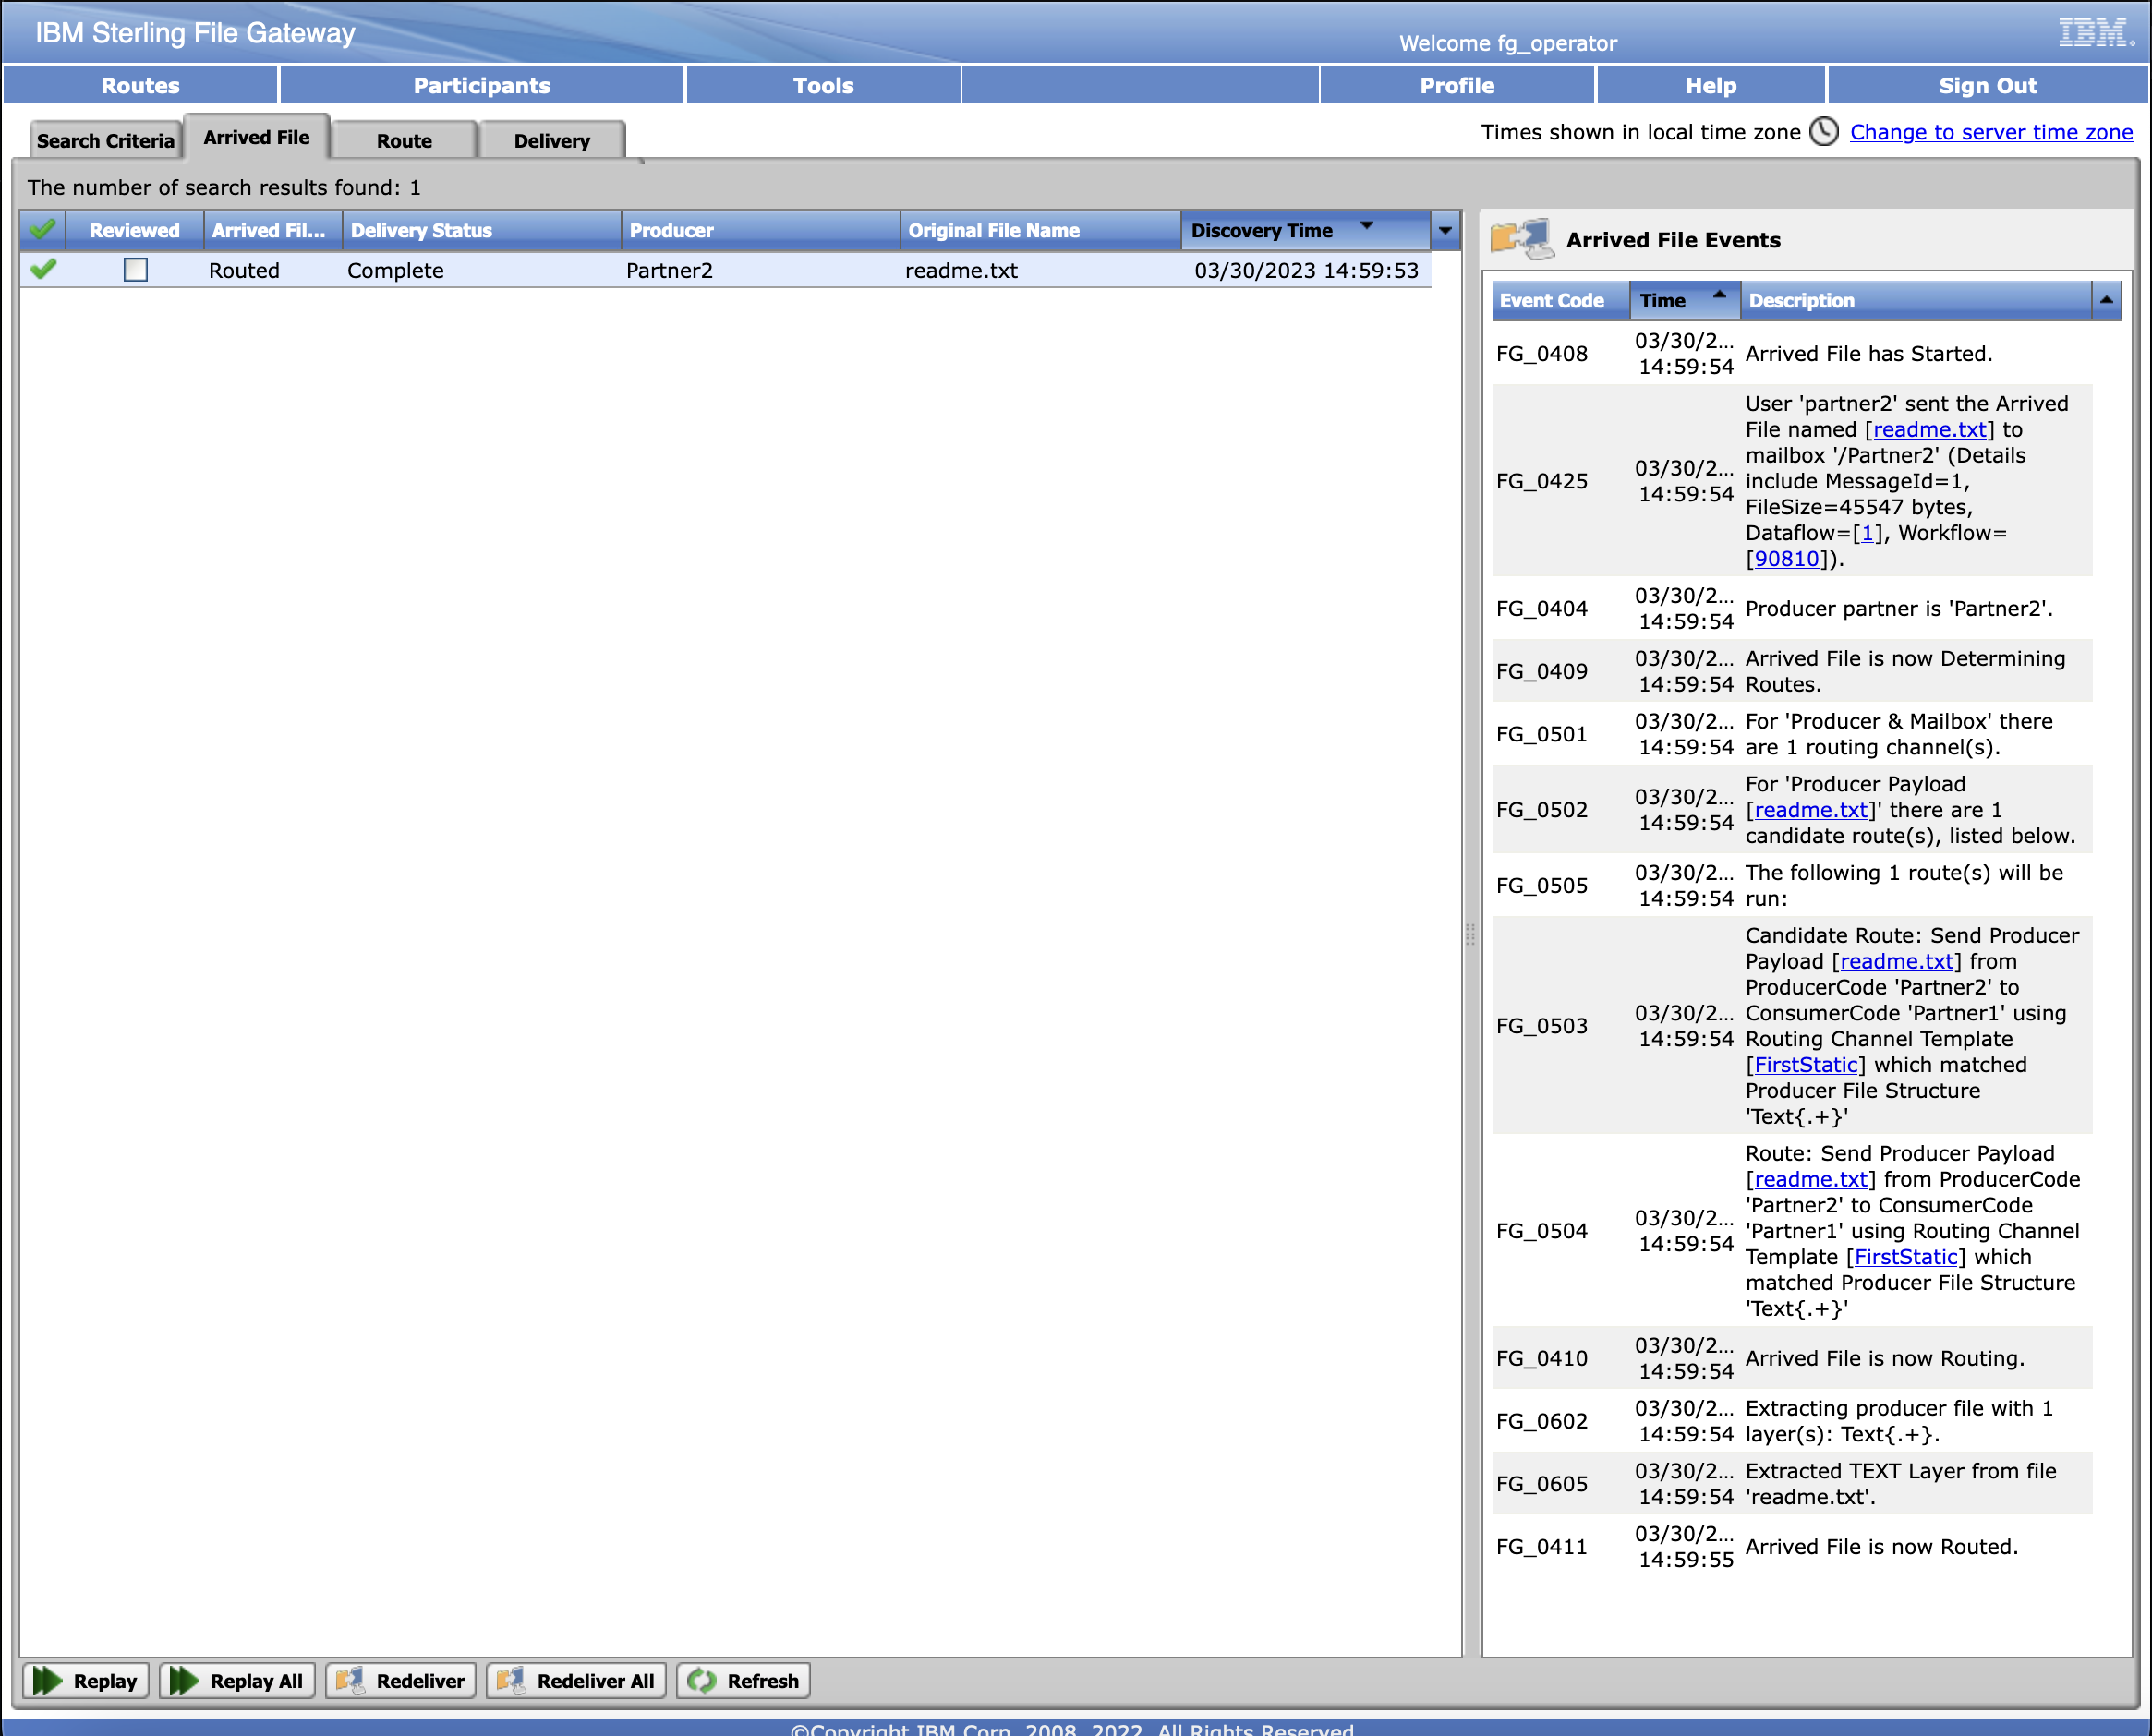
Log out and log back in to filegateway as fg_operator. If the default password password does not work for him, you might need to log back into the dashboard as fg_sysadmin and manually set fg_operator's password. Then you will be required to change it when you log in to the filegateway
Search for the file that was uploaded. We called it readme.txt in this example.
SFTP Access
In order to enable the SFTP Server Adapter, we first must create a host key.
Log into the dashboard url for B2Bi and select:
Deployment->SSH Host Indentity Key
Select the Go button next to New Host Identity key
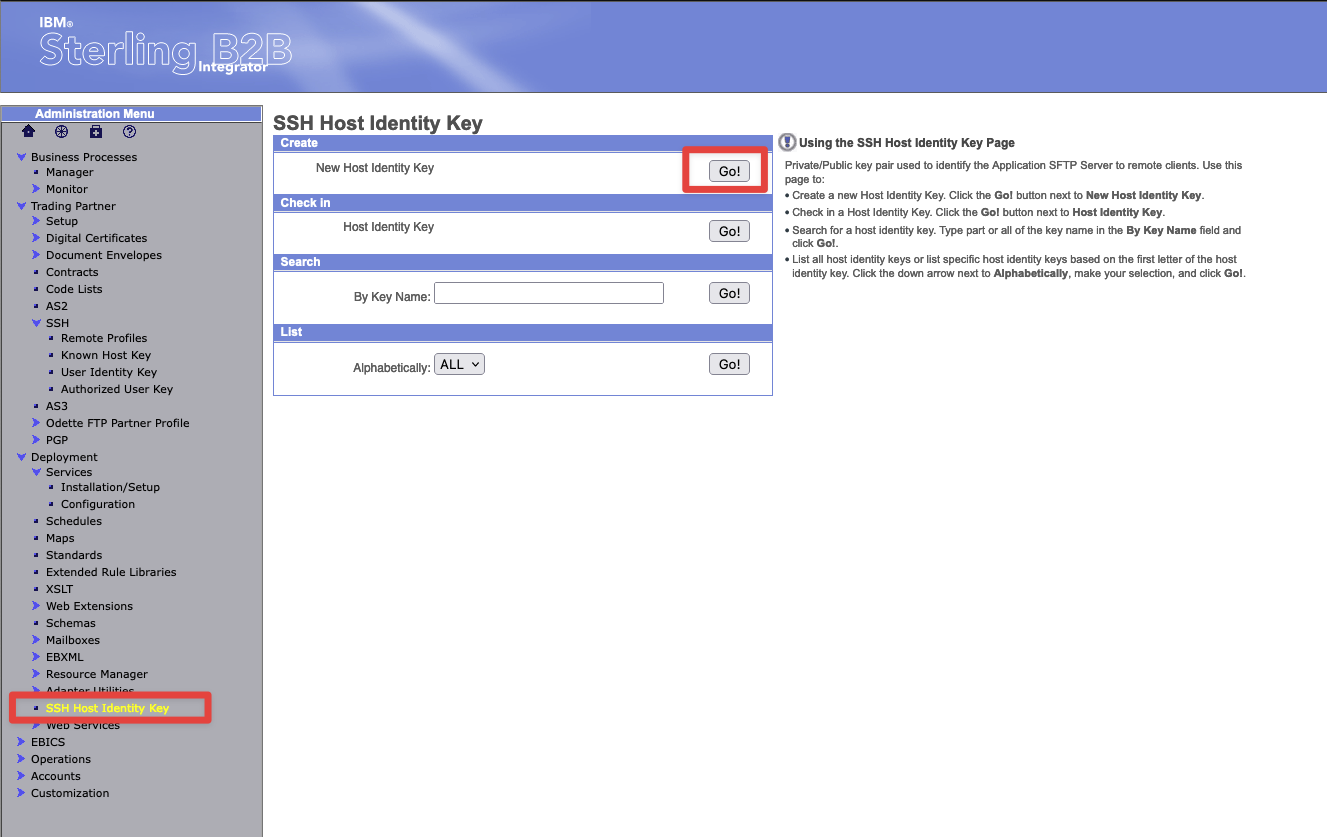
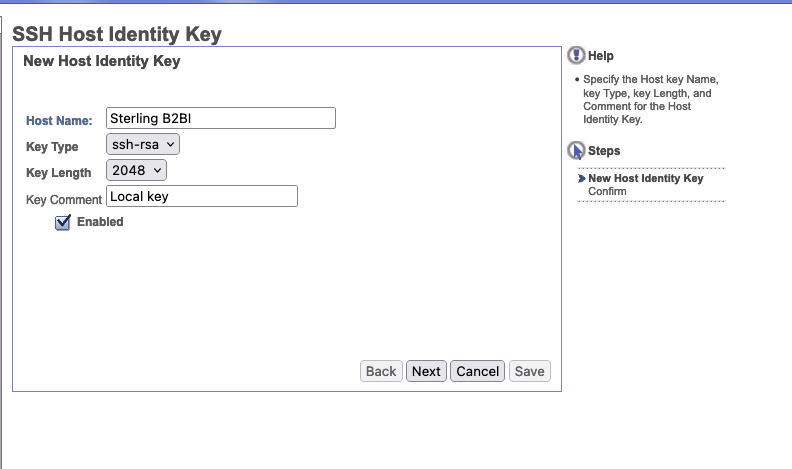
Set the hostname to something that matches. In our example we set it to sterlingb2bi and then set the key length to 2048.
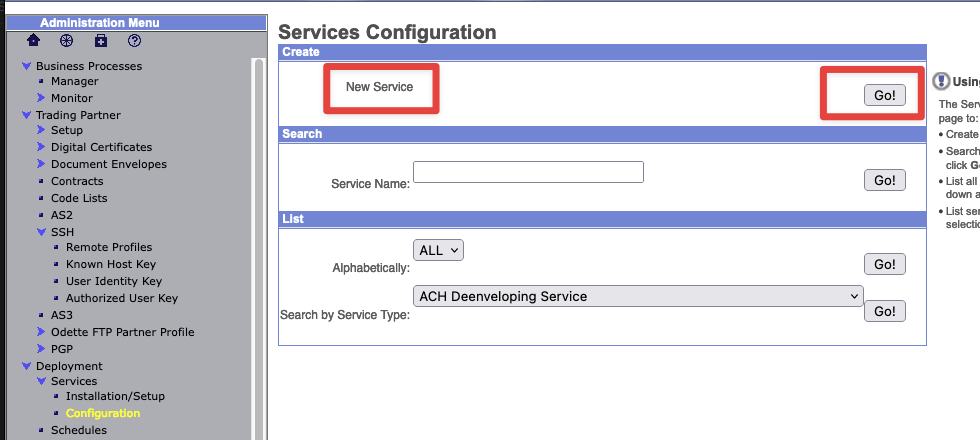
Under Deployment->Services->Configuration Create the new service.
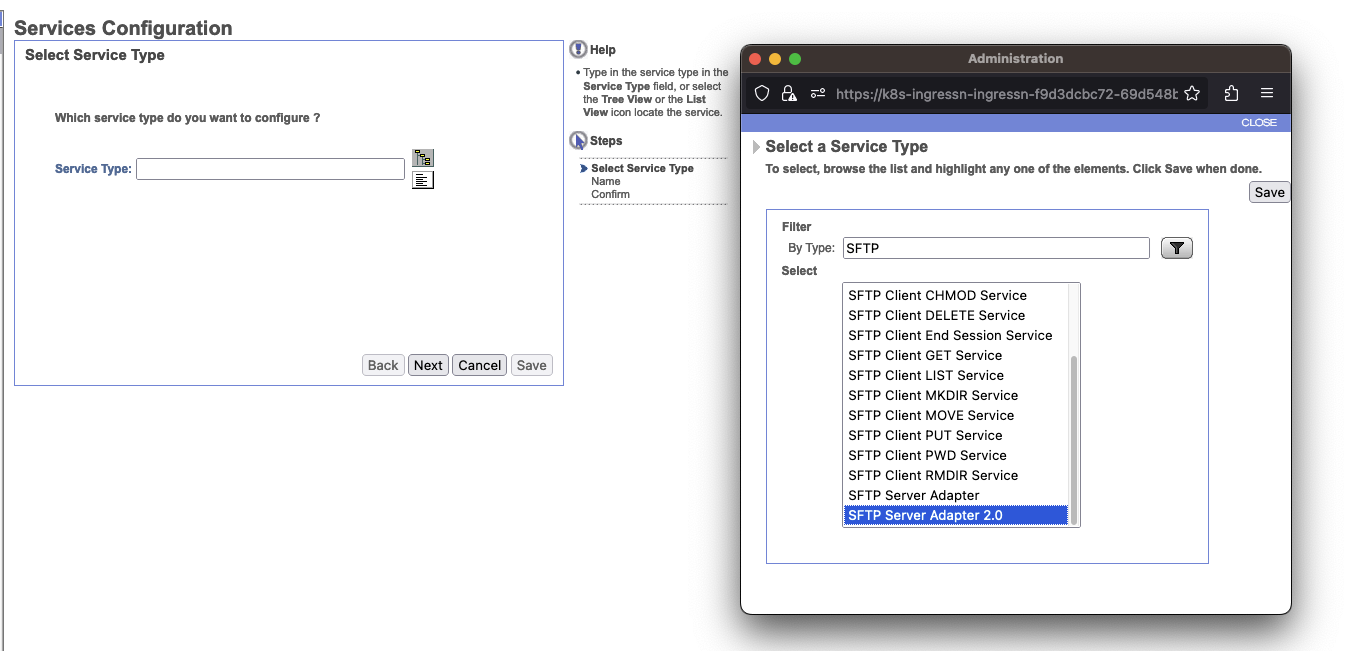
Select SFTP Server Adapter 2.0 under the Service Type.
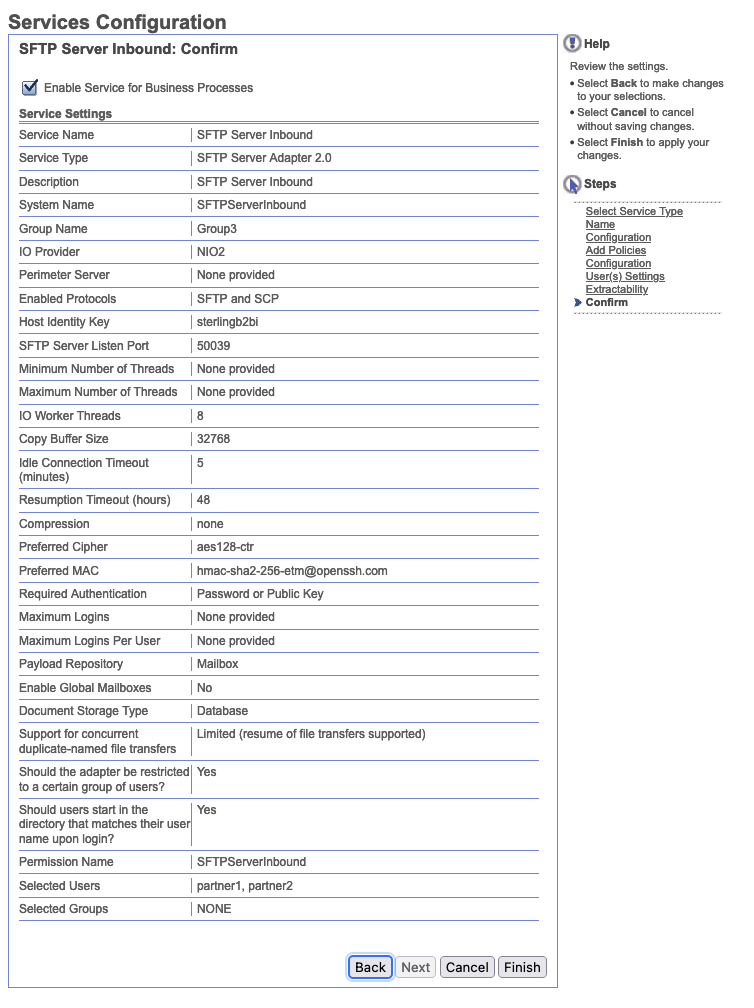
Under Services Configuration, let's name this SFTP Server Inbound and also set that as the description. While B2BI has the capability of scaling the service to live across multiple pods, for now we are going to have it just live on our AC service pod.
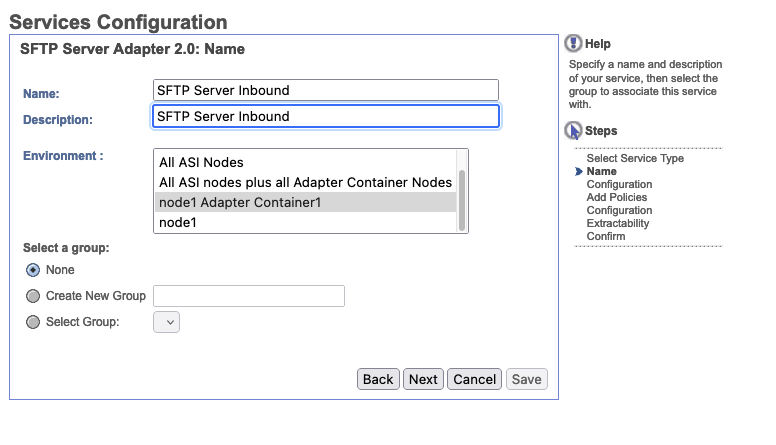
Let's configure our Services Configuration for SFTP Server Inbound with the following values. Our Host Identity Key will be pre-populated with the host key we already created.
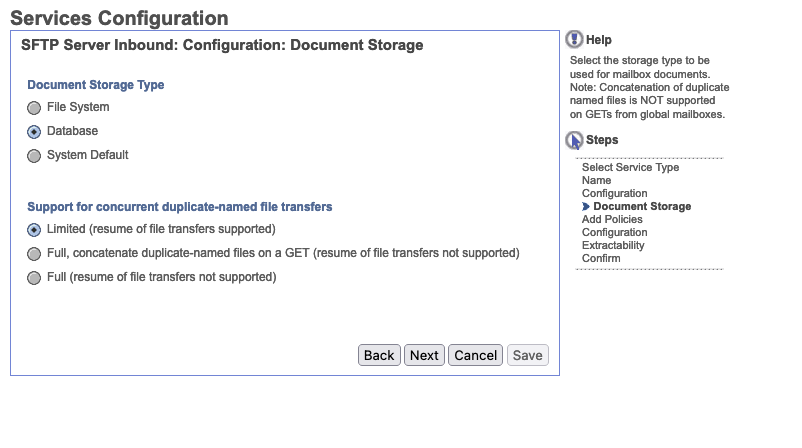
Now let's set our document storage. For testing purposes we selected the Database to be our storage location where the files will be stored as blobs. Going forward this might not be the ideal location, but it is suitable for testing.
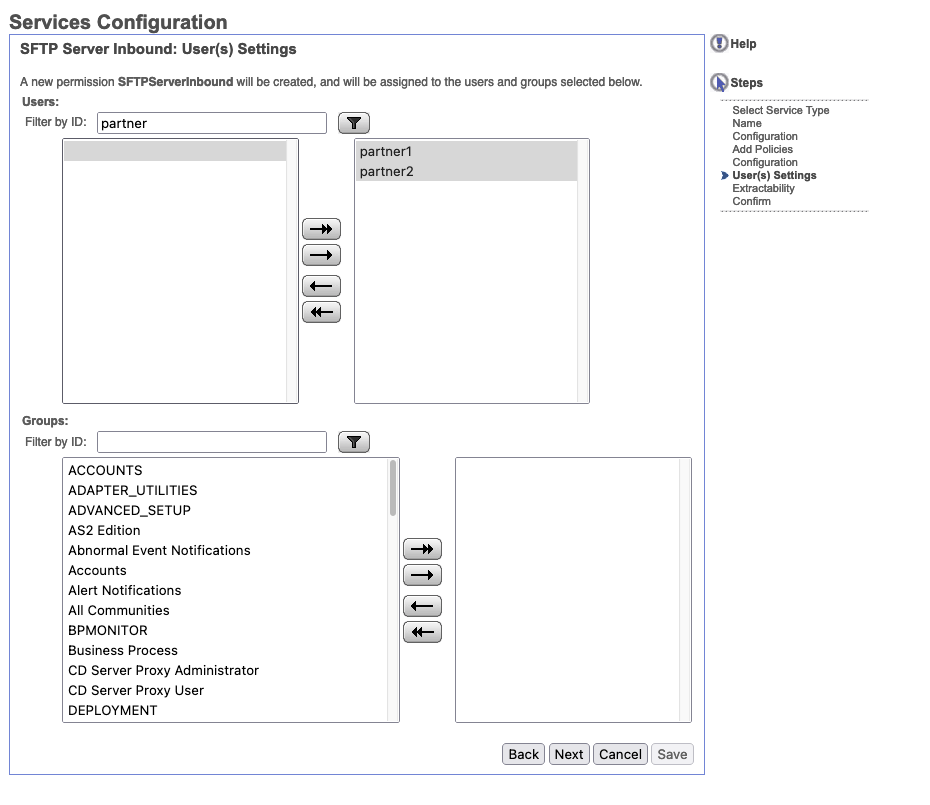
Next let's configure our allowed users. This can be set to match a group, but for our purposes, we will use the two partner ids we created above.
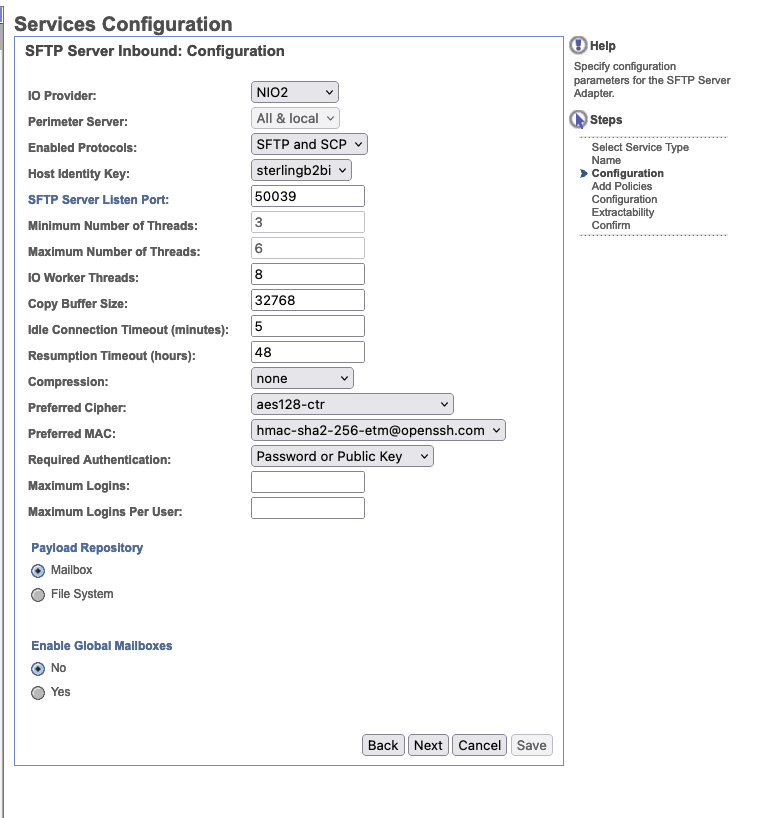
Our final services configuration should look similar to below. Make sure to check Enable Service for Business Processes as this will actually start the service. Also important to note that the listen port for the service will be 50039.
Let's verify the SFTP Adapter Service came up.
Under Services->Configuration search for SFTP Inbound as that's what we called this service adapter.
Under the Select Node dropdown, set it to node1AC1 as that's where we hosted this adapter service.
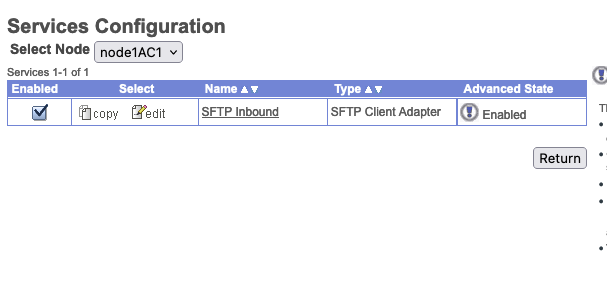
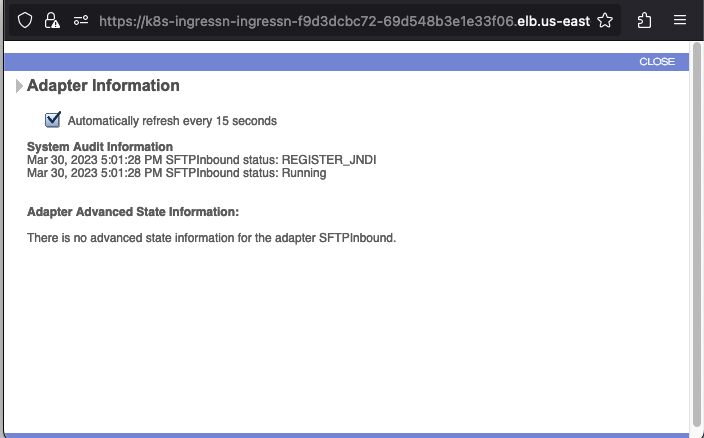
You should see under Advanced Stats that the service in running and enabled. Clicking the exclaimation point next to Enabled will show you the service log.
Cluster configuration to allow inbound access
So because we enabled the adapter to the AC node, we would need to add the extra ports to the overrides yaml for that service.
We are also listening to port 50039
So we update our AC overrides with the following:
ac:
  replicaCount: 1
  env:
    jvmOptions:
    #Refer to global env.extraEnvs for sample values
    extraEnvs: []

  frontendService:
    type: ClusterIP
    ports:
      http:
        name: http
        port: 35004
        targetPort: http
        nodePort: 30004
        protocol: TCP
    extraPorts:
      - name: sftp-frontend
        port: 50039
        targetPort: 50039
        nodePort: 50039
        protocol: TCP
    loadBalancerIP:
    annotations: {}

  backendService:
    type: LoadBalancer
    ports:
      - name: adapter-1
        port: 30401
        targetPort: 30401
        nodePort: 30401
        protocol: TCP
      - name: sftp-backend
        port: 50039
        targetPort: 50039
        nodePort: 50039
        protocol: TCP
    portRanges:
      - name: adapters
        portRange: 30501-30510
        targetPortRange: 30501-30510
        nodePortRange: 30501-30510
        protocol: TCP
    loadBalancerIP:
    annotations: {}
Let's run a helm upgrade after updating our overrides:
helm upgrade sterling-b2bi --debug -f overrides/sterling-b2bi-values.yaml ibm-b2bi-prod --timeout 3600s --namespace sterling
When that is complete, retrieve the loadbalancer address with the following command:
kubectl get service sterling-b2bi-b2bi-ac-backend-svc -o jsonpath="{..hostname}"

a3185b1737b284bcea6584859ea689e3-2046710660.us-east-1.elb.amazonaws.com
Verify that SFTP works from cmdline with the following:
sftp -P 50039 partner2@a3185b1737b284bcea6584859ea689e3-2046710660.us-east-1.elb.amazonaws.com
The authenticity of host '[a3185b1737b284bcea6584859ea689e3-2046710660.us-east-1.elb.amazonaws.com]:50039 ([3.214.94.81]:50039)' can't be established.
RSA key fingerprint is SHA256:fVTB9EihSrd651+zvl2RvzjuhZX11iwQaxNwBgDyvT4.
This key is not known by any other names
Are you sure you want to continue connecting (yes/no/[fingerprint])? yes
Warning: Permanently added '[a3185b1737b284bcea6584859ea689e3-2046710660.us-east-1.elb.amazonaws.com]:50039' (RSA) to the list of known hosts.
SSH Server supporting SFTP and SCP
partner2@a3185b1737b284bcea6584859ea689e3-2046710660.us-east-1.elb.amazonaws.com's password:
Connected to a3185b1737b284bcea6584859ea689e3-2046710660.us-east-1.elb.amazonaws.com.
sftp>
We should now be able to put files here and observe their routing in the filegateway
You may need to update the health check ports in AWS EC2 for the loadbalancer to point to port 50039 or the nodePort as this will otherwise not allow traffic in.
If you run into any helm error when adding the extra ports definitions that has "doesn't match $setElementOrder list" in the output, it's possible this is a helm related bug. Re-run the "helm upgrade" with "--force"
Configuring a Sterling Connect:Direct Server Adapter
The Connect:Direct server adapter receives and processes requests from remote Connect:Direct nodes. Files are copied to and from a mailbox or a business process to and from Connect:Direct nodes.
However, before we configure the Connect:Direct Server Adapter, there are other components that need to be configured. We must first create a Connect:Direct node and a Connect:Direct Netmap. Then using a Connect:Direct Cross-Reference, we will associate the node with the Netmap.
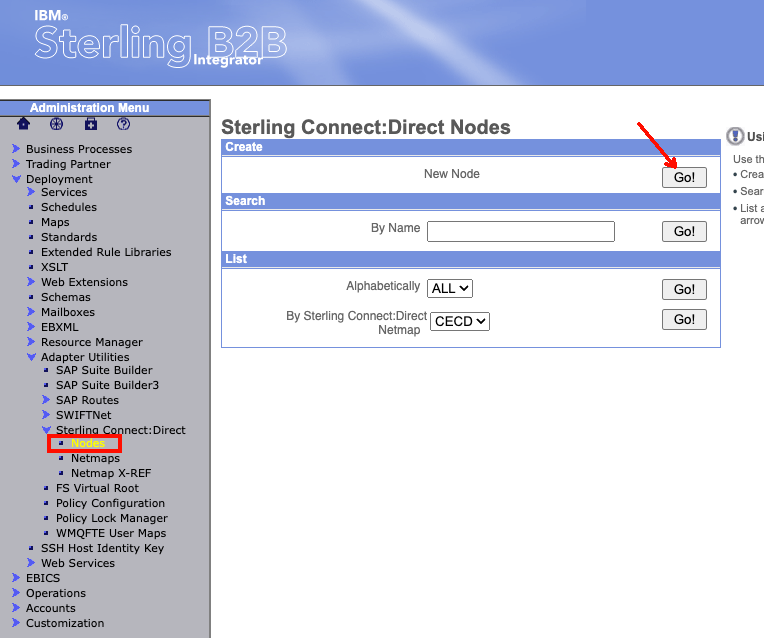
To begin, log into the Sterling B2Bi Admin console. Then from the Administration Menu on the left hand side, navigate to Deployment -> Adapter Utilities -> Sterling Connect:Direct -> Nodes. In the box named create, you should see "New Node". Click the "Go!" button on the right side of the box.
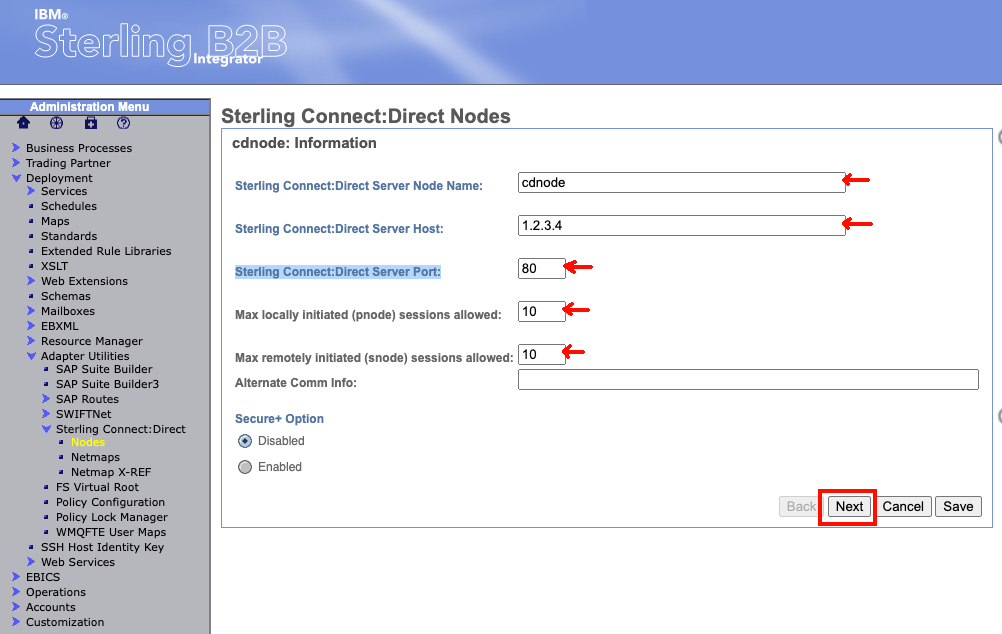
On the next page, enter the values for your node. We will need to set:
- Sterling Connect:Direct Server Node Name - The node name for the Sterling Connect:Direct server.
- Sterling Connect:Direct Server Host - The host name or IP address for the Sterling Connect:Direct server.
- Sterling Connect:Direct Server Port - The host port number for the Sterling Connect:Direct server.
- Max locally initiated (pnode) sessions allowed: Set to 10
- Max remotely initiated (snode) sessions allowed: Set to 10
- Leave the remaining fields/options blank or with their default value.
At the bottom of the page select "next".
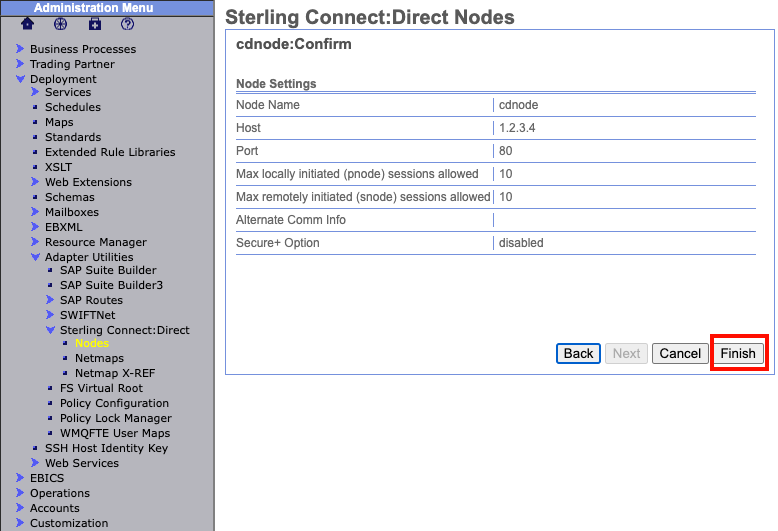
The following page will then display all your setting choices for a final review. If everything was correctly entered select "Finish" at the bottom.
Blue fields are always mandatory and can not be left blank.
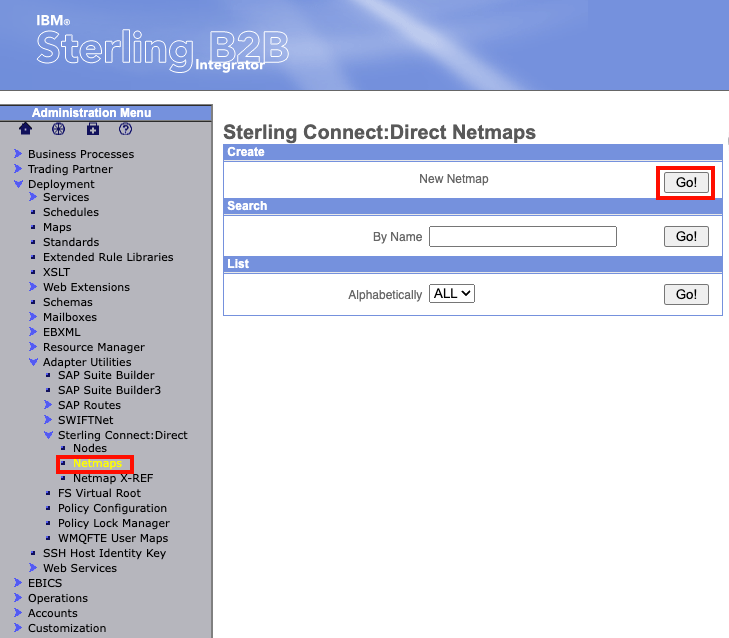
Now lets move on and create a Netmap. From the Administration Menu on the left hand side, navigate to Deployment -> Adapter Utilities -> Sterling Connect:Direct -> Netmaps. In the box named create, you should see "New Netmap". Click the "Go!" button on the right side of the box.
On the next page, enter the values for your Netmap. We will need to set:
- Netmap Name - The Sterling Connect:Direct netmap name.
- Netmap Description - Enter a description of your Netmap
At the bottom of the page select "next".
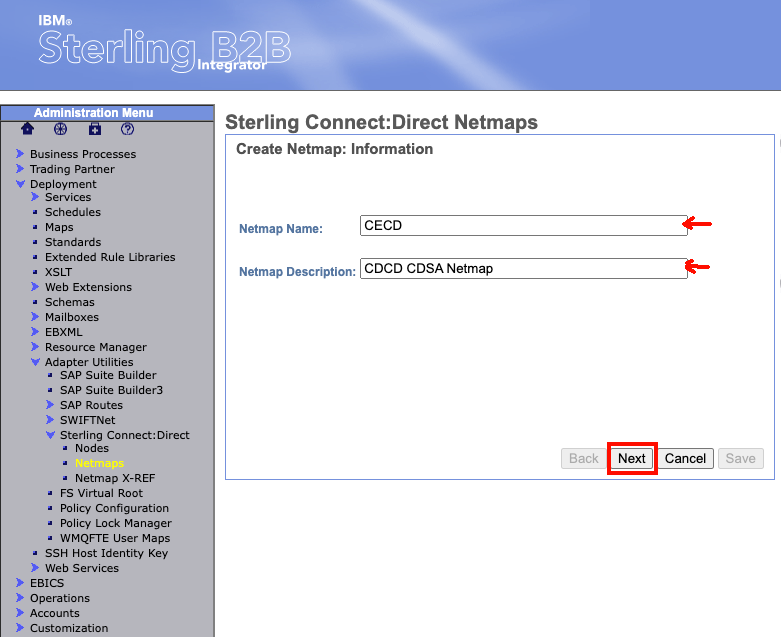
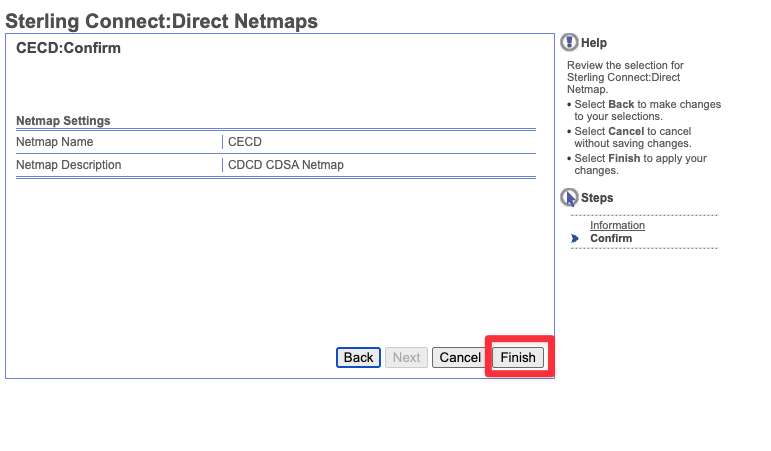
The following page will then display all your setting choices for a final review. If everything was correctly entered select "Finish" at the bottom.
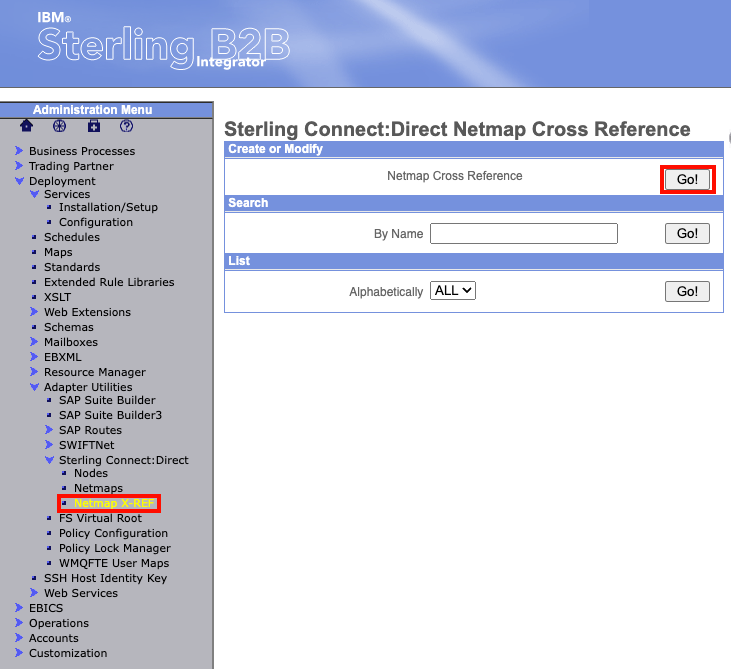
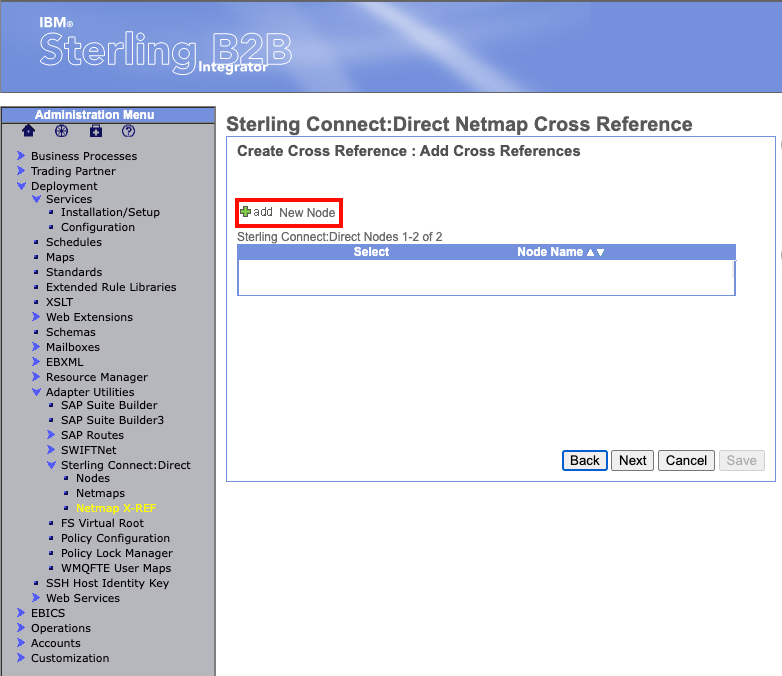
Now lets add our node to the Netmap using Connect:Direct Cross-Reference. From the Administration Menu on the left hand side, navigate to Deployment -> Adapter Utilities -> Sterling Connect:Direct -> Netmap X-REF. In the box named "Create or Modify", you should see "Netmap Cross Reference". Click the "Go!" button on the right side of the box.
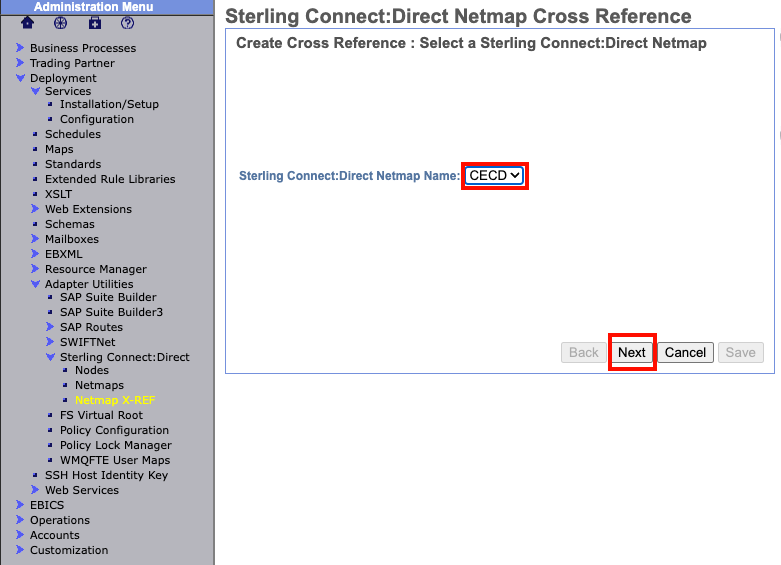
The next page will ask you to select a Netmap. The Netmap we just created should already appear in the drop down box. Verify the Netmap then select "next" at the bottom.
On this next page "Add Cross References", select the green plus next to "New Node".
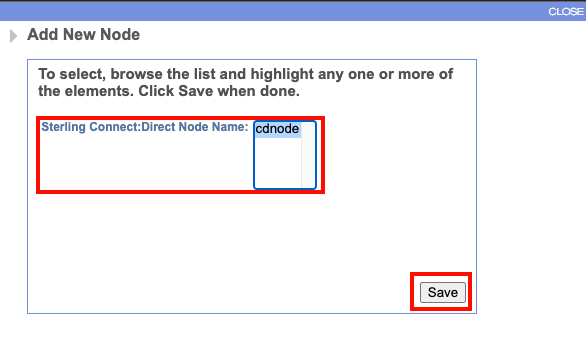
A pop-up window named "Add New Node" should appear. This will ask you to select the node you want to add to the Netmap. The node we created should appear in the box. Select it and select "save" at the bottom.
The node we selected should now appear in the list of nodes. At the bottom of the page select "next".
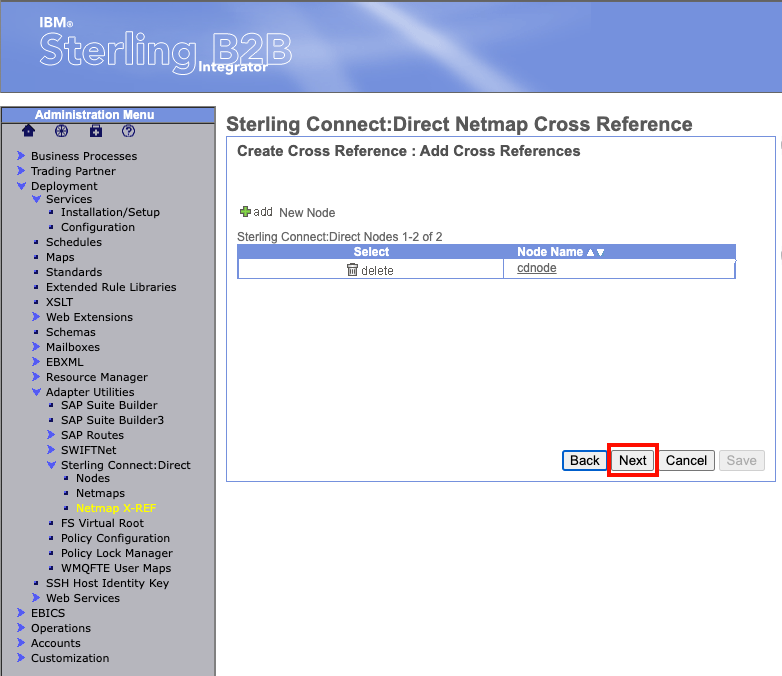
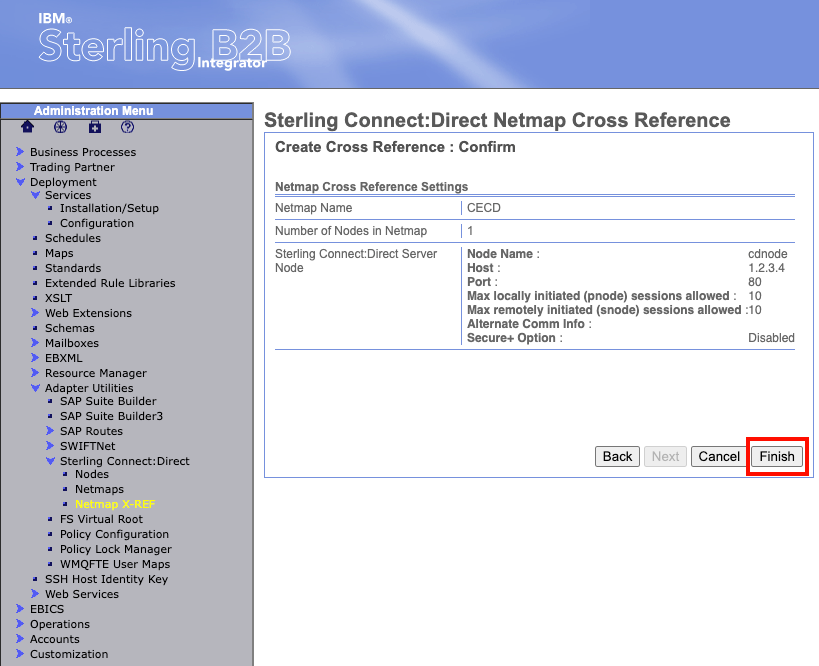
The following page will then display all your setting choices for a final review. If everything was correctly entered select "Finish" at the bottom.
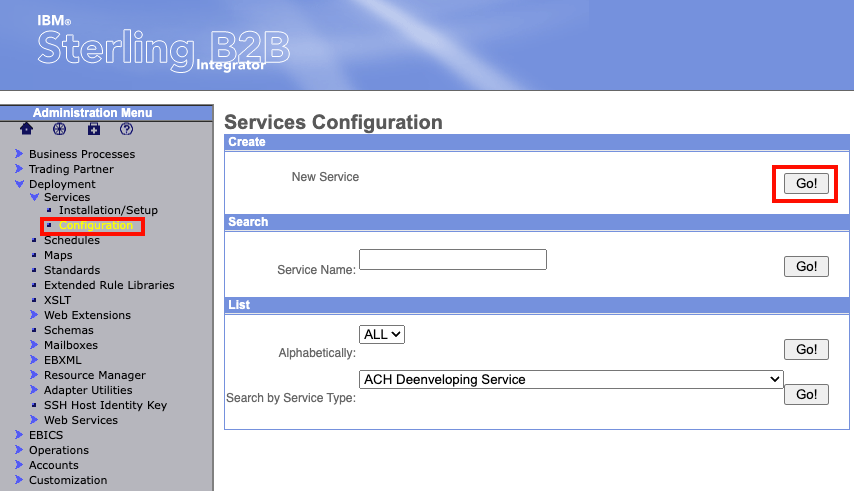
Now finally, lets move on to creating a Sterling Connect:Direct Server Adapter. From the Administration Menu on the left hand side, navigate to Deployment -> Services -> Configuration. In the box named "Create", you should see "New Service". Click the "Go!" button on the right side of the box.
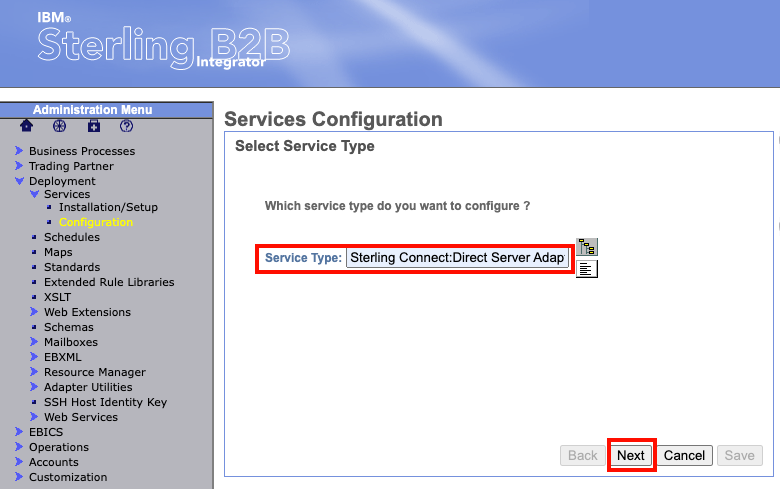
The next screen will prompt you for which service type to configure. In the box next to "Service Type" enter "Sterling Connect:Direct Server Adapter" and then select "next" at the bottom.
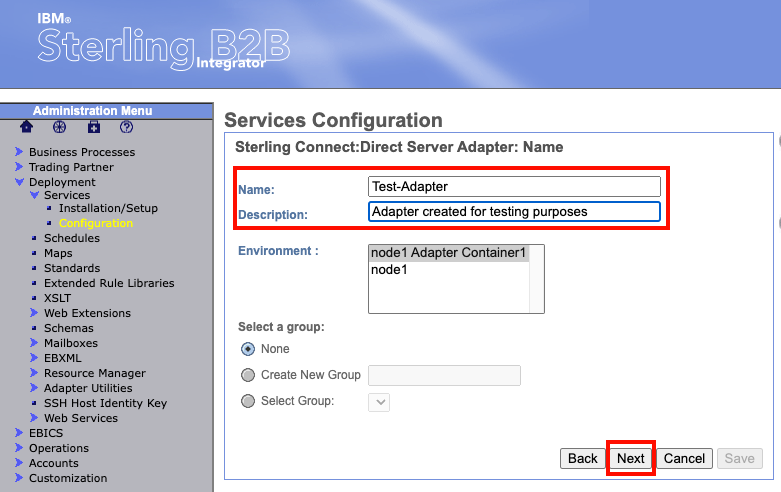
The next page will ask you to name the adapter and give a description. Fill out these fields and leave everything else default. Then select "next" at the bottom.
The next page will ask you to configure general settings for the adapter. On this page we only need to enter a value for "Sterling Connect:Direct Server Node Name". Generally, you will use the same name that you used for the adapter name. Enter that value in the box. Leave the rest of the settings with the default values and click "next" at the bottom.
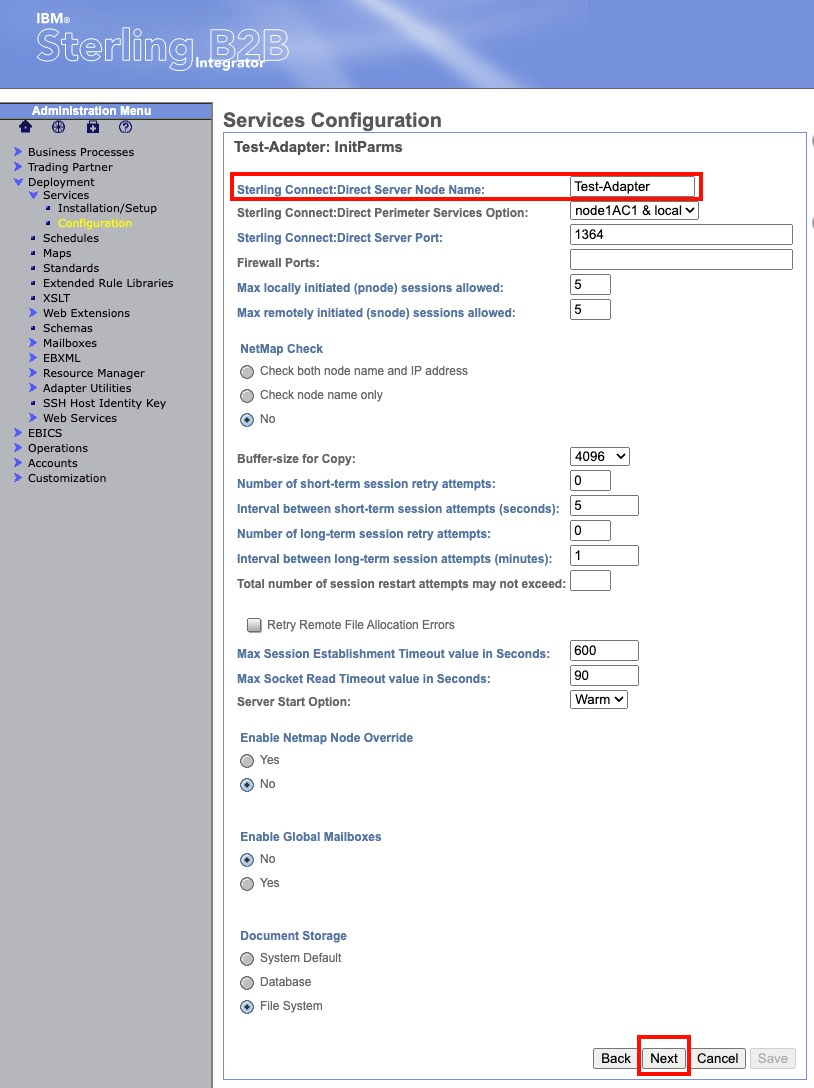
Keep selecting "next" at the bottom leaving all values default until you get to the screen that references Netmap.
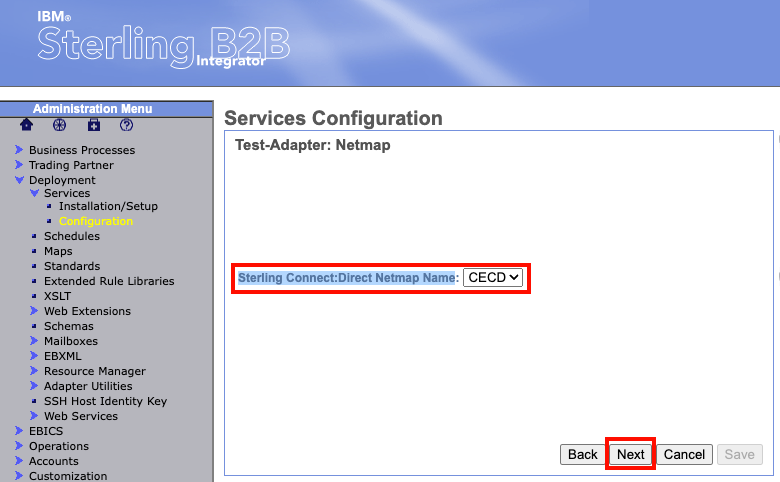
You should see an option named "Sterling Connect:Direct Netmap Name" followed by a drop down box. Within the drop down box, you should see the Netmap we created earlier. Verify the value then select "next" at the bottom.
The following page will then display all your setting choices for a final review. If everything was correctly entered select "Finish" at the bottom. And with that you have configured your Sterling Connect:Direct Server Adapter. If you need more information on the specific settings and options, please reference the following:
- Connect:Direct Node Settings: https://www.ibm.com/docs/en/b2b-integrator/5.2?topic=entry-creating-sterling-connectdirect-nodes
- Connect:Direct Netmap Settings: https://www.ibm.com/docs/en/b2b-integrator/5.2?topic=entry-creating-sterling-connectdirect-netmaps
- Direct:Connect Netmap Cross-Reference Settings: https://www.ibm.com/docs/en/b2b-integrator/5.2?topic=entry-creating-connectdirect-netmap-cross-reference
- Connect:Direct Server Adapter Settings: https://www.ibm.com/docs/en/b2b-integrator/5.2?topic=entry-creating-connectdirect-netmap-cross-reference
Sterling File Gateway - Access Multiple KMS Encrypted S3 Buckets Across Accounts
There may be situations where B2Bi needs to access multiple s3 buckets and these buckets may also reside within different AWS accounts. This guide will outline the process of creating, updating, and setting up IAM roles, policies, and resource-based policies. Then using these permissions to allow Sterling B2Bi running on EKS to interact with multiple s3 buckets that are residing in different AWS accounts. This guide assumes the prerequisites of having an OIDC provider in the EKS cluster and a service account that is attached to the pod B2Bi is running on. You also need CLI programmatic access to the EKS cluster and the AWS accounts that the EKS, S3 buckets, and KMS keys reside in.
Solution Overview
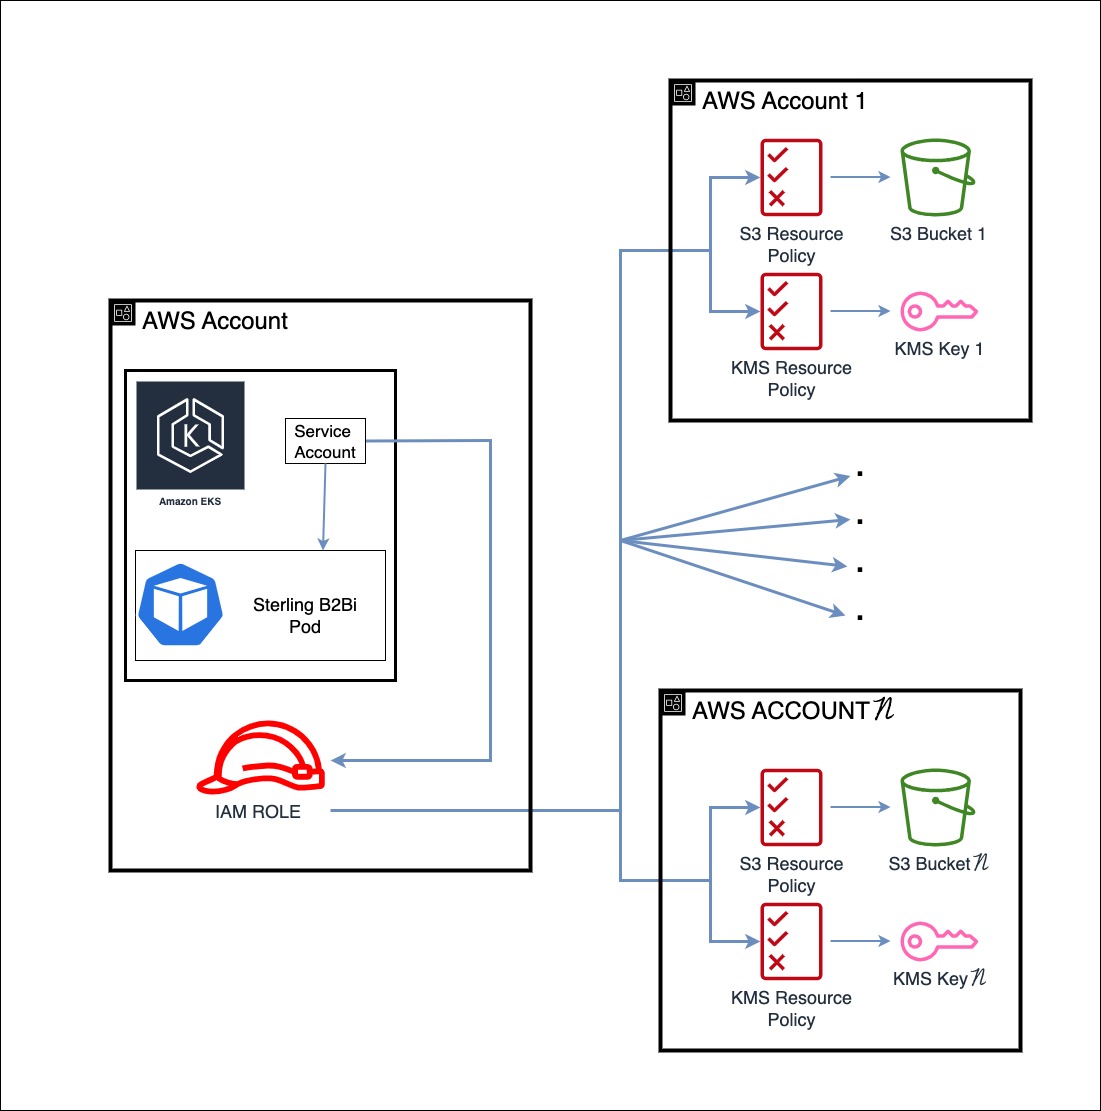
This diagram outlines the general solution of B2Bi accessing KMS encrypted s3 buckets that are within different AWS accounts. B2Bi is running on a pod within an EKS cluster. We use an IAM role and assign it to the service account attached the B2Bi pod. This is known as IAM Roles for Service Accounts (IRSA). In this example the role is within the same account that the EKS cluster is in. However, this role can be setup in any AWS account. Now that our B2Bi pod using a service account is associated with an AWS IAM role, we can now begin to assign permissions to that role. Because of the way IAM permissions work across accounts, we will need to add permissions to the role and we will also need to add a resource-based policy that allows the IAM role to use the bucket-key pair. Keep in mind that KMS keys can be used on multiple buckets. So, while you need to modify the resource-based policy for every S3 bucket since they are unique, you may have to modify a lesser number of KMS key resource-based policies since they can be shared across buckets. So in total, we will need to add policies to the iam role, the bucket, and the kms key. This will allow B2Bi to access KMS encrypted S3 Buckets in different accounts.
Two things to note. The first is this solution does not work with AWS Managed Keys. As of writing, AWS Managed Keys resource-based policies can not be altered and only principles from the same account the AWS Managed Key was created in has access to it. Meaning principles from other accounts can not access the key. Second, this solution is for accessing S3 KMS in different accounts. If the EKS cluster and KMS S3 buckets are all in the same account, you can still follow this guide. However, instead of using resource-based policies, you can assign policies directly to the IAM role since you don't have to access resources across different accounts.
This document will walk through the following steps:
- Modify ~/.aws/credentials file to work with multiple AWS accounts
- Link EKS OIDC identity provider to AWS account
- Create an IAM role with trust relationship
- Add policies and permissions to IAM role
- Attach IAM Role to Service Account
- Modify resource-based policies for S3 buckets and KMS keys.
Steps 2-5 will be done within the same AWS account.
Modify ~/.aws/credentials file
The steps mentioned in this section are intended to configure the AWS CLI for multiple user profiles within different AWS accounts. They are not directly part of the KMS S3 cross account solution. This will simply allow you to run commands in different accounts. If you intend to use the AWS Console or already have your AWS CLI configured, you can skip this step.
Since we will be working with multiple AWS accounts, we will need to modify the AWS CLI credentials file to setup multiple users. This process is pretty straightforward:
vim ~/.aws/credentials or use a text editor of your choice to modify the credentials file.
Once in the file, you should see this structure:
[default]
aws_access_key_id = XXXXXXXXXXXXX
aws_secret_access_key = **********************************
To add more users, simply follow the same structure and add the AWS users you want to the credentials file:
[user1]
aws_access_key_id = XXXXXXXXXXXXX
aws_secret_access_key = **********************************

[user2]
aws_access_key_id = XXXXXXXXXXXXX
aws_secret_access_key = **********************************

[user3]
aws_access_key_id = XXXXXXXXXXXXX
aws_secret_access_key = **********************************
Each user will have an unique aws_access_key_id and aws_secret_access_key. Above this you see user1, user2, user3. These are profiles that we can set and we are assigning those credentials to those profiles. The profile names can be whatever you want them to be. This will be used in the AWS CLI to specify which account the command will be run in:
aws s3 ls --profile user1 # runs command in account 1
aws s3 ls --profile user2 # runs command in account 2
aws s3 ls --profile user3 # runs command in account 3
This assumes users from different AWS accounts. Its possible to have AWS users from the same AWS account. For simplicity, this document assumes you have a user from each AWS account with the correct permissions.
While interacting with the ~/.aws/credentials file and making adjustments to profiles, it's important to note that this action could potentially disrupt your kubectl functionality. To rectify this situation, you can utilize the following command:
aws eks update-kubeconfig --name CLUSTER_NAME --region AWS_REGION --profile PROFILE_NAME
Link EKS OIDC Identity Provider to AWS Account
IAM identity providers enable you to manage external identities outside of AWS, and IAM OIDC identity providers define external identity provider services that follow the OpenID Connect (OIDC) standard. In our case, we're utilizing an OIDC identity provider within our EKS cluster. To ensure AWS can authenticate requests from this provider, we must integrate it into our AWS Account. So to start, pick the AWS account you want to setup your IAM role and identity provider. Once you have decided on an account, lets link the identity provider.
Remember to put --profile <YOUR_PROFILE> at end of each command to specify what AWS account to run the command in.
First thing we need is the OIDC identity provider URL associated with the OIDC identity provider in the EKS cluster. We can get the URL by running the following command:
aws eks describe-cluster --name CLUSTER_NAME --query "cluster.identity.oidc.issuer" --region AWS_REGION --profile YOUR_PROFILE
If you need a reminder of the name of the cluster name, use the following command:
aws eks list-clusters --region AWS_REGION --profile YOUR_PROFILE
Now using the OIDC identity provider URL we got, lets modify the url. We are going to add /.well-known/openid-configuration to the end of the url. Your url should look similar in structure.
https://oidc.eks.us-east-1.amazonaws.com/id/example/.well-known/openid-configuration
Now open a browser and go to that URL. You should see JSON output similar to this:
{
    "issuer": "https://oidc.eks.us-east-1.amazonaws.com/id/example",
    "jwks_uri": "https://oidc.eks.us-east-1.amazonaws.com/id/example/keys",
    "authorization_endpoint": "urn:kubernetes:programmatic_authorization",
    "response_types_supported": [
        "id_token"
    ],
    "subject_types_supported": [
        "public"
    ],
    "claims_supported": [
        "sub",
        "iss"
    ],
    "id_token_signing_alg_values_supported": [
        "RS256"
    ]
}
We are looking for the "jwks_uri". The "jwks_uri" should have a url as its key value. We need the "jwks_uri" url for the next step but we only need part of it. Remove the https:// and the /paths following the URL. Here is an example:
"jwks_uri": "https://oidc.eks.us-east-1.amazonaws.com/id/example/keys"
https://oidc.eks.us-east-1.amazonaws.com/id/example/keys
You are left with:
oidc.eks.us-east-1.amazonaws.com
Your URL and JSON values may be different. This is just an example.
Next we need to extract the thumbprint from this URL. The Identity Provider thumbprint, also known as the OIDC provider thumbprint, is a security measure used to establish trust between the Identity Provider and AWS services. When you configure an OIDC identity provider in AWS IAM, you need to supply the thumbprint for the top intermediate certificate authority that signed the certificate. Once we have a trusted thumbprint, AWS can establish trust with the EKS OIDC identity provider. To get this thumbprint we will use OpenSSL. If you don't have OpenSSL currently installed you can run the following command:
brew install openssl
We can check its installation by running:
openssl version
Now using OpenSSL, we can obtain the certificate from the certificate authority that signed the URL. Using the URL with the removed https:// and trailing /paths, run the following command:
openssl s_client -servername YOUR_URL -showcerts -connect YOUR_URL:443
You should see a chain of "-----BEGIN CERTIFICATE-----" and "-----END CERTIFICATE-----"
-----BEGIN CERTIFICATE-----
MIIF7DCCBNSgAwIBAgIQByOkjeOvl//8xMrhlZkruzANBgkqhkiG9w0BAQsFADA8
MQswCQYDVQQGEwJVUzEPMA0GA1UEChMGQW1hem9uMRwwGgYDVQQDExNBbWF6b24g
UlNBIDIwNDggTTAyMB4XDTIzMDUxMzAwMDAwMFoXDTI0MDYxMDIzNTk1OVowKzEp
...example...
ZUxtmBX91AEQ1ccU+Odj2ILrWdSs28J82ODoPlkJ6OqIYo+kEXrUwy8SM2N9iFJw
HgZNOwzPQ2Ox/ozlRh6/6OUgYZ84j343BoDnNbTQijLBe6HL4pVw4nPKWrUQnTot
xMymAcBknnb4X4TcmEoJ0CrB1H6FKfe8yASCLjwSC72Os9ADyADMZqTUSOH1V8Vh
R3Zv4DlLItu8BHaE59teueLM9AW1PBFMci5JiYrgLEM=
-----END CERTIFICATE-----
 1 s:/C=US/O=Amazon/CN=Amazon RSA 2048 M02
   i:/C=US/O=Amazon/CN=Amazon Root CA 1
-----BEGIN CERTIFICATE-----
MIIEXjCCA0agAwIBAgITB3MSSkvL1E7HtTvq8ZSELToPoTANBgkqhkiG9w0BAQsF
ADA5MQswCQYDVQQGEwJVUzEPMA0GA1UEChMGQW1hem9uMRkwFwYDVQQDExBBbWF6
b24gUm9vdCBDQSAxMB4XDTIyMDgyMzIyMjUzMFoXDTMwMDgyMzIyMjUzMFowPDEL
...example...
JqIRZhMbgAfp7O7FUwFIb7UIspogZSKxPIWJpxiPo3TcBambbVtQOcNRWz5qCQdD
slI2yayq0n2TXoHyNCLEH8rpsJRVILFsg0jc7BaFrMnF462+ajSehgj12IidNeRN
4zl+EoNaWdpnWndvSpAEkq2P
-----END CERTIFICATE-----
 2 s:/C=US/O=Amazon/CN=Amazon Root CA 1
   i:/C=US/ST=Arizona/L=Scottsdale/O=Starfield Technologies, Inc./CN=Starfield Services Root Certificate Authority - G2
-----BEGIN CERTIFICATE-----
MIIEkjCCA3qgAwIBAgITBn+USionzfP6wq4rAfkI7rnExjANBgkqhkiG9w0BAQsF
ADCBmDELMAkGA1UEBhMCVVMxEDAOBgNVBAgTB0FyaXpvbmExEzARBgNVBAcTClNj
b3R0c2RhbGUxJTAjBgNVBAoTHFN0YXJmaWVsZCBUZWNobm9sb2dpZXMsIEluYy4x
...example...
eyKdpwAJfqxGF4PcnCZXmTA5YpaP7dreqsXMGz7KQ2hsVxa81Q4gLv7/wmpdLqBK
bRRYh5TmOTFffHPLkIhqhBGWJ6bt2YFGpn6jcgAKUj6DiAdjd4lpFw85hdKrCEVN
0FE6/V1dN2RMfjCyVSRCnTawXZwXgWHxyvkQAiSr6w10kY17RSlQOYiypok1JR4U
akcjMS9cmvqtmg5iUaQqqcT5NJ0hGA==
-----END CERTIFICATE-----
Scroll to the very top of this chain and take the very first certificate and save it to a file. Name the file certificate.crt.
Using the example certificate chain above and taking the top most certificate, our certificate.crt should look similar to this:
-----BEGIN CERTIFICATE-----
MIIF7DCCBNSgAwIBAgIQByOkjeOvl//8xMrhlZkruzANBgkqhkiG9w0BAQsFADA8
MQswCQYDVQQGEwJVUzEPMA0GA1UEChMGQW1hem9uMRwwGgYDVQQDExNBbWF6b24g
UlNBIDIwNDggTTAyMB4XDTIzMDUxMzAwMDAwMFoXDTI0MDYxMDIzNTk1OVowKzEp
...example...
ZUxtmBX91AEQ1ccU+Odj2ILrWdSs28J82ODoPlkJ6OqIYo+kEXrUwy8SM2N9iFJw
HgZNOwzPQ2Ox/ozlRh6/6OUgYZ84j343BoDnNbTQijLBe6HL4pVw4nPKWrUQnTot
xMymAcBknnb4X4TcmEoJ0CrB1H6FKfe8yASCLjwSC72Os9ADyADMZqTUSOH1V8Vh
R3Zv4DlLItu8BHaE59teueLM9AW1PBFMci5JiYrgLEM=
-----END CERTIFICATE-----
Now we can extract the thumbprint using this certificate.crt file. Extracting the thumbprint will give us a SHA1 Fingerprint. However, we need to remove the colons from the fingerprint for it to be usable. We can do all this in one command:
openssl x509 -in certificate.crt -fingerprint -sha1 -noout | tr -d ':'
The output should be similar to this:
SHA1 Fingerprint=<NUMBERS_LETTERS>
Now that we have the finger print, we can finish setting up the identity provider in the AWS Account. Using the following command:
aws iam create-open-id-connect-provider --url OIDC_ISSUER_URL --thumbprint-list THUMBPRINT_LIST --client-id-list CLIENT_ID_LIST --region AWS_REGION --profile YOUR_PROFILE
- OIDC_ISSUER_URL: The full OIDC issuer URL obtained earlier through the command
aws eks describe-cluster --name CLUSTER_NAME --query "cluster.identity.oidc.issuer" --region AWS_REGION --profile YOUR_PROFILE - THUMBPRINT_LIST: The fingerprint we obtained in the previous steps
- CLIENT_ID_LIST: A list of client IDs. For EKS, you can use "sts.amazonaws.com" as the client ID.
We can check to see if the identity provider was setup in the AWS account by using the command:
aws iam list-open-id-connect-providers --profile YOUR_PROFILE
Create an IAM Role With Trust Relationship
Now that we linked the OIDC Identity Provider from the EKS cluster to an AWS account, we can create a role that a service account within the EKS cluster can assume. In this document, we won't go under the hood and discuss the intricacies of how a service account, OIDC Identity Provider, and AWS IAM interact and authenticate. Just know that B2Bi is running in a pod. That pod uses a service account as an identity and that service account is an authenticated user through the EKS OIDC Identity Provider. We linked the EKS OIDC Identity Provider to an AWS Account in the previous section and now that service account can assume a role in the AWS account.
Before we can create a role, we must create a trust policy. This trust policy essentially tells AWS which entities can use this role. In our case, it will be the EKS OIDC Identity Provider, since this is where the service account is coming from.
Using your editor of choice, create the following JSON document:
{
    "Version": "2012-10-17",
    "Statement": [
        {
            "Effect": "Allow",
            "Principal": {
                "Federated": "arn:aws:iam::ACCOUNT_ID:oidc-provider/oidc.eks.AWS_REGION.amazonaws.com/id/OIDC_ID"
            },
            "Action": "sts:AssumeRoleWithWebIdentity",
            "Condition": {
                "StringEquals": {
                    "oidc.eks.AWS_REGION.amazonaws.com/id/OIDC_ID:aud": "sts.amazonaws.com"
                }
            }
        }
    ]
}
This is a template. Replace with the values for your EKS cluster.
Now that we have a trust policy to our EKS OIDC Identity Provider, we can create an IAM Role and reference this trust policy during the role creation. Run the following command to create a role with a trust policy:
aws iam create-role --role-name YOUR_ROLE_NAME --assume-role-policy-document file://YOUR_TRUST_POLICY.json --profile YOUR_PROFILE
Add policies and permissions to IAM role
Lets now add permissions to this role. By default, users and roles within AWS have no permissions. Remember the goal is to access KMS encrypted S3 buckets that are in different accounts. So we will need at minimum KMS and S3 permissions. Now there is a couple of ways of adding permissions to a role. You can do either an inline policy or attach a managed policy. With inline, the policy is built into the role and can't be used on other entities. On the other hand, when you create and attach a managed policy, that policy exists outside of the role/entity. You can reuse this policy on multiple entities and altering this policy will alter the permissions for all entities that have this policy attached. We will cover both.
This section discusses inline policies and managed policies. You do not need to implement both.
To create any type of policy, we first need to create a policy document. So using the editor of your choice, create a JSON policy document. Here is an example document:
{
    "Version": "2012-10-17",
    "Statement": [
        {
            "Effect": "Allow",
            "Action": [
                "s3:GetObject",
                "s3:PutObject",
                "s3:DeleteObject",
                "s3:ListBucket",
                "s3:ListBucketMultipartUploads",
                "s3:GetBucketLocation",
                "kms:Encrypt",
                "kms:Decrypt",
                "kms:GenerateDataKey*",
                "kms:DescribeKey"
            ],
            "Resource": "*"
        }
    ]
}
This is an example policy. As you integrate policies into your environment, it is crucial to thoroughly assess your unique requirements and adhere to security compliance standards. Customize this policy to align with your specific needs and ensure it accurately reflects your security posture.
Now that we created a policy document with permissions for our role, to create an inline policy run the following command:
aws iam put-role-policy --role-name YOUR_ROLE_NAME --policy-name YOUR_POLICY_NAME --policy-document file://YOUR_POLICY.json --profile YOUR_PROFILE
To view an inline policy for a role, use the command:
aws iam get-role-policy --role-name ROLE_NAME --policy-name POLICY_NAME --profile YOUR_PROFILE
If you need a refresher on the name of the policy, you can view the policies attached to a role with the command:
aws iam list-role-policies --role-name YOUR_ROLE_NAME --query PolicyNames --output text --profile YOUR_PROFILE
If you need to edit the inline policy, you can rerun the aws iam put-role-policy we used earlier. This will overwrite the existing inline policy.
Now lets move on to a managed policy. When attaching a managed policy to a role, we can either use a preexisting policy or create a new policy. If using a preexisting policy, keep in mind that any changes made to that policy will affect all entities the policy is attached to.
To create an IAM managed policy, we will need the policy document we created earlier and we can use the following command. If using a preexisting policy, you can skip this step.
aws iam create-policy --policy-name POLICY_NAME --policy-document file://YOUR_POLICY.json --profile YOUR_PROFILE
We can view the policy we just created and other managed policies within the AWS account by using the following command:
aws iam list-policies --scope Local --profile YOUR_PROFILE
If you do not see the policy in the list, you may need to scroll down.
If you know the ARN for the policy, we can view a specific policy using the command:
aws iam get-policy --policy-arn POLICY_ARN --profile YOUR_PROFILE
If you need to edit an existing policy, you cannot directly modify a policy in place. Instead, you need to create a new version of the policy with the changes you want and then set that new version as the default version. To modify a managed policy, create a new version, and set that version to the default version, use the command:
aws iam create-policy-version --policy-arn POLICY_ARN --policy-document file://YOUR_POLICY.json --set-as-default --profile YOUR_PROFILE
We can see the different versions a managed policy has, use the command:
aws iam list-policy-versions --policy-arn POLICY_ARN --profile YOUR_PROFILE
The pervious command will only show you the versions not the permissions inside the version. To view the permissions in a version use the command:
aws iam get-policy-version --policy-arn POLICY_ARN --version-id VERSION_ID --profile YOUR_PROFILE
Lastly, to switch between versions, use the command:
aws iam set-default-policy-version --policy-arn POLICY_ARN --version-id VERSION --profile YOUR_PROFILE
Now that we have a managed policy configured, we can now attach that policy to the role we created earlier using the command:
aws iam attach-role-policy --role-name YOUR_ROLE_NAME --policy-arn YOUR_POLICY_ARN --profile YOUR_PROFILE
To view the policies attached to a role, use the command:
aws iam list-attached-role-policies --role-name YOUR_ROLE_NAME --profile YOUR_PROFILE
Inline policies do not appear in this list.
Attach IAM Role to Service Account
Now that we have an IAM Role configured and have given it permissions, we now need to tell the service account connected to the B2Bi pod to use this role. To do so, we use an annotation on the service account. Use the following command to annotate the service account with the role:
kubectl annotate serviceaccount SERVICE_ACCOUNT_NAME eks.amazonaws.com/role-arn=ROLE_ARN --namespace MY_NAMESPACE
You may need to restart the B2Bi pod for this change to take effect.
If you want to alter the annotation, you can overwrite the current annotation by adding the --overwrite flag at the end and rerun the command.
To view and verify the annotation on the service account, you can use the command:
kubectl describe sa SERVICE_ACCOUNT_NAME
Modifying resource-based policies for S3 buckets and KMS keys.
In this section, we will be modifying the resource-based policy for an S3 bucket (bucket policy) and a KMS key (key policy). The buckets and keys should be in a different account than the role we created. Since we are dealing with different accounts, make sure to use the correct profile --profile <YOUR_PROFILE> for the account the bucket and key reside.
Lets begin with an S3 bucket. We can view the buckets in an AWS account using the following command:
aws s3 ls --profile YOUR_PROFILE
Once we find the bucket we want B2Bi to use, we can begin to modify the bucket policy. Before we modify the bucket policy, its possible that the bucket might already have a bucket policy attached. We can check using the following command:
aws s3api get-bucket-policy --bucket YOUR_BUCKET_NAME --profile YOUR_PROFILE
If there is a bucket policy attached, this command will output the policy. If there is no policy on the bucket, the output should say "The bucket policy does not exist". If there is a policy attached to the bucket, we don't want to throw away those permissions. They are probably giving needed permissions to some other entity. The next step is to create a bucket policy document. If there was a preexisting bucket policy we want to bring those permissions into the new bucket policy document. If the bucket did not have a preexisting policy, we don't have to worry about bringing in those previous permissions. Using an editor of your choice, create a JSON bucket policy document. Here is an example:
{
    "Version": "2012-10-17",
    "Statement": [
        {
            "Sid": "Allow-B2Bi-Role-S3-Access",
            "Effect": "Allow",
            "Principal": {
                "AWS": "YOUR_ROLE_ARN"
            },
            "Action": [
                "s3:GetObject",
                "s3:PutObject",
                "s3:DeleteObject",
                "s3:ListBucket",
                "s3:ListBucketMultipartUploads",
                "s3:GetBucketLocation"
            ],
            "Resource": [
                "arn:aws:s3:::YOUR_BUCKET_NAME/*",
                "arn:aws:s3:::YOUR_BUCKET_NAME"
            ]
        }
    ]
}
This is an example policy and it doesn't account for your specific preexisting permissions. Also, as you integrate policies into your environment, it is crucial to thoroughly assess your unique requirements and adhere to security compliance standards. Customize this policy to align with your specific needs and ensure it accurately reflects your security posture.
In the example bucket policy above, remember that B2Bi is using the role we created in the previous section to gain AWS access. Make sure to replace YOUR_ROLE_ARN in the principle of the bucket policy with the role associated with B2Bi.
Now that we have a bucket policy document with the permissions we want to give. We can now attach that bucket policy to the s3 bucket with the command:
aws s3api put-bucket-policy --bucket YOUR_BUCKET_NAME --policy file://BUCKET_POLICY.json --profile YOUR_PROFILE
Using the get-bucket-policy we used earlier, we should now see our modified policy attached to the bucket.
Now that we have the s3 bucket configured with the correct permissions and policy, lets now modify the KMS key policy. Before we modify the key policy, we need to find what KMS key the bucket is using for encryption. To get this information, use the command:
aws s3api get-bucket-encryption --bucket BUCKET_NAME --profile YOUR_PROFILE
In the output of this command, we should see "KMSMasterKeyID" (Assuming this is an KMS encrypted S3 bucket). The value for "KMSMasterKeyID" should be a KMS key ARN. This is the key being used to encrypt this S3 bucket.
Now that we have the key that is being used to encrypt the S3 bucket. We can now start to modify the key policy. We will use almost all the same steps that we did when modifying the bucket policy. We need to create a JSON key policy document and again, we need to be cognizant of the preexisting key policy. Unlike the bucket policy, AWS automatically creates and attaches a basic key policy. We will need to bring those permissions into the new key policy document. To view the key policy, use the command:
aws kms get-key-policy --key-id KEY_ARN --policy-name default --output text --region AWS_REGION --profile YOUR_PROFILE
--policy-name will always be set to the value default
Now taking those preexisting permissions into account, create a JSON key policy document. Here is an example document:
{
    "Version": "2012-10-17",
    "Statement": [
        {
            "Sid": "EnableIAMUserPermissions",
            "Effect": "Allow",
            "Principal": {
                "AWS": "arn:aws:iam::ACCOUNT_ID_WHERE_KEY_WAS_CREATED:root"
            },
            "Action": "kms:*",
            "Resource": "*"
        },
        {
            "Sid": "Allow-B2Bi-Role-KMS-Access",
            "Effect": "Allow",
            "Principal": {
                "AWS": "YOUR_ROLE_ARN"
            },
            "Action": [
                "kms:Encrypt",
                "kms:Decrypt",
                "kms:GenerateDataKey*",
                "kms:DescribeKey"
            ],
            "Resource": "*"
        }
    ]
}
This is an example policy and it doesn't account for your specific preexisting permissions. Also, as you integrate policies into your environment, it is crucial to thoroughly assess your unique requirements and adhere to security compliance standards. Customize this policy to align with your specific needs and ensure it accurately reflects your security posture.
Now that you have a bucket policy and key policy, the role and in turn B2Bi should have access to that bucket-key pair. You can repeat this process for other bucket-key pairs you need B2Bi to access. Try to retrieve and send files to the S3 bucket using B2Bi. If you are able to, you have successfully configured access to KMS encrypted S3 buckets across accounts.