Pre-Reqs
It’s important to note that you will need an IBM Entitlement Key to install the IBM Foundational Services as well as Guardium Insights.
This can be retrieved from here
Installing required cli tools
Windows Exec Path
If your environment is Windows, let’s set a path for some of these executables to run from:
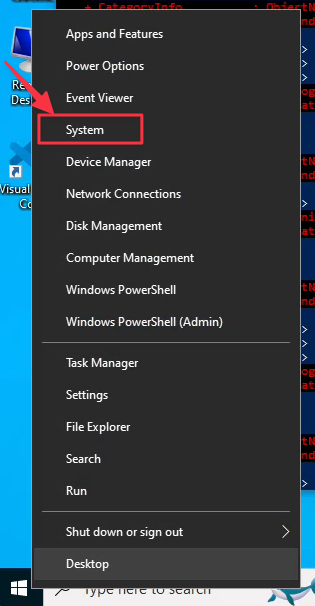
Right click on the Windows badge at the lower left hand slide and select System
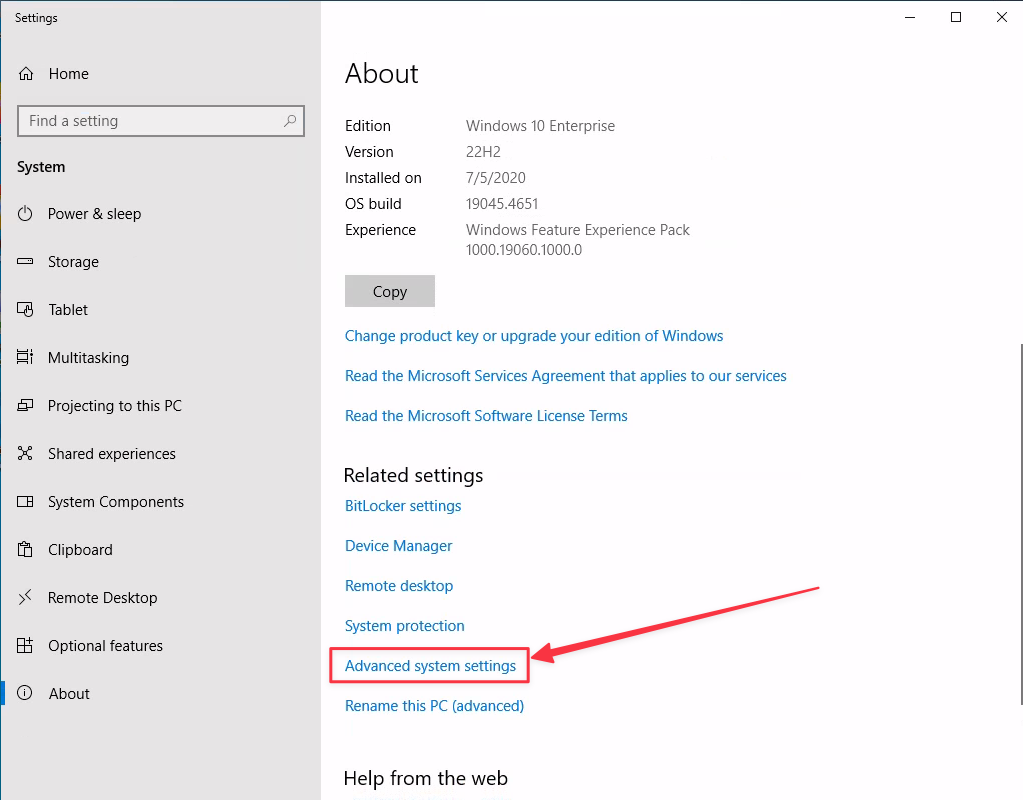
Scroll down and select Advanced system settings
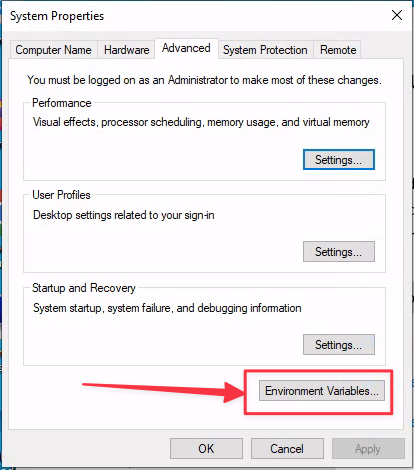
Select Environment Variables
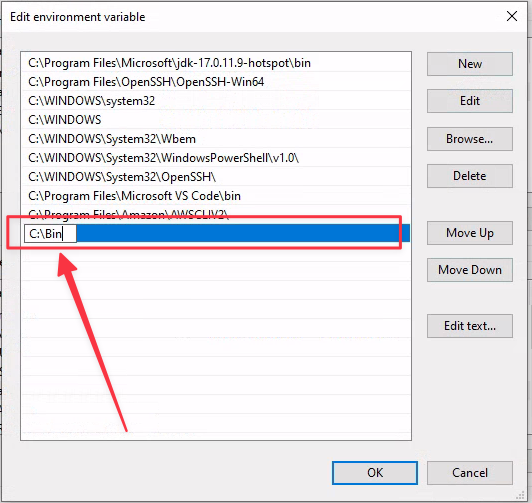
Under the env variables, select Path under System variables and hit Edit
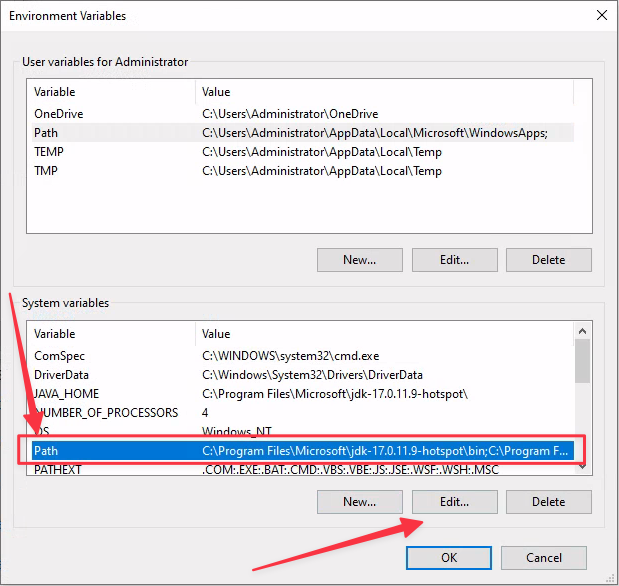
Click New and let’s create a new directory under C: called Bin
Once that is saved, create the new directory under C:

C:\Bin is where we will drop some of our executables.
Package managers
Install homebrew with the following command
/bin/bash -c "$(curl -fsSL https://raw.githubusercontent.com/Homebrew/install/HEAD/install.sh)"Install Gnu-Sed
MacOS and Linux use different versions of sed. Let’s install Gnu-Sed for Mac with Homebrew as it will make some commands easier.
brew install gnu-sedThis installs the scoop package manager. This just makes it easier to install some of the pre-reqs in Windows.
Run the following commands in a powershell window one line at a time:
Set-ExecutionPolicy -ExecutionPolicy RemoteSigned -Scope CurrentUser
iex "& {$(irm get.scoop.sh)} -RunAsAdmin"
Installing AWS CLI
curl "https://awscli.amazonaws.com/AWSCLIV2.pkg" -o "AWSCLIV2.pkg"Install it with sudo (to use for all users)
sudo installer -pkg ./AWSCLIV2.pkg -target /msiexec.exe /i https://awscli.amazonaws.com/AWSCLIV2.msiNow let’s configure our client env
aws configureAnswer all the questions with the info you got for your account.
Installing helm
curl -fsSL -o get_helm.sh https://raw.githubusercontent.com/helm/helm/main/scripts/get-helm-3 | bashTo install helm to windows with scoop
scoop install helmInstalling kubectl
Install kubectl with
brew install kubectlIn a powershell window, download the kubectl binary from Amazon S3
curl.exe -OL https://s3.us-west-2.amazonaws.com/amazon-eks/1.30.2/2024-07-12/bin/windows/amd64/kubectl.exeCopy the binary to C:\Bin
Installing eksctl
To install eksctl we’re going to use homebrew
brew tap weaveworks/tap

brew install weaveworks/tap/eksctl
In a powershell window:
scoop install eksctlVerify the installation
eksctl info

eksctl version: 0.187.0
kubectl version: v1.30.2-eks-1552ad0
OS: windows
Installing Openshift CLI
the oc cli is required to work with the IBM Cloud Pak plugin. This plugin is needed for part of the GI installation.
It also needs to be 4.10.x
We are installing 4.10.67
If /usr/local/bin doesn’t exist, create the directory path.
sudo mkdir -p /usr/local/binThen download the oc tar gzip and install.
curl -fsSL -o openshift-client-mac.tar.gz https://mirror.openshift.com/pub/openshift-v4/clients/ocp/4.10.67/openshift-client-mac.tar.gz
sudo tar -C /usr/local/bin -zxf openshift-client-mac.tar.gz oc
This should install client version 4.10.67 to /usr/local/bin.
Verify this with:
oc version --client
Client Version: 4.10.67
In a powershell window, download the openshift-cli tar gz.
curl.exe -OL https://mirror.openshift.com/pub/openshift-v4/clients/ocp/4.10.67/openshift-client-windows.zipExtract the zip file
Expand-Archive -LiteralPath 'C:\Users\Administrator\openshift-client-windows.zip' -DestinationPath 'C:\Bin'Verify it works
oc version --client

Client Version: 4.10.67
Verify the installation in a powershell window
Installing oc-ibm_pak
oc-ibm_pak is a plugin for the oc cli for managing cloud-paks.
Download the plugin with curl. At this writing, version 1.15.1 is the most recent.
curl -L https://github.com/IBM/ibm-pak/releases/download/v1.15.1/oc-ibm_pak-darwin-amd64.tar.gz -o oc-ibm_pak-darwin-amd64.tar.gzExtract and copy the plugin to /usr/local/bin
tar -zxf oc-ibm_pak-darwin-amd64.tar.gz
sudo cp oc-ibm_pak-darwin-amd64 /usr/local/bin/oc-ibm_pak
Verify the installation
oc ibm-pak --helpIn a powershell window, download the plugin with curl.exe. At this writing, version 1.15.1 is the most recent.
curl.exe -OL https://github.com/IBM/ibm-pak/releases/download/v1.15.1/oc-ibm_pak-windows-amd64.tar.gz -o oc-ibm_pak-windows-amd64.tar.gzExtract the plugin
tar -xvf oc-ibm_pak-windows-amd64.tar.gzCopy the plugin to our exec path
Copy-Item oc-ibm_pak-windows-amd64 C:\Bin\oc-ibm_pak.exeVerify the installation
oc ibm-pak --helpInstalling the Operator-SDK
Install the operator-sdk with homebrew
brew install operator-sdkVerify the installation
operator-sdk version

operator-sdk version: "v1.35.0", commit: "e95abdbd5ccb7ca0fd586e0c6f578e491b0a025b", kubernetes version: "v1.28.0", go version: "go1.21.11", GOOS: "darwin", GOARCH: "arm64"
Windows installation for the operator-sdk is a little more complicated…
Install golang
scoop install goDownloading the case file
Retrieve the ibm-guardium-data-security-center case file. As of this writing the latest is 2.6.0.
wget https://github.com/IBM/cloud-pak/raw/master/repo/case/ibm-guardium-data-security-center/2.6.0/ibm-guardium-data-security-center-2.6.0.tgzExtract the downloaded casefile in your directory
tar zxf ibm-guardium-data-security-center-2.6.0.tgzThis should create a directory called ibm-guardium-data-security-center
TBD